This tutorial will show you how to configure a load balancer on Ubuntu Server.
Introduction
Load balancing is a critical component of modern web applications, allowing them to distribute traffic across multiple servers to improve performance, scalability, and availability. A load balancer acts as a single entry point for client requests and distributes them across multiple servers, ensuring no single server becomes overwhelmed with traffic.
We will use HAProxy, a free and open-source software, to configure a simple round-robin load balancer that distributes traffic across multiple web servers. We will walk you through the installation and configuration process step-by-step, showing you how to configure HAProxy, set up numerous web servers, and test the load balancer to ensure it works correctly. At the end of this tutorial, you will have a fully functional load balancer that can distribute traffic across multiple servers, improving the performance and availability of your web applications.
Prerequisites:
- Two or more Ubuntu servers with Apache installed
- Ubuntu Server with root access
- Basic knowledge of Ubuntu Server and Apache
Configuring a Load Balancer on Ubuntu Server
Step 1: Install HAProxy
First, we need to install HAProxy on Ubuntu Server. Following command:
sudo apt-get install haproxy
Reading package lists... Done
Building dependency tree
Reading state information... Done
The following NEW packages will be installed:
  haproxy
0 upgraded, 1 newly installed, 0 to remove and 20 not upgraded.
Need to get 436 kB of archives.
After this operation, 1,448 kB of additional disk space will be used.
Get:1 http://us.archive.ubuntu.com/ubuntu bionic/main amd64 haproxy amd64 1.8.8-1ubuntu0.10 [436 kB]
...
Setting up haproxy (1.8.8-1ubuntu0.10) ...
Processing triggers for systemd (237-3ubuntu10.57) ...

Step 2: Configure HAProxy
Next, we need to configure HAProxy to distribute traffic across our web servers. Open the HAProxy configuration file in your favorite text editor:
sudo nano /etc/haproxy/haproxy.cfg
# HAProxy configuration file
global
log /dev/log local0
log /dev/log local1 notice
chroot /var/lib/haproxy
stats socket /run/haproxy/admin.sock mode 660 level admin
stats timeout 30s
user haproxy
group haproxy
daemon
defaults
log global
mode http
option httplog
option dontlognull
timeout connect 5000
timeout client 50000
timeout server 50000
frontend http_front
bind *:80
default_backend web_servers
backend web_servers
balance roundrobin
server web1 192.168.56.101:80 check
server web2 192.168.56.102:80 check
Replace the IP addresses and ports with the IP addresses and ports of your web servers.
Save and close the file.
Step 3: Restart HAProxy
After making changes to the configuration file, we need to restart HAProxy for the changes to take effect:
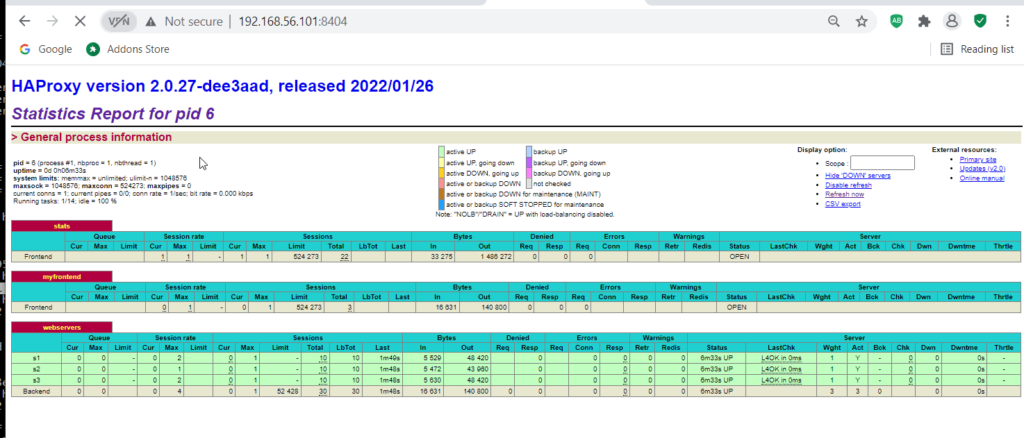
sudo systemctl restart haproxyStep 4: Test the Load Balancer. To test the load balancer, open a web browser and navigate to the IP address of your Ubuntu Server. You should be redirected to one of the web servers defined in the HAProxy configuration file.
Refresh the page several times to ensure the load balancer distributes traffic evenly across the web servers.