
This tutorial will show you how to install WordPress on Podman in CentOS 8. WordPress started as a blogging system but has become a complete content management system (CMS). Since WordPress is a free open source program, it has become the most popular CMS on the Web. With thousands of plugins, your website is nearly limitless. But we will be using container images pre-created for us. Check WordPress tutorial on ubuntu as well and for podman documentation.
Prerequisite
- podman
- rhel8 or centos 8 environment
Install podman on centos 8
Podman is available in the default Extras repository for CentOS 7 and the AppStream repo for CentOS 8 and Stream.
Centos 8
# dnf -y install podmanRHEL8
# dnf module enable -y container-tools:rhel8
# dnf module install -y container-tools:rhel8
The container-tools:rhel8 is the fast application stream containing the most recent rolling versions of the tools. Use the container-tools:2.0 stream for stable versions of Podman 1.6. The command yum module list container-tools shows the available streams. Suppose you would prefer newer (though not as well-tested) packages. In that case, the Kubic project provides packages for active Ubuntu releases 20.04 and more recent (it should also work with direct derivatives like Pop!_OS). In addition, the Kubic project page lists supported Ubuntu versions and architecture combinations. NOTE: The command sudo apt-get -y upgrade may be required in some cases if Podman cannot be installed without it. You can find the build sources for the Kubic packages here.

Create pod container
We need to create a pod so that the containers can talk to each other easily within the pod. First, expose port 8081 for the pod to reach port 80 in the pod.
[root@master8 ~]# podman pod create --name unixcop.com.wordpress --publish 8081:80
775f973263248ae188fb694ee6b475a04df88c2e187492f70c75ef82ea9e185b
There are two components of WordPress: a WordPress UI frontend and a database backend. We will create the backend first, using MySQL image from the docker hub. Make sure to include the newly created container in our pod.
[root@master8 ~]# podman run --detach --pod unixcop.com.wordpress \
> -e MYSQL_ROOT_PASSWORD="password" \
> -e MYSQL_DATABASE=unixcop.com.wordpressdb \
> -e MYSQL_USER=unixcop.com.wordpressusr \
> -e MYSQL_PASSWORD="password" \
> --name unixcop.com.wordpressdb -d docker.io/library/mariadb
Trying to pull docker.io/library/mariadb:latest...
Getting image source signatures
Copying blob 034655750c88 done
Copying blob f0b757a2a0f0 done
Copying blob 04f220ee9266 done
Copying blob 89c8a77f7842 done
Copying blob 4bbcce26bc5e done
Copying blob 7b1a6ab2e44d done
Copying blob e5cec468d3a6 done
Copying blob d1de5652303b done
Copying blob b14b1ba1d651 done
Copying blob ef669123e59e done
Copying config e2278f24ac done
Writing manifest to image destination
Storing signatures
b4f17629de6cc81b143ea73a1ea184f76e8836506386df090d1ec7bc8abf1c5f
[root@master8 ~]#
We will then proceed to create a WordPress container. We will use 127.0.0.1 (localhost) to reference our MySQL container because both containers are in the same pod.
[root@master8 ~]# podman run --detach --pod unixcop.com.wordpress \
> -e WORDPRESS_DB_HOST=127.0.0.1 \
> -e WORDPRESS_DB_NAME=unixcop.com.wordpressdb \
> -e WORDPRESS_DB_USER=unixcop.com.wordpressusr \
> -e WORDPRESS_DB_PASWORD=1234 \
> --name mywp docker.io/wordpress
Trying to pull docker.io/library/wordpress:latest...
Getting image source signatures
Copying blob 9874148cff9a done
Copying blob e5ae68f74026 done
Copying blob 585eed6f5399 done
Copying blob 52defac98629 done
Copying blob 99c3c1c4d556 done
Copying blob 2c23b6beb07a done
Copying blob aa83ee0498ff done
Copying blob 60fec1e8af22 done
Copying blob 7c6aa637d2ce done
Copying blob 512e63ec623a done
Copying blob 0be7ab550538 done
Copying blob 1a087da487a5 done
Copying blob 9196e9070fa9 done
Copying blob e53a38bd35fe done
Copying blob 631760d67b43 done
Copying blob 36c1780ac839 done
Copying blob c9cba9fbe11f done
Copying blob 6898437d0d35 done
Copying blob 14f1dd482e91 done
Copying blob d6bc7cb14e88 done
Copying blob 133e5531b3e0 done
Copying config b6306a6a70 done
Writing manifest to image destination
Storing signatures
caf2a62f655efc74104747f67792300a9177a0decd3913415c61542e1302bbda
[root@master8 ~]#
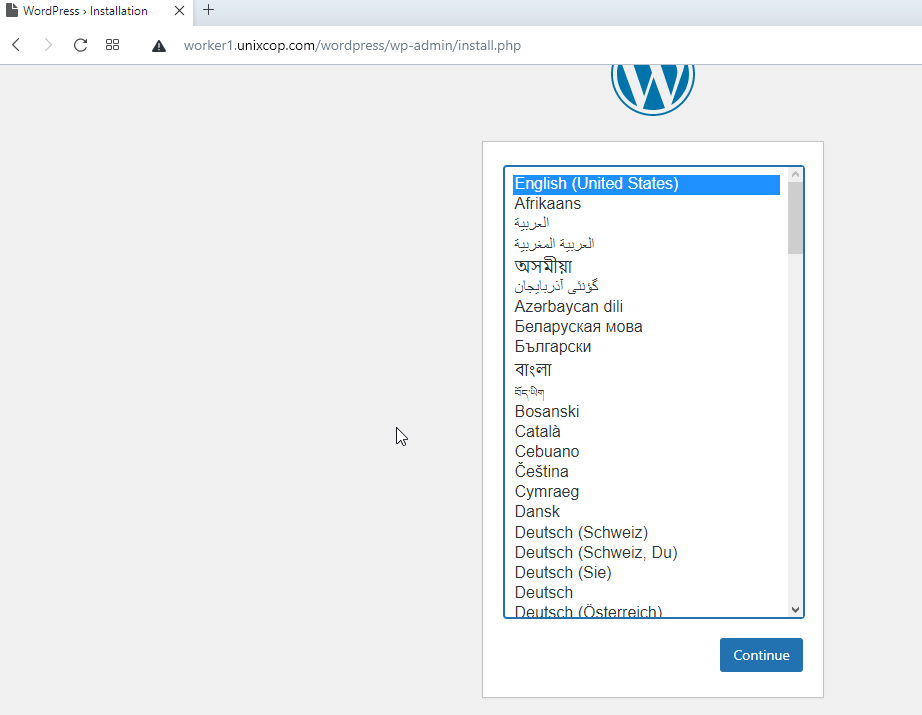
Final steps WordPress
To get the WordPress installer wizard, open a web browser and browse to localhost:8080 (or :8080). Then, follow through with the wizard to continue the WordPress installation.
Hy great blog after following the blog I face an issue , while accessing the wordpress localhost:8080 “Error establishing a database connection”. any suggestion?
Same here:(
Any hints or ideas?
I have the same problem as ninja. Somehow the wordpress app container can’t reach the mariadb in the other container in the same pod. Is it because I created a bridge for my network which is also used by KVM? Is it because I had to make firewall rules to allow both containers and KVM to use this bridge? No idea. These were the firewall rules:
firewall-cmd –permanent –direct –passthrough ipv4 -I FORWARD -i virbr0 -j ACCEPT
firewall-cmd –permanent –direct –passthrough ipv4 -I FORWARD -o virbr0 -j ACCEPT
In case everyone encounters this who has the same problem, my problem was that I have a DNS server running on my host. By default, netavark creates a DNS server for the pods, but this fails if there’s already an existing DNS server. The solution, which is only available since podman 4.2.0, is to make netavark use a different port by setting the dns_bind_port option in containers.conf