
What are users?
Users accounts are fundamental to system security. Every process (running program) on the system runs as a particular user.
Every user has username so that a human user can understand it. Internally, the system distinguishes user accounts by the unique identification number assigned to them, the user ID or UID.
Types of users:-
There are three main types of user account:
Superuser
system users
regular users
Superuser:- The superuser account is for system administration. The superuser’s name is root and the account has UID 0. The superuser has full access to the system.
System users:- The system has system user accounts which are used by processes that provide supporting services. These processes, or daemons, usually do not need to run as the superuser. They are assigned non-privileged accounts that allow them to secure their files and other resources from each other and from regular users on the system. Users do not interactively log in using a system user account.
Regular users:-
Most of the users have regular user account. Regular users also have limited access as system users.
The id command can be used to fetch the information about currently logged in users.
To fetch the information about another user. Use that username as an argument of id command.

To show the owner of a file you will use command ls with option -l. To fetch the owner of a directory use option -ld.

Fields of /etc/passwd file
The user information is stored in the /etc/passwd file. Each line in /etc/passwd has the information of a particular user. Each line consists of 7 fields to save the information about a user.
Username:password:UID:GID:description or full_name:user’s home directory location:login_shell

1. First field is the username (user1)
2. Second field is for password but here it always shows “x”. this x has the direct link to /etc/shadow file. And the password saved there in encrypted form. We will discuss in depth later about /etc/shadow.
3. The UID for this user account is 1001.
4. The GID number for this user account’s primary group (1001).
5. Description of this user of full name.
6. The howe directory for this user. /home/user1
7. The default shell program for this user, which runs on login (/bin/bash). For a regular user, this is normally the program that provides the user’s command-line prompt. A system user might use /sbin/nologin if interactive logins are not allowed for that user.
UID Ranges
Specific UID numbers and ranges of numbers are used for specific purposes by CentOS/RHEL8.
1. UID 0 is always assigned to the superuser account, root.
2. UID 1-200 is a range of “system users” assigned statically to system processes.
3. UID 201-999 is a range of “system users” used by system processes that do not own files on the file system. They are typically assigned dynamically from the available pool when the software that needs them is installed. Programs run as these “unprivileged” system users in order to limit their access to only the resources they need to function.
4. UID 1000+ is the range available for assignment to regular users.
NOTE:-
Prior to RHEL 7, the convention was that UID 1-499 was used for system users and UID 500+ for regular users.
WHAT IS A GROUP?
The collection of users is called a group. There are two types of groups.
Primary group : It will be created automatically whenever the user is created. User belongs to on group is called as primary group.
Secondary group : It will not create automatically. The admin user should be created manually and users belongs to more than one group is called secondary group. A user can be assigned to max. 16 groups. ie., 1 primary group and 15 secondary groups.
The mapping of group names to GIDs is defined in databases of group account information. By default, systems use the /etc/group file to store information about local groups.
Each group entry is divided into four colon-separated fields. Here is an example of a line from /etc/group:

1. First field contains the group name.
2. Second field always contains “x”. Obsolete group password field.
3. The GID number for this group 1003.
4. The list of users who are the members of this group.
Superuser Access or SUDO access:
In CentOS/RHEL the Superuser is the root user. This unlimited privilege, however, comes with responsibility. The root user has unlimited power to damage the system: remove files and directories, remove user accounts, add back doors, and so on.
In some cases, the root user’s account may not have a valid password at all for security reasons. In this case, users cannot log in to the system as root directly with a password, and su cannot be used to get an interactive shell. One tool that can be used to get root access in this case is sudo.
Note:-
Red Hat recommends that system administrators do not log in directly as root. Instead, system administrators should log in as a normal user and use other mechanisms (su, sudo, or PolicyKit, for example) to temporarily gain superuser privileges. By logging in as the superuser, the entire desktop environment unnecessarily runs with administrative privileges. In that situation, any security vulnerability which would normally only compromise the user account has the potential to compromise the entire system.
Gaining Sudo Access:
In some cases, the root user’s account may not have a valid password at all for security reasons. In this case, users cannot log in to the system as root directly with a password, and su cannot be used to get an interactive shell. One tool that can be used to get root access in this case is sudo.
Sudo normally requires users to enter their own password for authentication.
Configuring Sudo:
The /etc/sudoers is the main configuration file for sudo.
To avoid problems if multiple administrators try to edit it at the same time, it should only be edited with the special visudo command.
For example, the following line from the /etc/sudoers file enables sudo access for members of group wheel.
%wheel ALL=(ALL) ALL
A % specifies that this is a group, group wheel. The ALL=(ALL) specifies that on any host that might have this file, wheel can run any command. The final ALL specifies that wheel can run those commands as any user on the system.
Note:-
Using supplementary files under the /etc/sudoers.d directory is convenient and simple. You can enable or disable sudo access simply by copying a file into the directory or removing it from the directory.
To enable full sudo access for the user user01, you can create /etc/sudoers.d/user01 with the following content:
user01 ALL=(ALL) ALL
To enable full sudo access for the group group01, you could create /etc/sudoers.d/group01 with the following content:
%group01 ALL=(ALL) ALL
It is also possible to set up sudo to allow a user to run commands as another user without entering their password:
jenkins ALL=(ALL) NOPASSWD:ALL
Below line will not allow to change the root password to sudo user.
%Admins ALL=(ALL) NOPASSWD:ALL, !/bin/passwd root
Managing users account:-
User management means managing user. ie., Creating the users, deleting the users and modifying the users.
Important points related to user account.
1. Users and groups use is to control access to files and resources.
2. Users can login to the system by supplying username and passwords to the system.
3. Every file on the system own by a user and associated with a group.
4. Every process has an owner and group affiliation.
5. Every user in the system assign a unique user id (uid) and group id (gid).
6. User names and user id store in /etc/passwd file.
7. User’s passwords store in /etc/shadow file in an encrypted form.
8. Users assign a home directory and a shell to work with the O/S.
9. Users cannot read, write and execute each other’s files without permission.
10. Whenever a user is created a mail box is created automatically in /var/spool/mail location.
11. And some user environmental files like .bash_logout, .bash_profile, .bashrc , …etc. are also get copy from /etc/skell to his/her home directory (/home/).
Command to add user
In how many ways can we create the users?
(i) # useradd – syntax of useradd command with full option.
# useradd -u {uid} -g {gid} -G {secondary group} -c {comment} -d {home directory} -s {shell}{user name}
Example : # useradd -u 600 -g 600 -G java -c “oracle user” -d /home/raju -s /bin/bash raju

(ii) # adduser – syntax of adduser is same as useradd.
(iii) # newusers (In this file we have to enter the user details same as /etc/passwd file)
# newusers {file_name} (This command will create multiple users at a time)
First we should create a file and enter user’s data as fields same as the fields of /etc/passwd file for how many users do you want to create and mention that file as an argument for newusers command.
When we will execute this command new users will create but their environmental files like .bash_logout, .bash_profile, .bashrc and .bash_history files will not be copied from /etc/skell directory. So, we have to copied manually from /etc/skell directory.
Command to delete user:
# userdel {option}{username}
The options are,
-f —–> forcefully delete the user even through the user is login. The user’s home directory, mail and message directories are also deleted.
-r —–> recursively means files in the user’s home directory will be deleted and his home directory also deleted but the other files belong to that user should be deleted manually.
usermod command: The use of usermod command is to modify user account.
What is syntax of the usermod command with full options?
# usermod {options} {user name}
The options are, -L —–} lock the password
-U —–} unlock the password
-o —–} creates duplicate user modify the user’s id same as other user
-u —–} modify user id
-g —–} modify group id
-G —–} modify or add the secondary group
-c —–} modify comment
-d —–} modify home directory
-s —–} modify user’s login shell
-l —–} modify user’s login name
-md —-} modify the users home directory and the old home directory.
How to create the duplicate root user?
# useradd -o -u 0 -g root {user name}
What are the uses of .bash_logout, .bash_profile and .bashrc files?
.bash_logout : is a user’s logout ending program file. It will execute first whenever the user is logout.
.bash_profile : is user’s login startup program file. It will execute first whenever the user is login. It consists the user’s environmental variables.
.bashrc : The use of this file is to create the user’s custom commands and to specify the umask values for that user’s only.
What is the command to check the user belongs to how many groups?
# groups {username}
What is the syntax to create the group?
# groupadd {groupname}
The options are, -f —–> add the group forcefully,
-g —–> group id no.,
-o —–>non-unique (duplicate group id),
-p —–> group password ,
-r —–> system group,
-R —–> root group
What is the syntax to modify the group?
# groupmod {options}{group name}
The options are, -g ——} group id
-n ——} new name for existing one, ie., rename the group
-o ——} non-unique (duplicate group id)
-p ——} group passwd
-R ——}root group
What is syntax to delete the group?
# groupdel {group name} (to delete the group without options)
# groupdel -R {group name} (to delete the group and apply changes to the root directory)
How to assign the password to the group?
# gpasswd {group name} (to assign a password to the group without any options)
# gpasswd {options}{group name}
The options are, -a ——}add users to the group
-d ——} delete the user from the group
-r ——} remove the group password
-R ——} restrict to access that group
-A ——} set the list of Administrative users
-M ——} set the list of group members
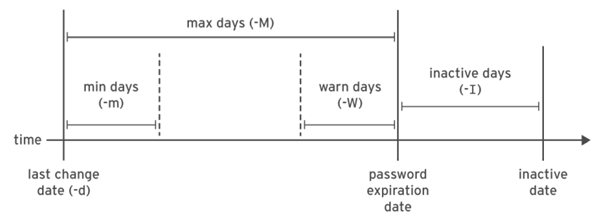
How to change the password aging policies?
we can change the password policies in 2 ways.
(i) First open the /etc/login.defs file and modify the current values.
Example : # vim /etc/login.defs
min – 0 —–} means the user can change the password to any no. of times.
min – 2 —–} means the user can change the password within 2 days. ie., he can change the
password after 2 days.
max – 5 —–} means the user should change the password before or after 5 days. Otherwise the password will get expire after 5 days.
inactive – 2 —–} means after password expiry date the grace period another 2 days will be remaining to change the password.
warning – 7 —–} means a warning will be given to the user about the password expiry 7 days before
expiry date.
(ii) second by executing the # chage command.
Example : # chage {options}{user name}
The options are, -d —–} last day
-E —–} expiry date
-I —–} inactive days
-l —–} list all the policies
-m —–} min. days
-M —–} max. days
-w —–} warning days
Note : Whenever we change the password aging policy using # chage command, the information will be modified in /etc/shadow file.
In which location the sudo user commands history logged?
All the sudo users commands history is logged in /var/log/secure file to make a record of sudo user commands.
# cat /var/log/secure (to see the contents of this file)
# tailf /var/log/secure (to see the updates of this file continuously and press ctrl + c to quit the tailf)
How to assign the password to normal user by him whenever first login to the system?
Whenever the user is created and that user is trying to login to the system, it will ask the password. If the root user is not assign the password to that user, then that normal user can assign the password by his own using the following commands.
a. # useradd {user name} (to create the user)
b. # passwd -S {user name} (to see the status of the password of that user. if root user is not assigned the password then the password status is locked)
c. # passwd -d {user name} (then delete the password for that user)
d. # chage -d 0 {user name} (it will change the password age policy)
e. # su – {user name} (Try to switch to that user then it will display the following message)
Newpassword : (type new password for that user)
Retype password : (retype the password again)
The other useful commands :
1. # w (this command gives the login user information like how many users currently login and full information )
2. # who (to see users who are currently login and on which terminal they login)
3. # last (see the list of users who are login and logout since the /var/log/wtmp file created)
4. # lastb (to see the list of the users who tried as bad logins)
5. # lastreboot (to see all reboots since the log file created)
6. # uptime (to see the information from how long the system is running, how many users login and load average)
The load average is from 1 sec : 5 secs : 15 secs
7. # df (to see the mounted partitions, their mount points and amount of disk space)
8. # du (to see the disk usage of the each file in bytes)
9. # uname -r (gives the current kernel version)
10.# last -x (It shows last shutdown date and time)
11.# last -x grep shutdown (only shutdown time shows ie., grep will filter the ‘last -x’ command)
* grep: It is used to search a word or sentence in file (ie., inside the file)
* find : It is used to search a command or file inside the system)
12.# cat /etc/shells or # chsh -l (to see how many shells supported by Linux)
/bin/sh —–} default shell for Unix
/bin/bash —–} default shell for Linux
/sbin/nologin —–} users cannot login shell
/bin/tcsh —–} c shell to write ‘C++’ language programs
/bin/csh —–} c shell to write ‘C’ language programs# echo $SHELL (to see the current shell)
Here are few other articles available that can help you with LVM, RAID, partition management in Centos8.
Please give your suggestions and comments below. Thank you.