
What is RAID? And what is it’s use?
RAID stands for “Redundant Array of Independent Disks” or “Redundant Array of Inexpensive Disks“. It is a data storage virtualization technology that combines multiple physical disk drive components into one or more logical units for the purposes of data redundancy, performance improvement, or both.
It provides fault tolerance, load balancing using stripping, mirroring and parity concepts.
How many types of RAIDs available?
There are mainly two types of RAIDs available.
(i) Hardware RAID (Depends on vendors and also more expensive)
(ii) Software RAID (Does not depends on vendors and less expensive when compared to Hardware RAID and also it is maintained by system administrator only.
Hardware RAID
Its controllers can be configured through card BIOS before an operating system is booted. After booting of operating system proprietary configuration utilities are available from the manufacturer of each controller.
Software RAID
Its implementations are provided by many new versions of operating systems. These can be implemented as:
- A component of the file system (such as Btrfs, Spectrum scale , ZFS etc.)
- A more generic logical volume manager (such as veritas or LVM)
- A layer that sits above any file system and provides parity protection to user data.
- A layer that abstracts multiple devices, thereby providing a single virtual device (such as Linux kernel’s md)
Standard RAID levels
There are several levels available. We will take a deep discussion about mostly used one.
RAID 0 : It consists of striping, but no mirroring or parity.
How to configure RAID – 0 in Linux?
To configure it, minimum 2 disks are required and the partition id is “fd”.
Reading and writing is very fast. So, it produces high performance. if one disk is failed we cannot recover the data. So, there is no redundancy and fault tolerance in this level.
Example : For example if the data is 1, 2, 3, 4, 5 and 6 then ….

If the Disk-1 is /dev/sdb and disk-2 is /dev/sdc then, to create raid0 using disk1 and disk2:
# mdadm -Cv /dev/md0 –level=0 –raid-devices=2 /dev/sdb /dev/sdc
To check the it is created or not
# cat /proc/mdstat
To create the ext4 file system on the RAID – 0
# mkfs.ext4 /dev/md0
To create the it’s mount point
# mkdir /mnt/raid0
To mount it on the mount point
# mount /dev/md0 /mnt/raid0
To see the details of the RAID-0 partition
# mdadm -D /dev/md0
To failed the disk manually
# mdadm /dev/md0 -f /dev/sdb
To remove the above failed disk
# mdadm /dev/md0 -r /dev/sdb
To add the new disk in place of failed disk
# mdadm /dev/md0 -a /dev/sdd
To unmount the raid file system
# umount /mnt/raid0
To stop it’s volume
# mdadm –stop /dev/md0
To add third disk to the RAID-0 volume
# mdadm /dev/md0 –add /dev/sde
To grow the it’s file system
# mdadm –grow /dev/md0 –raid_device=3
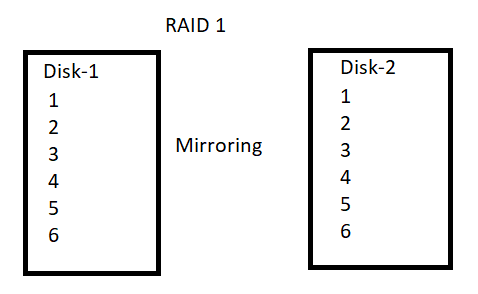
RAID 1: It consists of data mirroring, without parity or striping.
How to configure RAID – 1 in Linux?
To configure it, minimum 2 disks are required and the partition id is “fd”.
In this the same data will be written on 2 disks ie., exact copy on both the disks.
if one disk is failed we can recover the data from another disk. So, there is a high availability, redundancy and fault tolerance in this level. In this writing speed is slow in comparison to RAID-0.
Example : For example if the data is 1, 2, 3, 4, 5 and 6 then ….
If the Disk-1 is /dev/sdb and the Disk-2 is /dev/sdc then,
To create the RAID-1 using disk-1 and disk-2
# mdadm -Cv /dev/md0 -l 1 -n 2 /dev/sdb /dev/sdc
To check the it is created or not
# cat /proc/mdstat
To create the ext4 file system on the RAID-1
# mkfs.ext4 /dev/md0
To create the its mount point
# mkdir /mnt/raid1
To mount it on the mount point
# mount /dev/md0 /mnt/raid1
To see the details of the RAID-1 partition
# mdadm -D /dev/md0
To failed the disk manually
# mdadm /dev/md0 -f /dev/sdb
To remove the above failed disk
# mdadm /dev/md0 -r /dev/sdb
To add the new disk in place of failed disk
# mdadm /dev/md0 -a /dev/sdd
To unmount the raid file system
# umount /mnt/raid1
To stop the it’s volume
# mdadm –stop /dev/md0
To add third disk to the it’s volume
# mdadm /dev/md0 –add /dev/sde
To grow the it’s file system
# mdadm –grow /dev/md0 –raid_device=3
RAID 2:
It consists of bit-level striping with dedicated Hamming-code parity.
Now this level is just for historical significance only (for example, The Thinking Machine CM-2). As of 2014 it is not used by any commercially available system.
RAID 3: It consists of byte-level striping with dedicated parity. It is not commonly used in practice.
RAID 4 : It consists of block-level striping with dedicated parity across multiple disks. Since data is striped in level 4 and the records can be read from any disk.
However, since all the writes must go to the dedicated parity disk, this causes a performance bottleneck for all write operations. It is not commonly used.
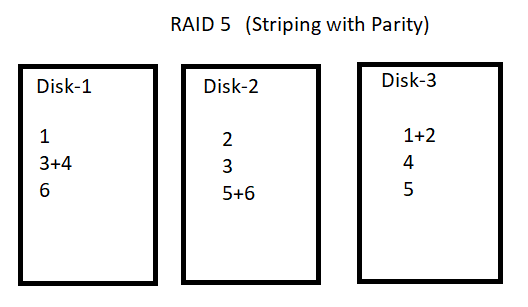
RAID 5: It is working on block level striping with distributed parity.
How to configure RAID-5 in Linux?
To configure RAID-5, minimum 3 disks are required and the partition id is “fd”.
In every disk approximately 25 – 30% of space reserves for parity. Reading and writing is very fast. So, it produces high performance. This uses Stripping with parity concept.
If one disk got fail we can recover the data using remaining two disks and parity.
If two disks got fail, then we cannot recover the data.
Example : For example if the data is 1, 2, 3, 4, 5 and 6 then ….
If the Disk-1 is /dev/sdb, Disk-2 is /dev/sdc and disk-3 is /dev/sdd then,
To create the RAID-5 using disk-1, disk-2 and disk-3
# mdadm –create –verbose /dev/md0 –level=5 –raid-devices=3 /dev/sdb /dev/sdc /dev/sdd
To check that RAID-5 has been created or not.
# cat /proc/mdstat
To create the ext4 file system on the RAID-5
# mkfs.ext4 /dev/md0
To create the it’s mount point
# mkdir /mnt/raid5
To mount it on the mount point
# mount /dev/md0 /mnt/raid5
To see the details of the RAID-5 partition
# mdadm -D /dev/md0
To failed the disk manually
# mdadm /dev/md0 -f /dev/sdb
To remove the above failed disk
# mdadm /dev/md0 -r /dev/sdb
To add the new disk in place of failed disk
# mdadm /dev/md0 -a /dev/sde
To unmount the raid file system
# umount /mnt/raid5
To stop the it’s volume
# mdadm –stop /dev/md0
To add fourth disk to the it’s volume
# mdadm /dev/md0 –add /dev/sdf
To grow the it’s file system
# mdadm –grow /dev/md0 –raid_device=4
What are the main advantages of RAID-5?
It uses Stripping with parity and requires only three disks. Because of Stripping the data reading and writing will be fast. And by using parity we can recover the data if one of the three disks failed. So, the main advantage of this level is we can get fast writing, reading and also redundancy fault tolerance with less expensive.
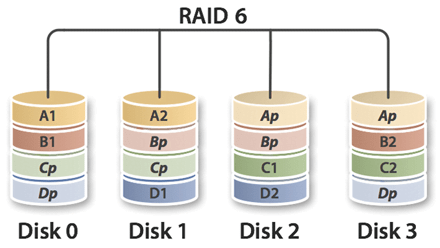
RAID 6: It consists of block-level striping with double distributed parity. Double parity provides fault tolerance up to two failed drives. This is especially for high-availability systems. The read speed is same as raid5 but the right speed is slower then that.
The larger the drive capacities and the larger the array size, the more important it becomes to choose 6 instead of 5.
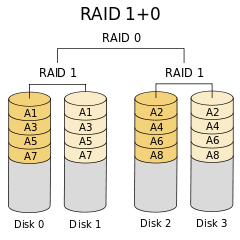
RAID 10: It is also know as level 1+0. Since its working nature is striping with mirroring with high usage of disk space.
According to manufacturer specifications, in most cases RAID 10 provides better throughput and latency than all other levels except RAID 0 (which wins in throughput). Thus, it is the preferable level for I/O-intensive applications such as database, email, and web servers, as well as for any other use requiring high disk performance.
In this article we discussed different types of levels. We also discussed how to configure them, that are in use mostly. Please share you suggestions and feedback below. Thank you.