
What is LVM and why we go for it?
In LVM combination of 2 or more physical disk in order to make a big logical disk is called Logical Volume.
If normal Linux partition is full and an application requires some more disk space. Then normal partition cannot be extended for that application requirement.
For this first we have to take a backup of that normal partition. Delete that partition and again create that partition with more disk space. Format and mount that partition and finally restore the application from the backup. This process requires down time.
So, to overcome this problem LVM concept is coming into the picture. Using this we can extend or reduce the file systems as per requirement without loss of any data.
Components of the LVM
1. Physical Volume (PV)
2. Physical Extent (PE)
3. Volume Group (VG)
4. Logical Volume (LV)
5. Logical Extent (LE)
Physical Volume (PV) :
It is the standard partition that we add to the LVM. Normally a physical volume is a standard primary or logical partition with the partition code as 8e.
Physical Extent (PE):
LVM tools segment physical volumes into physical extents (PEs), which are small chunks of data that act as the smallest storage block on a physical volume.
Volume Group (VG):
Volume groups are storage pools make up with one or more physical volumes. This is the functional equivalent of a whole disk in basic storage. A PV can be allocate to a single VG only. A VG can consist of unused space and any number of logical volumes.
Logical Volume (LV) :
It is composed of a group of LEs. We can format (make a file system) and mount any file system on the logical volume. The size of these logical volumes can be increase or decrease easily as per the requirement.
Logical Extent (LE) :
It is also a chunk of disk space. Every logical extent is mapped to a specific physical extent.
Creating a Logical Volume
To create a logical volume, perform the following steps:
First Prepare the physical device.
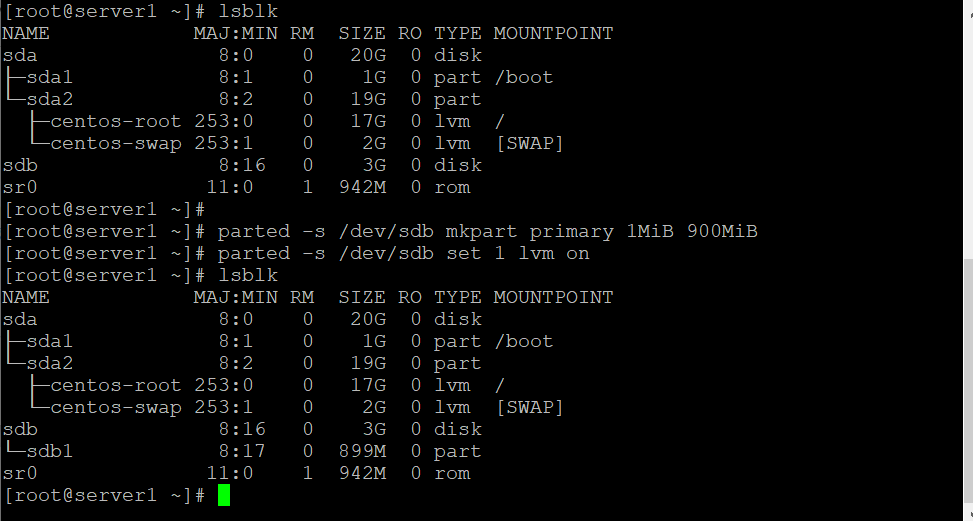
Use parted, gdisk, or fdisk to create a new partition for use with LVM. Always set the partition type to Linux LVM on LVM partitions; use 0x8e for MBR partitions. If necessary, use partprobe to register the new partition with the kernel. Here we are using parted command. You can check after set LVM on, lsblk command gives you the report of physical partition sdb1.
Create a physical Volume:
Now we will create a physical volume by using sdb1. You can use multiple physical disks as per your need. Convert the Physical disk into physical volumes by
# pvcreate /dev/sdb1
This labels the device /dev/sdb1 as PVs, ready for allocation into a volume group.
A PV needs to be create only if there are no PVs free to create or extend a VG.
Create a volume group:
Use vgcreate to collect one or more physical volumes into a volume group.
# vgcreate vg01 /dev/sdb1
The name of volume group is vg01. If you required to give the extent site for vg then you use the following syntax.
# vgcreate -s (PE size in MBs) (volume group name) (physical volume names)
Create a logical volume:
Use lvcreate to create a new logical volume from the available physical extents in a volume group. At a minimum, the lvcreate command includes the -n option to set the LV name, either the -L option to set the LV size in bytes or the -l option to set the LV size in extents, and the name of the volume group hosting this logical volume.
# lvcreate -n lv01 -L 500M vg01

This creates an LV called lv01, 500 MiB in size, in the VG vg01. This command will fail if the volume group does not have a sufficient number of free physical extents for the requested size.
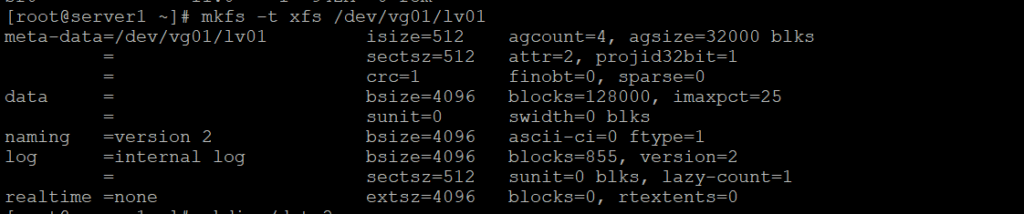
Add the file system:
Here you can format logical volume by using any filesystem ext3, ext4, xfs. We are going forward with XFS.
# mkfs -t xfs /dev/vg01/lv01
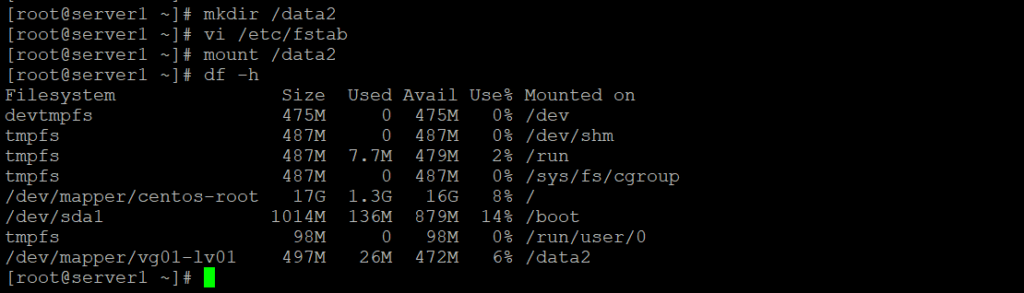
Use mkdir to create a mount point.
# mkdir /data2
Make entry into /etc/fstab file as
/dev/vg01/lv01 /mnt/data xfs defaults 0 0
Run mount /data2 to mount the file system that you just added in /etc/fstab.
# mount /data2
REVIEWING LVM STATUS
Physical Volumes
Use pvdisplay to display information about physical volumes.
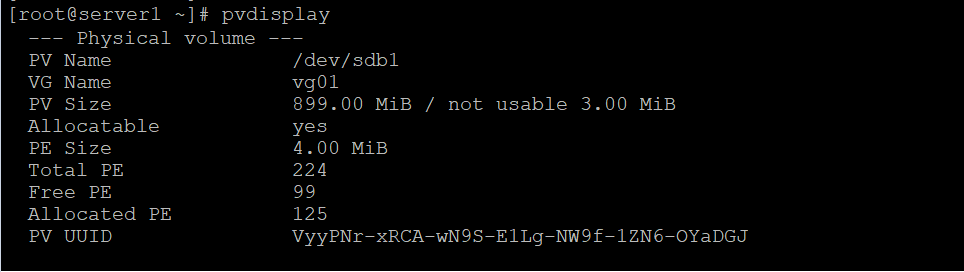
PV Name shows the device name.
VG Name shows the volume group.
PV Size shows the physical size of the PV, including any unusable space.
PE Size is the physical extent size, which is the smallest size a logical volume can be
allocated.
It is also the multiplying factor when calculating the size of any value reported in PE units, such as Free PE;
for example: 26 PEs x 4 MiB (the PE Size) equals 104 MiB of free space. A logical volume size is rounded to a factor of PE units.
LVM sets the PE size automatically, although it is possible to specify it. Free PE shows how many PE units are available for allocation to new logical volumes.
Other commands for PV that can be use to fetch the information:
- pvs (displays all physical volumes with less details)
- pvdisplay (displays all physical volumes with more details)
- pvdisplay “<PV name>”(displays the details of the specified physical volume)
- pvscan (to scan all the physical volumes)
- pvscan “<PV name>”(to scan the specified physical volume)
Volume Groups
Use vgdisplay to display information about volume groups.
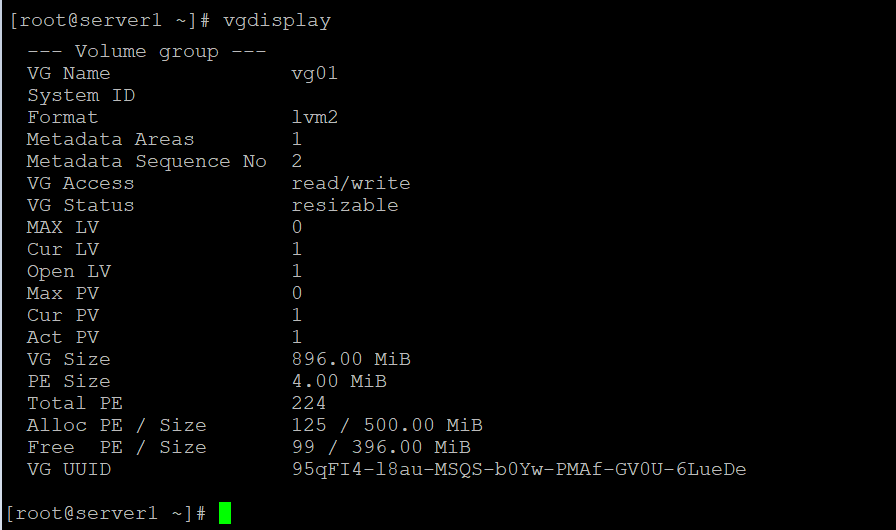
Other commands for VG that can be use to fetch the information:
- vgs (displays all volume groups with less details)
- vgdisplay (displays all volume groups with more details)
- vgdisplay “<VG name>”(displays the specified volume group with more details)
- vgscan (to scan all the volume groups)
- vgscan “<VG name>”(to scan the specified volume group)
Logical Volumes
Use lvdisplay to display information about logical volumes.
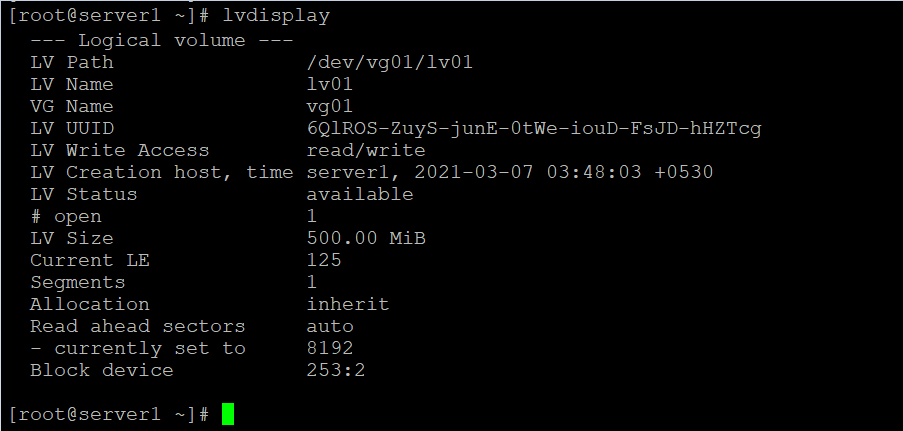
LV Path shows the device name of the logical volume.
LV Size shows the total size of the LV. Use file-system tools to determine the free space and used space for storage of data.
Current LE shows the number of logical extents used by this LV. An LE usually maps to a physical extent in the VG, and therefore the physical volume.
Other commands for VG that can be use to fetch the information:
- lvs (displays all logical volumes with less details)
- lvdisplay (displays all logical volumes with more details)
- lvdisplay “<LV name>”(displays the specified logical volume details)
- lvscan (to scan all the logical volumes)
- lvscan “<LV name>”(to scan the specified logical volume)
Removing a Logical Volume
To remove the logical volume follow the below set of steps:
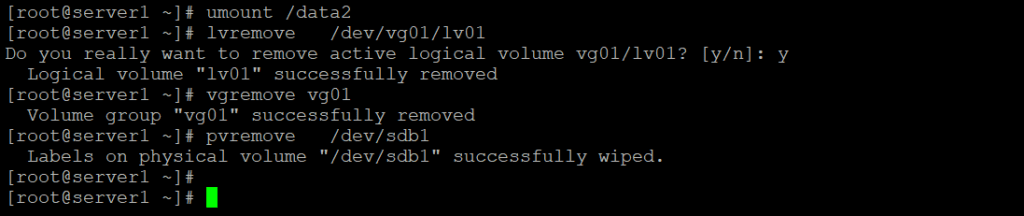
Prepare the file system
Move all data that must be kept to another file system. Use the umount command to unmount the file system and then remove any /etc/fstab entries associated with this file system.
# umount /data2
WARNING
Removing a logical volume destroys any data stored on the logical volume. Backup or move your data before you remove the logical volume.
Remove the logical volume
Use lvremove command to remove the logical volume. Unmount the LV file system before running this command. The command prompts for confirmation before removing the LV.
# lvremove /dev/vg01/lv01
Remove the volume group
Use vgremove VG_NAME to remove a volume group.
# vgremove vg01
Remove the physical volumes
Use pvremove to remove physical volumes. Use a space-delimited list of PV devices to remove more than one at a time. This command deletes the PV metadata from the partition (or disk).
# pvremove /dev/sdb1
How to extend the Volume Group?
Extending the volume group is actually adding a new physical volume to the volume group. To extend the volume group we need to create a new partition using # fdisk command and make sure that it’s partition id should be 8e, save the changes and update the partition table by # partprobe Create a physical volume on the newly created partition using # pvcreate command. Add the partition to the volume group using # vgextend command
Example : # fdisk /dev/sdb
Command (m for help) : n
First cylinder : press Enter for default one
Last cylinder : +500M (create 500MB partition)
Command (m for help) : t (to change the partition id)
Select the partition : type the partition number
Specify the Hexa code : 8e
Command (m for help) : w (to save the changes)
After this use command # partprobe /dev/sdb then # pvcreate /dev/sdb1
# vgextend “<VG_Name>”/dev/sdb1
# vgdisplay “<VG_Name>”(to check the size of the volume group)
How to extend the logical volume and update it’s file system?
Sometimes the file system size may be full, so we need to increase the size of the logical volume to continue adding the data in it. The size of the logical volume can be increased online, no downtime required.
Check current size of the logical volume by # lvdisplay and the size of the file system by # df – hT command.
Increase the size of the logical volume by # lvextend or # lvresize commands. Then finally update the file system by # resize2fs or # xfs_growfs commands. Example : # df -hT
# lvextend -L + <size in MB></dev/vgname/lvname>
or # lvresize -L + <size in MB></dev/vgname/lvname>
run # resize2fs
# lvdisplay (to check the size of the logical volume)
# df -hT (to check the size of the file system)
How to reduce the logical volume and update the file system?
Reducing the size of the logical volume is a complicated task and we have remember some points before reducing the logical volume, otherwise the file system may be damaged . Logical volume size cannot be reduced online and it requires downtime because we have to unmount the file system by # umount <file system mount point> command.
Check the consistency of the file system by # e2fsck <device or partition name> command. Reduce the logical volume by # lvreduce -L -<Size of in MB></dev/vgname/lvname> command.
Then update the file system by # resize2fs </dev/vgname/lvname> Finally mount the file system by # mount -a
Example : 1. # umount <file system mount point>
2. # e2fsck <device or partition name>
3. # lvreduce -L – <Size of in MB></dev/vgname/lvname>
4. # resize2fs </dev/vgname/lvname>
5. # lvdisplay </dev/vgname/lvname> (to check the size of the logical volume>
6. # mount -a (to mount the file system)
7. # df -hT (to check the size of the file system)
How to move or migrate the logical volume data from one physical volume to another physical volume?
There might be a situation where the physical volume might be failing and it is required to replaced. In such case, we need to migrate or move the logical volume data from the failed physical volume new physical volume and isolate (remove) the failed physical volume.
First access the mount point of the failing physical volume and check the data in it.
Verify the size of the physical volume by the command-
#pvs or #pvdisplay </dev/vgname/lvname>
Unmount the file system of that physical volume by # umount <filesystem mount point>
Add a new physical volume and the size should be same size or higher than that failing physical volume. Migrate the physical volume contents to the new physical volume using # pvmove <old PV><New PV> Mount back the logical volume, access the mount point and verify the data in it.
Remove the failed physical volume by #vgreduce <vg_name><pv_name>
Example : 1. # cd <file system mount point>
2. # ls
3. # pvs <pvname> or # pvdisplay <pvname>
4. # umount <file system mount point>
5. # pvcreate <Device or partition name>
6. #vgextend <vgname><pvname>
7. # pvmove <old pvname ><new pvname>
8. # mount -a
9. # vgreduce <vgname ><failed pvname>
# cd <file system mount point>
# ls
In this article we have discussed about LVM and all of its component. As I think this article will help you a lot. Please give your comments and suggestions below.
Thank you.