In my previous article, I covered using self-signed certificates to achieve a basic HTTPS connection with our Nginx instance. Today, we’re going to expand upon our configuration covering the various options we can (and some of them, we should) apply to optimize and further secure the TLS connections.
Before we begin, let’s first quickly add a server block to the configurations so that requests for unsecure HTTP connections are automatically redirected to the HTTPS. As we’ve already defined a server block which listens on port 443, let’s add another server block above as follows:
server {
    listen 80;
    server_name freebsd.local;

    # return a "Moved Permanently" redirection response
    # to the HTTPS version of our site
    return 301 https://$host$request_uri;
}
Disable SSL in favour of TLS
SSL is an older protocol that has various security flaws. While the newer TLS might not be without any flaws either, it does replace the former. The latest version of TLS as of now is TLS 1.3, although some clients may not support it.
I will not go in too much depth regarding the differences as there are other articles which have already covered it well. In any case, we should force our server to only use TLS. Put the following within the http context of the nginx.conf file:
ssl_protocols TLSv1.2 TLSv1.3;Prefer Better Cipher Suites
Cipher suites are the set of algorithms that the clients and our server use for TLS. The problem is that some cipher suites are less secure than others. Obviously, we should make it so that the more secure algorithms are used. We can make nginx tell the clients about the cipher suites we want to use (as well as the ones we don’t support) with the ssl_prefer_server_ciphers directive. Put the following under the previous ssl_protocols directive:
ssl_prefer_server_ciphers on;Now time for listing the cipher suites. This is done with the ssl_ciphers directive. The format of the argument it takes is similar to what the openssl library understands. Unfortunately, I am not fully familiar with the various suites nor am I qualified enough to suggest any. Therefore, I have used the suites recommended by this article:
ssl_ciphers
'ECDHE-ECDSA-AES256-GCM-SHA384:ECDHE-RSA-AES256-GCM-SHA384:ECDHE-ECDSA-CHACHA20-POLY1305:ECDHE-RSA-CHACHA20-POLY1305:ECDHE-ECDSA-AES128-GCM-SHA256:ECDHE-RSA-AES128-GCM-SHA256:ECDHE-ECDSA-AES256-SHA384:ECDHE-RSA-AES256-SHA384:ECDHE-ECDSA-AES128-SHA256:ECDHE-RSA-AES128-SHA256:!ADH:!AECDH:!MD5';
Note that I’ve also appended some ciphers with a ! which disables those algorithms.
Using Server DH Parameters – Nginx
Diffie-Hellman (DH) Key Exchange is a protocol to securely exchange secret keys (to be used for symmetric encryption) over an unsecure connection. You can have a look at the Wikipedia article to see how this works in more detail. Nonetheless, the following is my understanding. Please feel free to correct me if I’m wrong.
Suppose Alice and Bob want to communicate while Mallory (the bad guy; suggesting the channel is unsecure) is around. To do so, they need to exchange keys. Now they could use Public-Key encryption to achieve this but that is very inefficient as compared to using symmetric encryption. Therefore, they will exchange the symmetric key using public and private keys and use the shared symmetric key for encryption further communications.
First Alice encrypts the symmetric key using their own public key, and they send it to Bob. Although Bob can’t decrypt that key, they instead put their own layer of encryption on top of it and send it back to Alice. Alice now undoes their previous encryption and send it to Alice who can undo their own encryption but now having the required key. This is how Diffie-Hellman key exchange works.
Now while DH is a genius idea, it apparently hasn’t been properly implemented in most services. The parameters used for this key exchange aren’t strong enough to ensure proper security. Therefore, in our nginx configuration we should specify our own parameters. For that, let’s use openssl to generate dh parameters:
openssl dhparam 2048 -out /usr/local/etc/nginx/ssl/dhparam.pem
Note that the keysize (2048 in this case) should be the same as that used when generating our certificates. Now add the following directive to nginx.conf:
ssl_dhparam /usr/local/etc/nginx/ssl/dhparam.pem;Enable HSTS
HTTP Strict Transport Security (HSTS) is a way for web servers to specify that clients should connect to it using only HTTPS connections. This is communicated by the server via an HTTP response header named Strict-Transport-Security, the value of this header should be max-age=<1 year in seconds>. So in nginx‘s language, put the following:
add_header Strict-Transport-Security 'max-age=31536000' always;Enable Session Caches and Tickets on Nginx
We can enable ssl session caching so that servers can cache the TLS handshakes for a certain amount of time reducing connection times. There is also another way to do this: session tickets. While SSL session caches are stored in the server, SSL tickets are given to the clients and they can present those tickets so that re-negotiation isn’t necessary. We can enable both of those in our server configuration.
Let’s first enable session tickets:
ssl_session_tickets on;Now the cache is configured using the ssl_session_cache directive. It has a default value of “built-in” which isn’t optimal as it limits the caches to be used by only one worker process. We’ll have its value to be shared so that all worker processes can use the same cache. Like in FastCGI caches, we can give the cache a name and a size.
ssl_session_cache shared:SSL:40m;I’ve named it SSL with a size of 40 MB. By default, these caches will last for 5 minutes. We can change it to be 4 hours with the following directive:
ssl_session_timeout 4h;Conclusion
Let’s put all of this into a single configuration and test it out.
user www;

worker_processes auto;

events {
    worker_connections 1024;
}

http {
    include mime.types;
    server {
        listen 80;
        server_name freebsd.local;
        return 301 https://$host$request_uri;
    }
    server {
        listen 443 ssl http2;
        server_name freebsd.local;
        root /var/www/html;
        index index.html;

        # certificate locations
        ssl_certificate /usr/local/etc/nginx/ssl/self.crt;
        ssl_certificate_key /usr/local/etc/nginx/ssl/self.key;

        # use TLS not SSL
        ssl_protocols TLSv1.2 TLSv1.3;

        # only prefer these ciphers
        ssl_prefer_server_ciphers on;
        ssl_ciphers 'ECDHE-ECDSA-AES256-GCM-SHA384:ECDHE-RSA-AES256-GCM-SHA384:ECDHE-ECDSA-CHACHA20-POLY1305:ECDHE-RSA-CHACHA20-POLY1305:ECDHE-ECDSA-AES128-GCM-SHA256:ECDHE-RSA-AES128-GCM-SHA256:ECDHE-ECDSA-AES256-SHA384:ECDHE-RSA-AES256-SHA384:ECDHE-ECDSA-AES128-SHA256:ECDHE-RSA-AES128-SHA256:!ADH:!AECDH:!MD5';

        # use our dh parameters
        ssl_dhparam /usr/local/etc/nginx/ssl/dhparam.pem;

        # enable HSTS
        add_header Strict-Transport-Security 'max-age=31536000' always;

        # ssl session caches and tickets
        ssl_session_tickets on;
        ssl_session_cache shared:SSL:40m;
        ssl_session_timeout 4h;

        location / {
            try_files $uri $uri/ =404;
        }

    }
}
Let’s try it out.
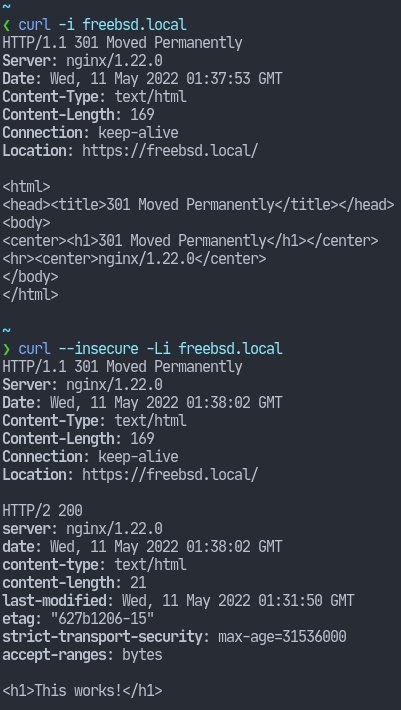
In the first output, we see that we’ve been redirected to the HTTPS version of the site. In the second output, we see the HSTS header. I’ve used the --insecure flag to make curl proceed even with the self-signed certificate.
That’s it for today’s article. Hope you found this useful and thank you for reading.