This post is about “Nginx and Using HTTP2”
Introduction
There goes a lot more behind the scenes between a browser and a server than we might think. Our browser may be handed a index.html but on processing, it (the browser) may need to get additional documents such as style sheets, JavaScript files, etc. This requires multiple connections to the server. Making a connection requires performing the TCP three-way handshake, exchanging headers, etc. all of which introduces unnecessary overhead, as well as latency to the client. It is in this context that the need for a better way to serve documents become apparent.
It wasn’t until the publication of the HTTP/2 protocol that the issue could be solved. HTTP/2 protocol, officially RFC 7540 or more recently RFC 9113, is a replacement for the older HTTP/1.1 which provides an optimized method for transportation of documents over TCP. It allows multiplexing connections so that multiple documents can be sent over the same stream. It also allows compressing the headers and many requests into a single packet. Furthermore, it provides an optional feature called server push whereby a server can send additional documents that the client may need along side the response for the document that was actually requested. For example, a server may send the style sheets and JavaScript files along side the response for the request to an HTML file.
In this article, we’re going to look into configuring Nginx so that it uses this protocol instead of the default HTTP/1.1.
Enabling HTTP2 in Nginx
While using HTTP/2 should be possible unencrypted, most browsers don’t support this; using encryption is generally good for security and privacy anyway. Therefore, we’re now going to switch to using TLS with our Nginx instance. To do this, we’ll need to generate SSL certificates. For now, those will be self-signed. However, I’ll cover using proper TLS certificates in the near future.
So to generate a self-signed certificate using openssl, run the following command:
openssl req -x509 -days 700 -nodes -newkey rsa:2048 -keyout /etc/nginx/ssl/self.key -out /etc/nginx/ssl/self.crtNote that I’ve manually created the /etc/nginx/ssl/ directory as it isn’t there by default.
I’ve used the openssl command-line program for generating (req) a new certificate signing request using the
X.509 standard (-x509) for public-key certificate. The certificate lasts for 700 days (-days). We’re also defining
the location for the RSA private key (-newkey) and asking for it not to be encrypted (-nodes) because we don’t want to type in a passphrase. And finally defining the location for the certificate file (-out).
Now change the listen directive in the nginx.conf file to be the following:
listen 443 ssl http2;This enables SSL as well as HTTP2 for our server. Now we need to define the paths for the above created certificates. Put the following within the same http context as the listen directive:
ssl_certificate /etc/nginx/ssl/self.crt;
ssl_certificate_key /etc/nginx/ssl/self.key;
And that’s it. Now our server will use HTTP2 by default. Additionally, if we wanted to use the server push feature, then define a location block such as the following:
location = /index.html {
    http2_push /style.css;
    http2_push /thumb.png;
}
Using such a configuration, we can check the headers for the response to see if HTTP2 is working:
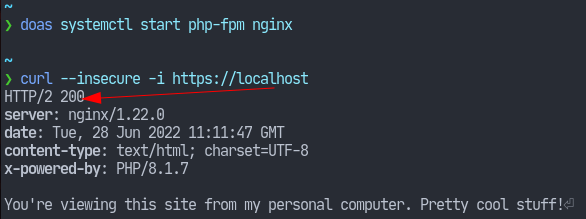
That’s it for today’s article. Thank you for reading, and I hope you learned something.