
In this post, you will learn how to install Ampache5 on Ubuntu / Debian
Ampache is an open-source web based audio/video streaming applcation and file manager, which allows you to access your Audio & Video files from anywhere from the world through internet. It has a decent and responsive GUI which allow users to locate their files really easily
Requirements to install Ampache5 on Debian / Ubuntu :
- VPS with Ubuntu 18.04 or greater or Debian 9 or 10
- Minimum of 1GB of RAM and 10-20GB of Disk Space (It totally depends on your requirements of files spaces and etc)
- Root Access
- Minimum PHP7.4 is required for Ampache5
Step 1 : Updating and Installing NGINX
To stream our content over the internet we would need a web server, In this tutorial we will be using nginx as our web server. To install run the following command
apt-get update -y
apt-get upgrade -y
apt-get install nginx

Step 2 : Installing PHP
Ampache5 is based on PHP, So we would be needing to install PHP7 or greater on our server. In this case, We can install PHP7.4 and some other required extensions and modules for Ampache5
PHP7 Packages may not be available by default in Ubuntu 18.04 or greater, To install the required packages we can install it through a third party repository
apt-get install software-properties-common
add-apt-repository ppa:ondrej/php
Install PHP7.4 and required extensions by running the following commands:
apt-get install php7.4 php7.4-fpm php7.4-common php7.4-curl php7.4-mbstring php7.4-xmlrpc php7.4-mysql php7.4-gd php7.4-xml php7.4-cli php7.4-zip php7.4-intl
Step 3 : Installing MySQL/MariaDB
Ampache uses Database server to store the content like audio/video files name keylink etc.
In this we can use MariaDB server as our Database Server. To install the server run the following commands
apt-get install mariadb-server mariadb-client
— Run the following command to configure the MariaDB Server
mysql_secure_installation
— Do the following steps as in the image or as in the text

Set root password? [Y/n] Y
Remove anonymous users? [Y/n] Y
Disallow root login remotely? [Y/n] n
Remove test database and access to it? [Y/n] Y
Reload privilege tables now? [Y/n] Y
Step 3(b): Create a Database for Ampache5
We have almost setup everything we need for Ampache5, Now we can create a database for the Panel
mysql -u root -p
xc
Step 4 : Download & Install Ampache5 on Ubuntu / Debian
Now we can continue to install Ampache by downloading the latest release from Github link
wget https://github.com/ampache/ampache/releases/download/5.2.0/ampache-5.2.0_all.zip
unzip ampache-5.2.0_all.zip -d /var/www/html/ampache
Run the following commands to give the permissions:
chown -R www-data:www-data /var/www/html/ampache/
chmod -R 755 /var/www/html/ampache/
Step 5 : Configuring NGINX VirtualHost
If you want to have a FQDN Connected to your VPS, Configure NGINX VirtualHost for Ampache5
nano /etc/nginx/sites-available/ampache5.conf
server {

    # listen to
    listen  [::]:used_port; #ssl; ipv6 optional with ssl enabled
    listen       used_port; #ssl; ipv4 optional with ssl enabled

    server_name my_server_name;
    charset utf-8;

    # Logging, error_log mode [notice] is necessary for rewrite_log on,
    # (very usefull if rewrite rules do not work as expected)

         error_log       /var/log/ampache/error.log; # notice;
       # access_log      /var/log/ampache/access.log;
       # rewrite_log     on;

    # Use secure SSL/TLS settings, see https://mozilla.github.io/server-side-tls/ssl-config-generator/
    # ssl_protocols TLSv1.2;
    # ssl_ciphers 'ECDHE-ECDSA-AES256-GCM-SHA384:ECDHE-RSA-AES256-GCM-SHA384:ECDHE-ECDSA-CHACHA20-POLY1305:ECDHE-RSA-CHACHA20-POLY1305:ECDHE-ECDSA-AES128-GCM-SHA256:ECDHE-RSA-AES128-GCM-SHA256:ECDHE-E    CDSA-AES256-SHA384:ECDHE-RSA-AES256-SHA384:ECDHE-ECDSA-AES128-SHA256:ECDHE-RSA-AES128-SHA256';
    # ssl_prefer_server_ciphers on;
    # add_header Strict-Transport-Security max-age=15768000;
    # etc.

    # Use secure headers to avoid XSS and many other things
    add_header X-Content-Type-Options nosniff;
    add_header X-XSS-Protection "1; mode=block";
    add_header X-Robots-Tag none;
    add_header X-Download-Options noopen;
    add_header X-Permitted-Cross-Domain-Policies none;
    add_header X-Frame-Options "SAMEORIGIN" always;
    add_header Referrer-Policy "no-referrer";
    add_header Content-Security-Policy "script-src 'self' 'unsafe-inline' 'unsafe-eval'; frame-src 'self'; object-src 'self'";

    # Avoid information leak
    server_tokens off;
    fastcgi_hide_header X-Powered-By;

    root /path/to/ampache/root/directory;
    index index.php;

    # Somebody said this helps, in my setup it doesn't prevent temporary saving in files
    proxy_max_temp_file_size 0;

    # Rewrite rule for Subsonic backend
    if ( !-d $request_filename ) {
        rewrite ^/rest/(.*).view$ /rest/index.php?action=$1 last;
        rewrite ^/rest/fake/(.+)$ /play/$1 last;
    }

    # Rewrite rule for Channels
    if (!-d $request_filename){
      rewrite ^/channel/([0-9]+)/(.*)$ /channel/index.php?channel=$1&target=$2 last;
    }

    # Beautiful URL Rewriting
        rewrite ^/play/ssid/(\w+)/type/(\w+)/oid/([0-9]+)/uid/([0-9]+)/name/(.*)$ /play/index.php?ssid=$1&type=$2&oid=$3&uid=$4&name=$5 last;
        rewrite ^/play/ssid/(\w+)/type/(\w+)/oid/([0-9]+)/uid/([0-9]+)/client/(.*)/name/(.*)$ /play/index.php?ssid=$1&type=$2&oid=$3&uid=$4&client=$5&name=$6 last;
        rewrite ^/play/ssid/(\w+)/type/(\w+)/oid/([0-9]+)/uid/([0-9]+)/client/(.*)/player/(.*)/name/(.*)$ /play/index.php?ssid=$1&type=$2&oid=$3&uid=$4&client=$5&player=$6&name=$7 last;
        rewrite ^/play/ssid/(\w+)/type/(\w+)/oid/([0-9]+)/uid/([0-9]+)/client/(.*)/bitrate/([0-9]+)/player/(.*)/name/(.*)$ /play/index.php?ssid=$1&type=$2&oid=$3&uid=$4&client=$5&bitrate=$6player=$7&name=$8 last;
        rewrite ^/play/ssid/(\w+)/type/(\w+)/oid/([0-9]+)/uid/([0-9]+)/client/(.*)/transcode_to/(w+)/bitrate/([0-9]+)/player/(.*)/name/(.*)$ /play/index.php?ssid=$1&type=$2&oid=$3&uid=$4&client=$5&transcode_to=$6&bitrate=$7&player=$8&name=$9 last;
        rewrite ^/play/ssid/(\w+)/type/(\w+)/oid/([0-9]+)/uid/([0-9]+)/client/(.*)/noscrobble/([0-1])/name/(.*)$ /play/index.php?ssid=$1&type=$2&oid=$3&uid=$4&client=$5&noscrobble=$6&name=$7 last;
        rewrite ^/play/ssid/(\w+)/type/(\w+)/oid/([0-9]+)/uid/([0-9]+)/client/(.*)/noscrobble/([0-1])/player/(.*)/name/(.*)$ /play/index.php?ssid=$1&type=$2&oid=$3&uid=$4&client=$5&noscrobble=$6&player=$7&name=$8 last;
        rewrite ^/play/ssid/(\w+)/type/(\w+)/oid/([0-9]+)/uid/([0-9]+)/client/(.*)/noscrobble/([0-1])/bitrate/([0-9]+)/player/(.*)/name/(.*)$ /play/index.php?ssid=$1&type=$2&oid=$3&uid=$4&client=$5&noscrobble=$6&bitrate=$7player=$8&name=$9 last;
        rewrite ^/play/ssid/(\w+)/type/(\w+)/oid/([0-9]+)/uid/([0-9]+)/client/(.*)/noscrobble/([0-1])/transcode_to/(w+)/bitrate/([0-9]+)/player/(.*)/name/(.*)$ /play/index.php?ssid=$1&type=$2&oid=$3&uid=$4&client=$5&noscrobble=$6&transcode_to=$7&bitrate=$8&player=$9&name=$10 last;

    # the following line was needed for me to get downloads of single songs to work
        rewrite ^/play/ssid/(.*)/type/(.*)/oid/([0-9]+)/uid/([0-9]+)/action/(.*)/name/(.*)$ /play/index.php?ssid=$1&type=$2&oid=$3&uid=$4action=$5&name=$6 last;
        location /play {
                if (!-e $request_filename) {
                rewrite ^/play/art/([^/]+)/([^/]+)/([0-9]+)/thumb([0-9]*)\.([a-z]+)$ /image.php?object_type=$2&object_id=$3&auth=$1 last;
                }

        rewrite ^/([^/]+)/([^/]+)(/.*)?$ /play/$3?$1=$2;
        rewrite ^/(/[^/]+|[^/]+/|/?)$ /play/index.php last;
        break;
        }

   location /rest {
      limit_except GET POST {
         deny all;
      }
   }

   location ^~ /bin/ {
      deny all;
      return 403;
   }

   location ^~ /config/ {
      deny all;
      return 403;
   }

   location / {
      limit_except GET POST HEAD{
         deny all;
      }
   }

   location ~ ^/.*.php {
        fastcgi_index index.php;

    # sets the timeout for requests in [s] , 60s are normally enough
        fastcgi_read_timeout 600s;

        include fastcgi_params;
        fastcgi_param SCRIPT_FILENAME $document_root$fastcgi_script_name;

    # Mitigate HTTPOXY https://httpoxy.org/
        fastcgi_param HTTP_PROXY "";

    # has to be set to on if encryption (https) is used:
        # fastcgi_param HTTPS on;

        fastcgi_split_path_info ^(.+?\.php)(/.*)$;

    # chose as your php-fpm is configured to listen on
        fastcgi_pass unix:/var/run/php5-fpm.sock;
        # fastcgi_pass 127.0.0.1:8000/;
   }

   # Rewrite rule for WebSocket
   location /ws {
        rewrite ^/ws/(.*) /$1 break;
        proxy_http_version 1.1;
        proxy_set_header Upgrade $http_upgrade;
        proxy_set_header Connection "upgrade";
        proxy_set_header Host $host;
        proxy_pass http://127.0.0.1:8100/;
   }
}
Replace the server name with your own domain name.It will look like this, Save the file with CTRL+O and press Enter

Run the following commands to fully configure the new VirtualHost and restart Apache2
ln -s /etc/nginx/sites-available/ampache.conf /etc/nginx/sites-enabled/
systemctl restart nginx.service
Step 6 : Run the Web Installer
Open your browser, and open the link “yourdomainname.com/install.php or “youriphere/install.php
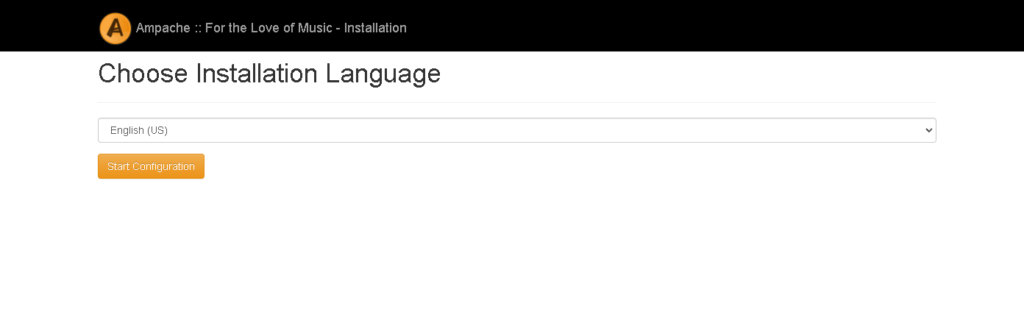
— First you will see the following screen press start configuration
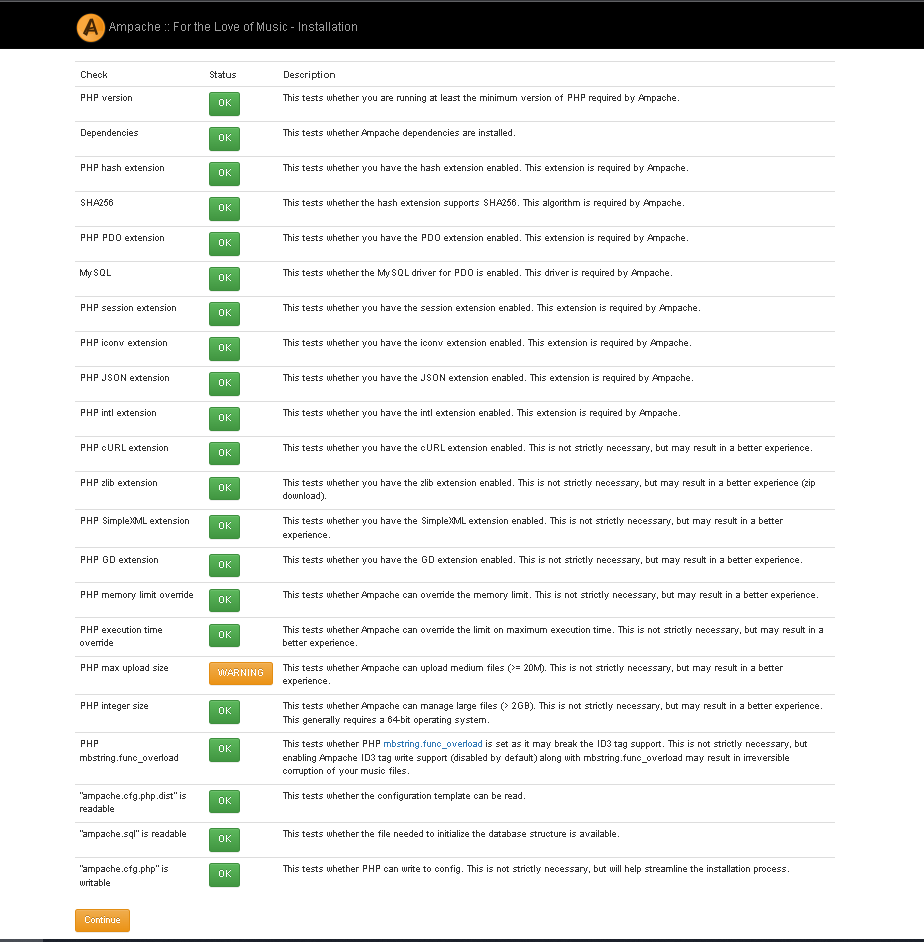
— Second, This is an check to confirm whether everything is installed, If you have followed the tutorial, You will not have any issue.
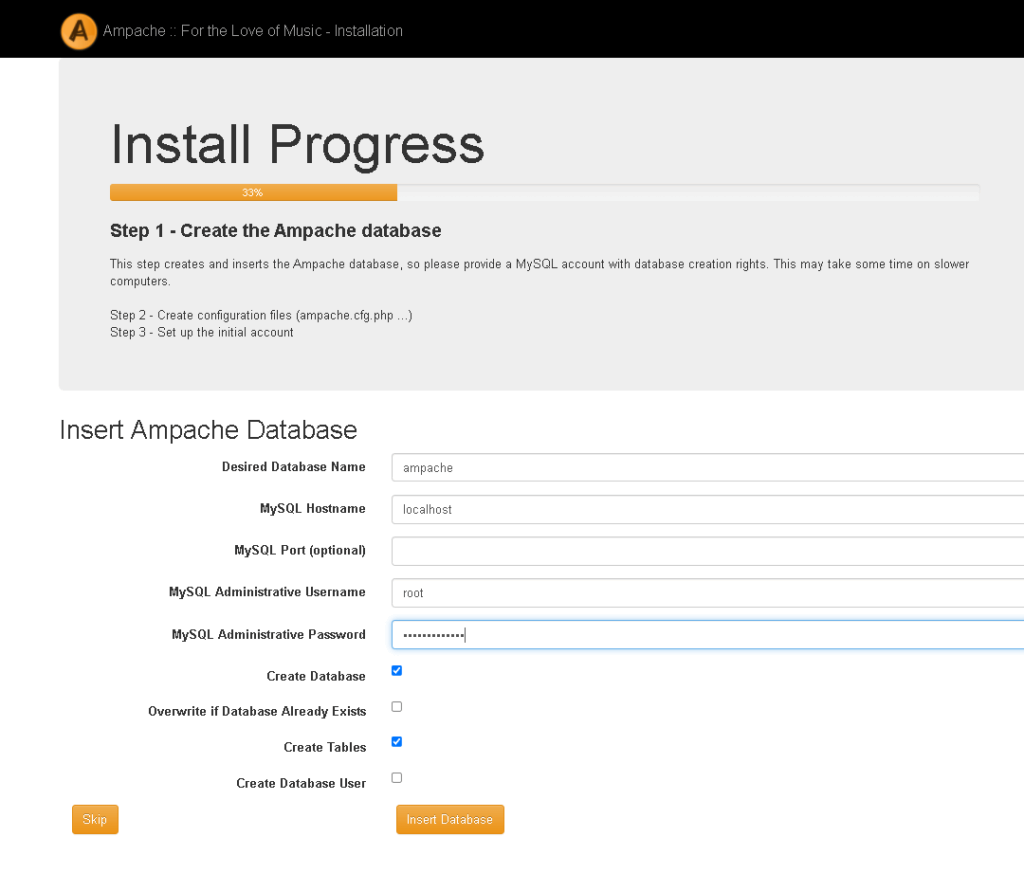
Third, You will see the following screen here enter your database details you created or use Root User to create the database but its advised to use the database details
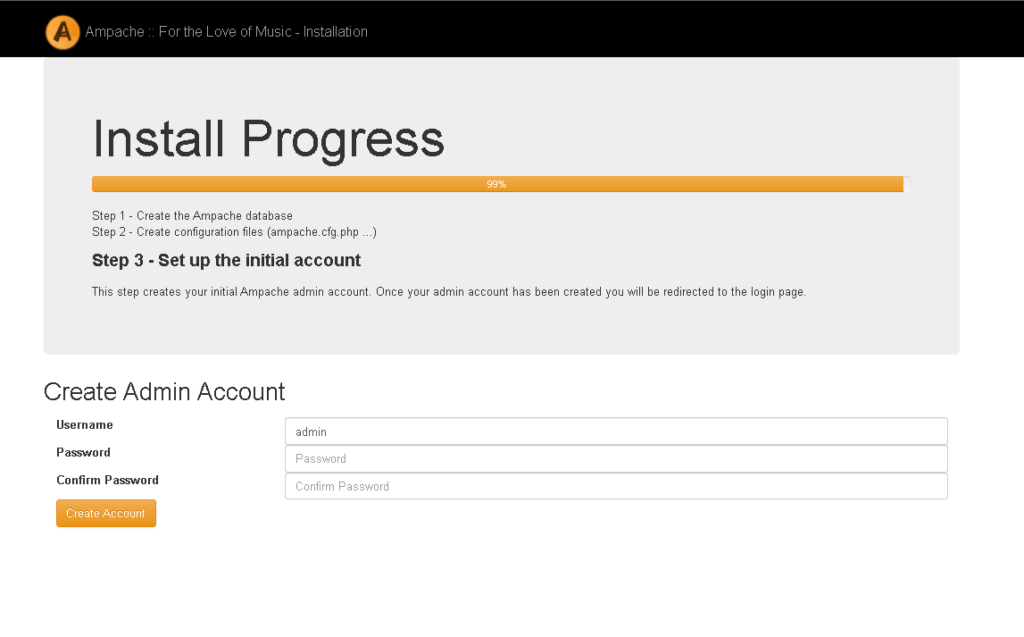
Fourth, You will see the following to create an admin user for the panel
Then, Finally you can login into your account

install Ampache5 on Debian / Ubuntu – Conclusion
You have successfully installed Ampache5 Panel into your VPS Server!