
Hello, friends. We continue playing with Docker. Today is the turn to deploy GLPI using Docker, so you have another way to use and install it.
Introduction – Docker
Docker is a software development platform for virtualization with multiple operating systems running on the same host. This is made possible by containers that are distributed as images.
The system is very lightweight because it does not incorporate an operating system, which also allows for better use of resources. Docker also allows applications to be isolated, which is very useful for testing without bringing down the client’s production server.
Meanwhile, GLPI is a web application that allows us to deploy a fleet management system. It has also evolved and with it, you can also manage hardware, software, and data centers by linking the asset inventory to the helpdesk.
Today we will use both technologies.
Deploy GLPI using Docker
The first thing we need to do is learn how to install Docker. As in this post, I used Ubuntu 22.04 as the system, you can learn how to install Docker on it and obviously Docker Compose.
Once both tools are up to speed, you can then create a folder where GLPI will be and access it
mkdir glpi
cd glpi
Now create a file called docker-compose.yml.
nano docker-compose.ymlAnd add this content in the
version: "3.2"

services:

  mariadb:
    image: mariadb:10.7
    container_name: mariadb
    hostname: mariadb
    volumes:
      - /var/lib/mysql:/var/lib/mysql
    environment:
      - MARIADB_ROOT_PASSWORD=pass
      - MARIADB_DATABASE=glpidb
      - MARIADB_USER=glpi_user
      - MARIADB_PASSWORD=glpi
    restart: always

  glpi:
    image: diouxx/glpi
    container_name : glpi
    hostname: glpi
    ports:
      - "80:80"
    volumes:
      - /etc/timezone:/etc/timezone:ro
      - /etc/localtime:/etc/localtime:ro
      - /var/www/html/glpi/:/var/www/html/glpi
    environment:
      - TIMEZONE=America/Chicago
    restart: always
It is simple content, but let’s take a look at it anyway. In this file two services are inserted which are MariaDB and GLPI. Remember that GLPI requires a database handler like MariaDB.
In the first section is MariaDB with a volume for data persistence. The information contained in environment can be modified as you like (user, passwords, and database name).
In the other section there is GLPI. Here it is easier because there are fewer fields. You expose the host port 80 for the application and mount the volumes for the data persistence and the timezone that you have to modify.
Save the changes and close the editor.
Now apply all the changes by running
sudo docker compose up -d
If all goes well, you will see something similar to this.
Log in to GLPI
Now all that remains is to complete the installation via the web browser by going to http:your-server.
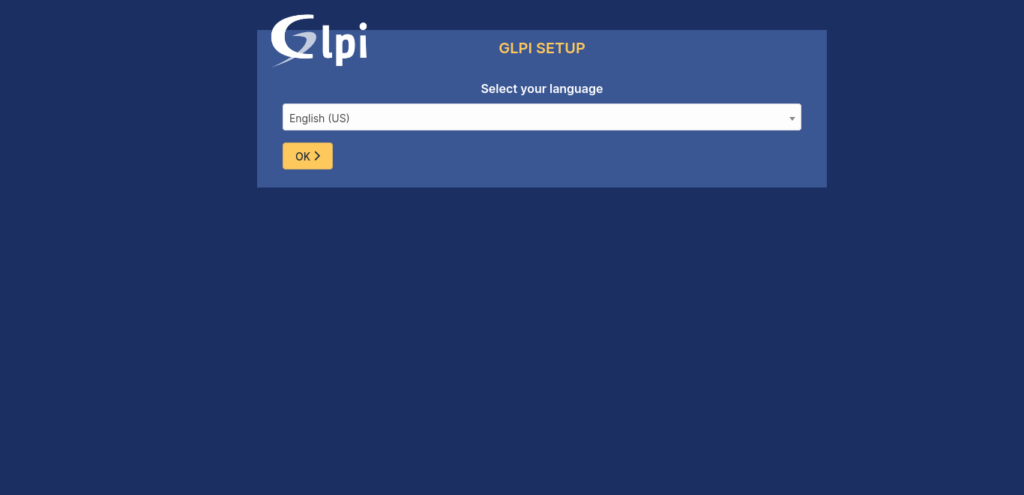
You will see the welcome screen and language selection.
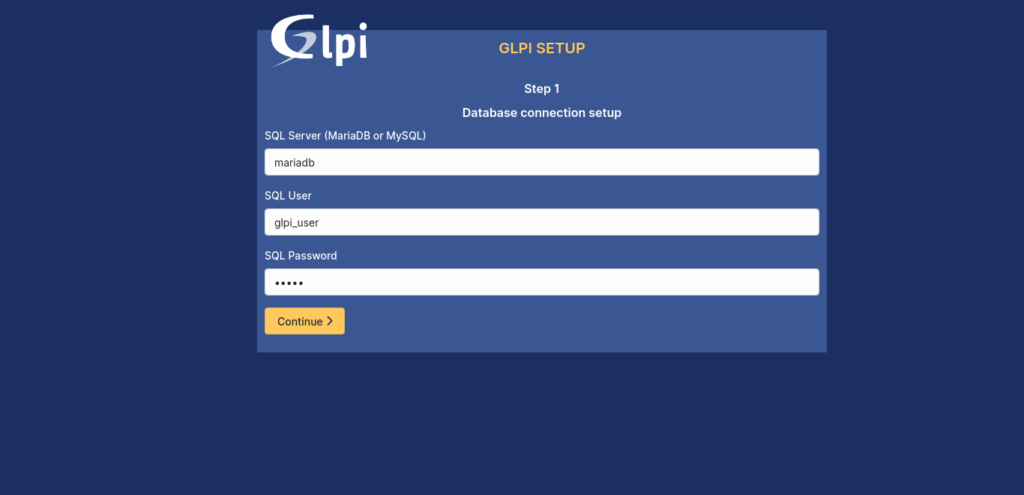
Go through the whole process and in the database connection, enter the values that are in the file.
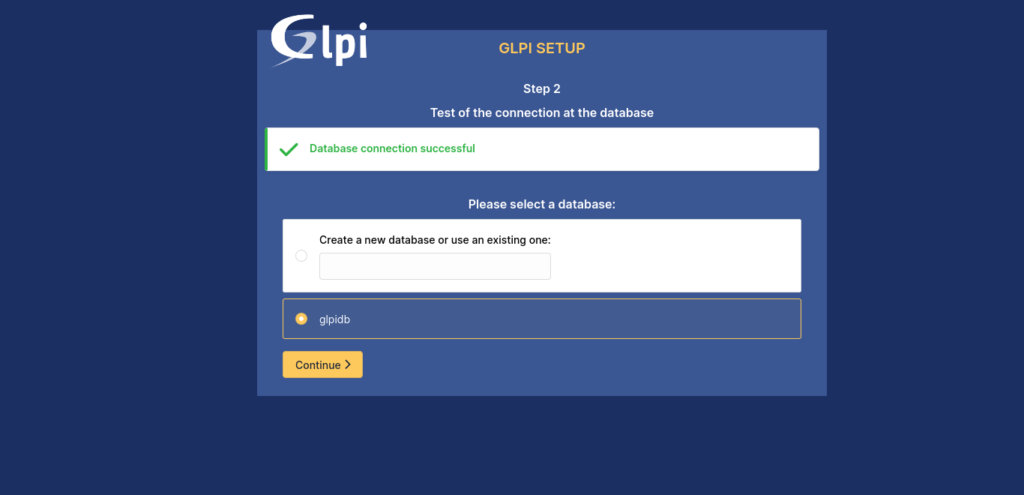
If all goes well, you will see this.
Continue the entire process, until you are given the login credentials. Then, you will see the login screen, and you will see the dashboard.

This is it.
Conclusion
Docker is a marvel with which we can deploy applications quickly and easily. Today, you have learned how to do it with GLPI.
How to install GLPI on Ubuntu 22.04