
An Introduction
Welcome back! Here today we are going to learn how to configure LVM or Logical Volume Manager with Ubuntu 21.04. While working in the live production environment it’s very obvious to get out do space sometimes. For critical file systems like / or /etc, it will be complicated to expend if no Logical Volumes provisions are taken care of initially.
What all Local Volumes do is that it create chunks of hard drives which are known to be logical volumes. Such volumes can be considered as slices of the hard drive. These slices can be added to the desired file system when required. For the production environment, it is recommended to keep Logical Volumes provisioning all the time.
Key terminologies used of LVM
- Physical Volumes
The very first building of LVM creation, basically physical block drives are called Physical volume here.
- Volume Group
LVM combines physical volumes into a pool of storage which is called a Volume group. This combines groups to act as a single drive. Volume group extracts all defined features beneath Physical Volumes.
- Logical Volume
Now, a group of Physical volumes altogether can be sliced into any number of Logical Volumes. This is the layer with which users will be interacting. Logically Logical Volumes are equal to the partition on a physical device.
How to configure LVM with Ubuntu 21.04.
Here, for testing purposing, I will be using VirtualBox installed Ubuntu 21.04 machine. I have added one additional hard drive to create and explain the LVM scenario.
Check what we have in storage, have a look.
Install LVM package first.
# apt install lvm2
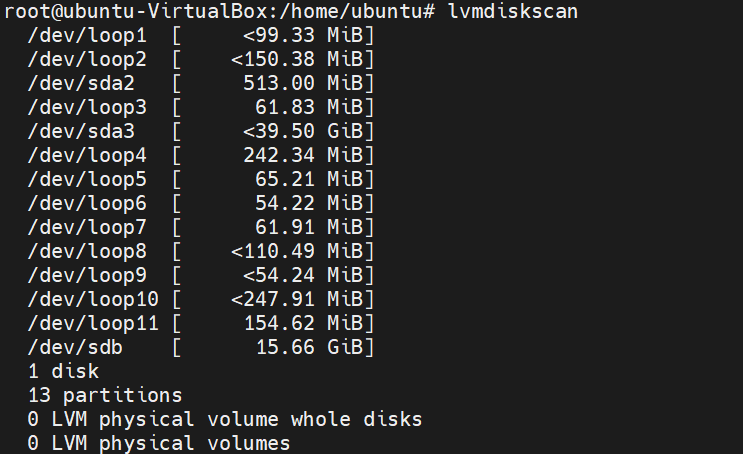
Display what drives can be managed with LVM
# lvmdiskscan
Run the fdisk command to see what we have.
# fdisk -l
We require at least two empty drives to create LVM partitions.
# pvcreate /dev/sdb /dev/sdc
Physical volume "/dev/sdb" successfully created.
Physical volume "/dev/sdc" successfully created.
Create a new volume group with created physical volumes. We require to assign a name to the volume group.
# vgcreate UnixCop /dev/sdb /dev/sdc

Now time to create Logical volumes, define specific sizes. The size will be the exact file system size that you will be able to use in real-time.
# lvcreate -L 10G -n UCLVM UnixCop
To check Physical Volumes
# pvdisplay
  --- Physical volume ---
  PV Name               /dev/sdb
  VG Name               UnixCop
  PV Size               15.66 GiB / not usable 4.07 MiB
  Allocatable           yes
  PE Size               4.00 MiB
  Total PE              4008
  Free PE               1448
  Allocated PE          2560
  PV UUID               MTcB8p-ipiE-H3Rq-0xvE-DbAY-GRdl-0L207A

  --- Physical volume ---
  PV Name               /dev/sdc
  VG Name               UnixCop
  PV Size               10.00 GiB / not usable 4.00 MiB
  Allocatable           yes
  PE Size               4.00 MiB
  Total PE              2559
  Free PE               2559
  Allocated PE          0
  PV UUID               eGMc5G-B3Zl-TWyw-4Z8V-5yNt-5jTT-JXtAKX
To display Volume Group
# vgdisplay
  --- Volume group ---
  VG Name               UnixCop
  System ID
  Format                lvm2
  Metadata Areas        2
  Metadata Sequence No  2
  VG Access             read/write
  VG Status             resizable
  MAX LV                0
  Cur LV                1
  Open LV               0
  Max PV                0
  Cur PV                2
  Act PV                2
  VG Size               25.65 GiB
  PE Size               4.00 MiB
  Total PE              6567
  Alloc PE / Size       2560 / 10.00 GiB
  Free  PE / Size       4007 / 15.65 GiB
  VG UUID               u7a2ko-lBKT-tREq-HVg0-DPeN-rltd-ZB5O3s
To check Logical Volume
# lvdisplay
--- Logical volume ---
LV Path /dev/UnixCop/UCLVM
LV Name UCLVM
VG Name UnixCop
LV UUID HIHbwx-q02y-euJn-ILzZ-kJdf-QrfU-vJDTKa
LV Write Access read/write
LV Creation host, time ubuntu-VirtualBox, 2022-01-30 15:53:04 +0530
LV Status available
# open 0
LV Size 10.00 GiB
Current LE 2560
Segments 1
Allocation inherit
Read ahead sectors auto
Use the following command to scan Logical Volumes
# lvmdiskscan -l

Use pvs command to get another detail.
# pvs
  PV         VG      Fmt  Attr PSize   PFree
  /dev/sdb   UnixCop lvm2 a--  <15.66g  <5.66g
  /dev/sdc   UnixCop lvm2 a--  <10.00g <10.00g
We have created a set of drive chunks with the help of LVM. Stay tuned till the next article.

