
So, this post is about pfSense backup and recovery
Backup Strategies
The optimal backup strategy is the following:
- Take frequent backups
- Keep multiple copies of backups in a safe location off the firewall
- Periodically test backups
The remainder of this section expands on these points.
The best practice is to make a backup after each minor change, and both before and after each major change or series of changes. Typically, an initial backup is taken in case the change being made has undesirable effects. An after-the-fact backup is taken after evaluating the change and ensuring it had the intended outcome. Periodic backups are also helpful, regardless of changes.
pfSense software makes an internal backup upon each change, and the best practice is to download a manual backup as well. The automatic backups made on each change are useful for reverting to prior configurations after changes have proven detrimental, but are not good for disaster recovery as they are on the system itself and not kept externally. As it is a fairly simple and painless process, administrators should make a habit of downloading a backup now and then and keeping it in a safe place. Backups may be handled easily and automatically using the free AutoConfigBackup service.
Backup files can contain sensitive information, so carefully consider security measures for backups kept off the firewall. . For offline backups, consider physical security measures such as keeping media containing backups in a fire safe and at a remote secure location such as a second office or bank safety deposit box.
Making Backups in the GUI
So, Making a backup in the GUI is simple:
Navigate to Diagnostics > Backup & Restore

Set any desired options, or leave the options at their default values.

Click Download Configuration as XML (Figure GUI Backup).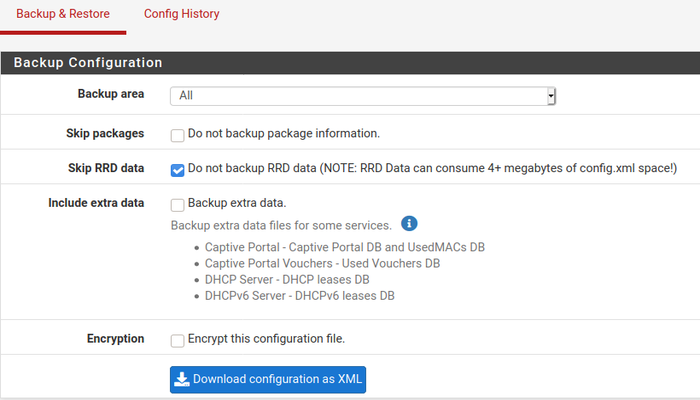
The web browser will then prompt to save the file somewhere on the PC client. It will be named config-<hostname>-<timestamp>.xml, but that may be changed before saving the file.
Using cURL
For those who prefer to use cURL, the following example accomplishes the same goal:
Fetch the login form and save the cookies and CSRF token:
$ curl -L -k --cookie-jar cookies.txt \
     https://192.168.1.1/ \
     | grep "name='__csrf_magic'" \
     | sed 's/.*value="\(.*\)".*/\1/' > csrf.txt
Submit the login form to complete the login procedure:
$ curl -L -k --cookie cookies.txt --cookie-jar cookies.txt \
     --data-urlencode "login=Login" \
     --data-urlencode "usernamefld=admin" \
     --data-urlencode "passwordfld=pfsense" \
     --data-urlencode "__csrf_magic=$(cat csrf.txt)" \
https://192.168.1.1/ > /dev/null- Now the script is complete and you can perform actions!
- Fetch the target page to obtain a new CSRF token:
$ curl -L -k --cookie cookies.txt --cookie-jar cookies.txt \
     https://192.168.1.1/diag_backup.php  \
     | grep "name='__csrf_magic'"   \
     | sed 's/.*value="\(.*\)".*/\1/' > csrf.txt
Download the backup:
$ curl -L -k --cookie cookies.txt --cookie-jar cookies.txt \
     --data-urlencode "download=download" \
     --data-urlencode "donotbackuprrd=yes" \
     --data-urlencode "__csrf_magic=$(head -n 1 csrf.txt)" \
     https://192.168.1.1/diag_backup.php > config-router-`date +%Y%m%d%H%M%S`.xml
Restoring from Backups
Backups are not useful without a means to restore them, and by extension, test them. Several means for restoring configurations are available in pfSense® software.
Restoring with the GUI
The easiest way for most users to restore a configuration is by using the GUI:
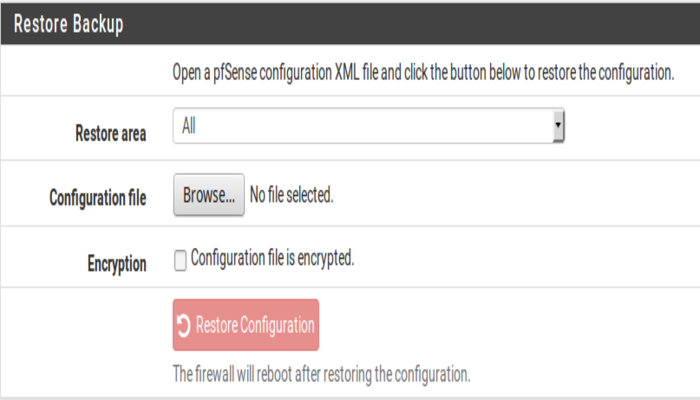
- Navigate to Diagnostics > Backup & Restore
- Locate the Restore Backup .
- Select the area to restore, or leave at the default selection for a complete backup.
- Click Browse
- Locate the backup file on the local PC
- Click Restore Configuration
- The firewall will then apply the configuration and reboot with the settings obtained from the backup file.
While easy to work with, this method has prerequisites when dealing with a full restore to a new installation. First, it would need to be done after the new target system is fully installed and running. Second, it requires an additional PC connected to a working network or crossover cable behind the firewall being restored.
Configuration Backup Cache Settings
The number of backups stored in the configuration history may be changed if needed.
- Navigate to Diagnostics > Backup & Restore
- Click the Config History tab
- Click
 at the right end of the Configuration Backup Cache Settings bar to expand the settings
 - Enter the new number of configurations to retain in the Backup Count field
- Click Save
Along with the configuration count, the page also displays the amount of space consumed by the backup cache.