

Modern business environment demands Web and e-commerce applications that accelerate your entry into new markets like a boom ! help you find new ways to reach and retain customers, and allow you to introduce new products and services quickly. To build and deploy these new solutions, you need a proven, reliable e-commerce platform that can connect and empower all types of users while integrating your corporate data.
Oracle WebLogic Server is a unified and extensible platform for developing, deploying and running enterprise applications, such as Java, for on-premises and in the cloud.
Hi Guys ! Today, we will discuss about Oracle WebLogic server. We have got through some intro & now will have a glimpse of some architectural overview of this Oracle Middle ware product, Then we will go the how to’s. Don’t get bored till then !
WebLogic Server operates in the middle tier of a multi tier (or n-tier) architecture. A multi tier architecture determines where the software components that make up a computing system are executed in relation to each other and to the hardware, network, and users. Choosing the best location for each software component lets you develop applications faster; eases deployment and administration; and provides greater control over performance, utilization, security, scalability, and reliability.
Architectural Overview

Modern application operates with the main 3 components. That’s Client Tier, Middle Tier & The Back end Tier. Oracle WebLogic is standing in the middle section of the above architecture diagram.
This Middle ware includes:
- WebLogic Server and other Web servers.
- Firewalls, and proxy servers that mediate traffic between clients and WebLogic Server.
If you are interested, we can discuss more about the architectural overview. But let just not get bored today, we will go to the direct hands on now !
Requirements
I needed the following things to do the installation & configuration work:
- Fresh installed Cantos 8 Machine
- 4 GB of RAM.
- 4 Core CPU.
- 50 GB of free Space.
- 1 Static IP.
- Graphical Access on the server (if you work with ssh XAuthority like me)
Before Getting Started
Machine Installation
I have installed a centos8 machine on the virtual box with the IP 192.168.0.165 & user weblogic. We will do the rest of the work with the username weblogic & oracle (User oracle will be added later on the installation interest). User weblogic has administrative access to the machine. It’s not recommended that we use root for the installation purposes.
Set the Hostname
We will set the hostname as ipamaster.unixcop.local. Obviously you can set of your own
hostnamectl set-hostname weblogic.unixcop.local
SELinux Permissive
We need to set the SELinux is Permissive/Disabled mode
We can make it permanent or temporary by changing the configuration situated at the /etc/selinux Directory
Entry to the hosts file
We have to add the IP & hostname to the /etc/hosts file. In my case, the IP is 192.168.0.165
Installation & Configuration
System Updation
First we need to update our system, just to make sure all the packages/softwares are updated.
Run the command
sudo dnf update -y
Have patience please ! it might take a while (on fresh machine depending on your internet connection)
Install Oracle JDK
Oracle WebLogic Server 14c is certified with Java Development Kit (JDK) 8 and 11. Therefore, you can install any of them on your Java EE application server.
Open Oracle JDK 11 Download Page in a web browser. (NB: You might needed to be registered on their website to download)
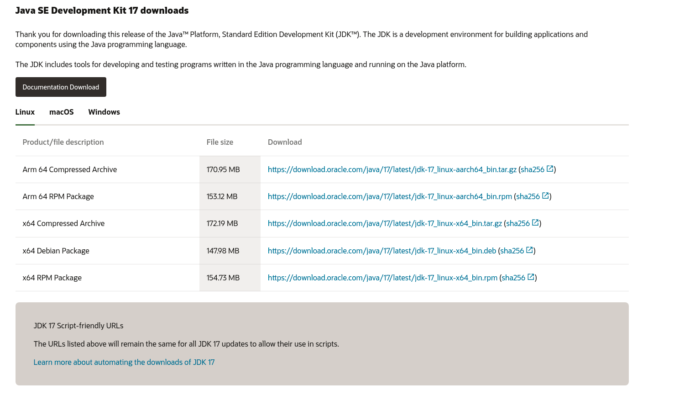
Download the required JDK & wait till the download finishes
run the following command to install the JDK locally
dnf localinstall -y jdk-11.0.12_linux-x64_bin.rpm
Wait till the installation finishes.
Now we need to set the JAVA_HOME environment variable in /etc/profile and the current Linux shell.
Run the following commands
echo "export JAVA_HOME=/usr/java/jdk-11.0.12" >> /etc/profile
export JAVA_HOME=/usr/java/jdk-11.0.12
Once done, check the version of java to verify if the java has installed successfully.
Run the following command
java -version
You will get the output regarding the installed java version if you have done all good.

Pre-Installation Tasks
We need to create the necessary operating system users and groups to own WebLogic software.
Like following
Add the group oinstall, this group will be the default installation group for WebLogic
groupadd -g 1001 oinstall
Now, we need to add user adjacent to the group
useradd -u 1001 -g oinstall oracle
Now need to change the password for the user oracle
passwd oracle
Create a directory to install WebLogic software and set necessary permissions
mkdir -p /u01/app/oracle/product/14.1.1.0
chown -R oracle:oinstall /u01/app
chmod -R 775 /u01
Install Oracle Weblogic Server 14c:
Go to Weblogic Download Page
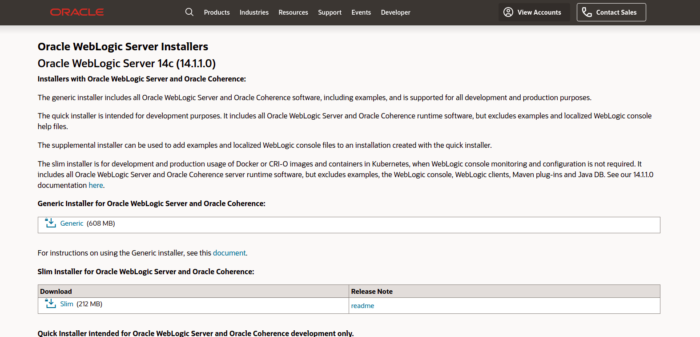
Download the generic installer
As the downloaded file is a .zip file, we need to unzip that for our purposes, so we need to install unzip package.
dnf install -y unzipOnce the package is installed, we are ready to unzip & install but we need to do the rest of the process with the oracle user. So, switch to the oracle user using the following command
su - oracle
Edit .bash_profile of oracle user & add those following lines
export ORACLE_BASE=/u01/app/oracleexport ORACLE_HOME=$ORACLE_BASE/product/14.1.1.0
export MW_HOME=$ORACLE_HOME
export WLS_HOME=$MW_HOME/wlserver
export DOMAIN_BASE=$ORACLE_HOME/user_projects/domains
export DOMAIN_HOME=$DOMAIN_BASE/base_domain
Execute the .bash_profile script to set environment variables for current Linux shell.
. ~/.bash_profile
Using unzip command to extract Weblogic Generic Installer
unzip fmw_14.1.1.0.0_wls_lite_Disk1_1of1.zip
Within a while, it will be unzipped. Now it’s time to install, finally !
Run the following command to start the installation process
java -jar fmw_14.1.1.0.0_wls_lite_generic.jar
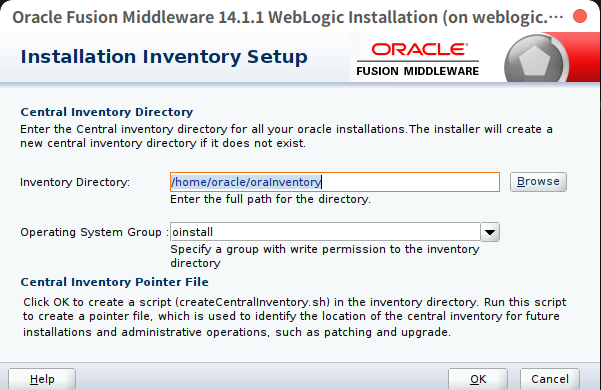
Change the inventory directory with our created directory which is /u01/app/oracle/product/14.1.1.0
Click Next
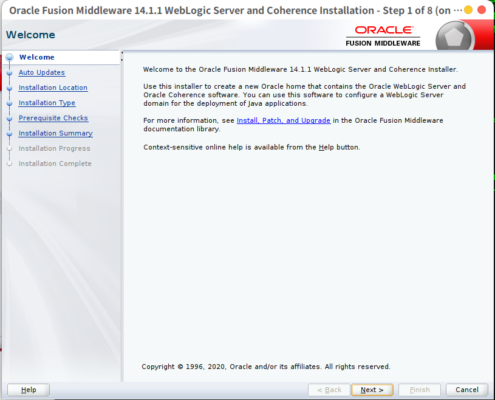
Welcome screen will be appeared, click Next.
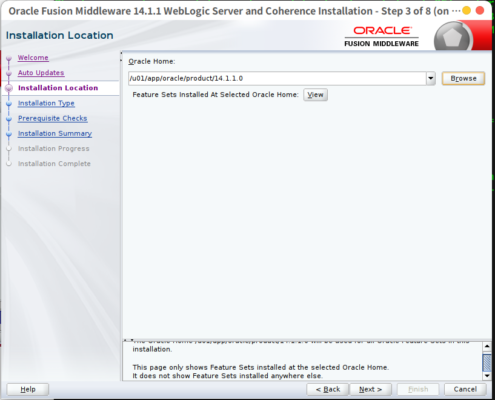
Set the oracle home as /u01/app/oracle/product/14.1.1.0 & click Next
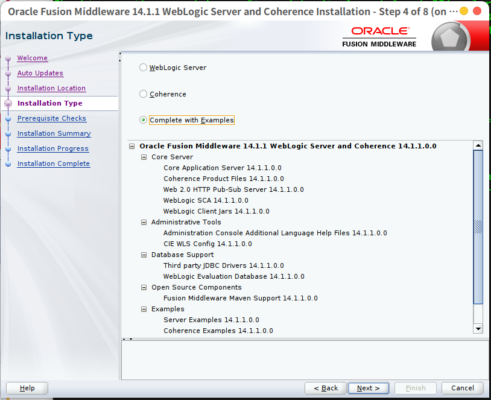
We would like to install complete with examples suite, so select that option to go ahead.
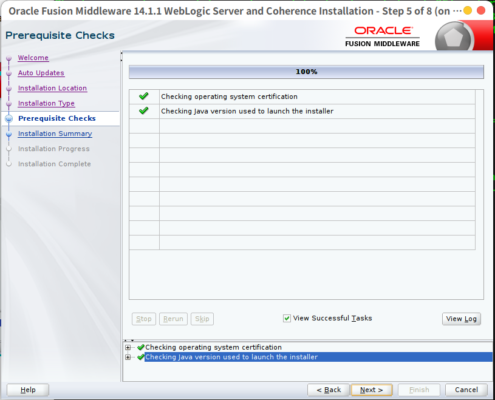
Wait till the prerequisite checks to complete. After done, click Next
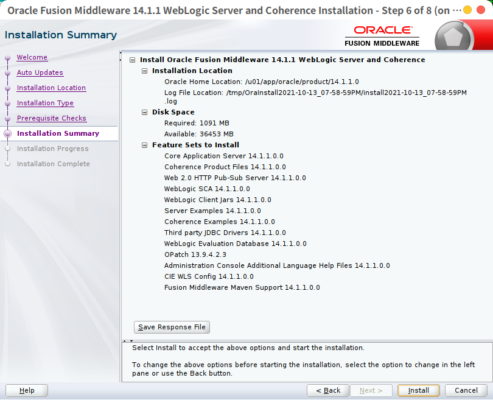
This window is providing us a summary of the installation, click install to start installing WebLogic.
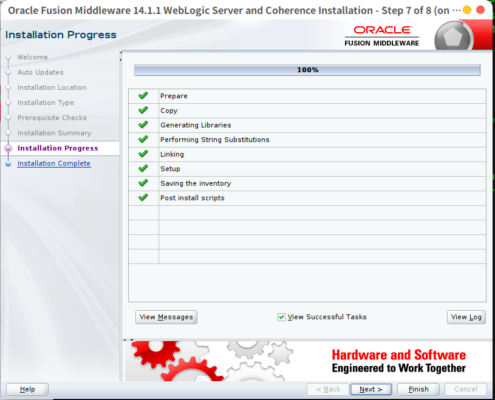
Wait till the installation process complete, once done & click Next
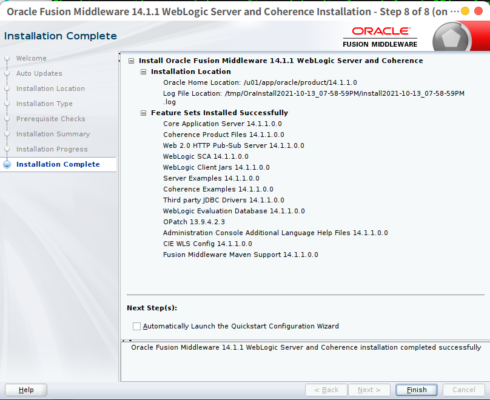
Click finish & Congratulations ! you have done the installation successfully !
Now it’s time to configure
WebLogic Configuration
Start the configuration by running the following script, and this will give us a configuration window
/u01/app/oracle/product/14.1.1/oracle_common/common/bin/config.sh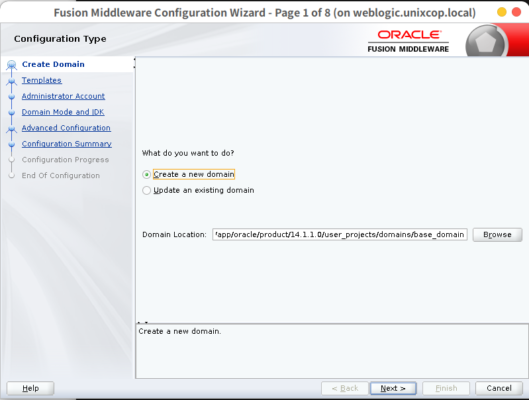
Create a Domain for your Weblogic application server. Click Next
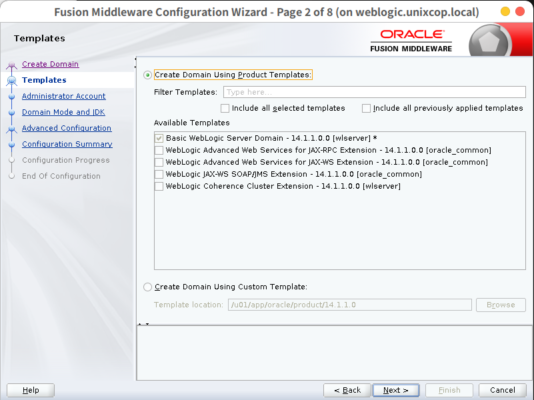
Select a template to create the domain. Click Next
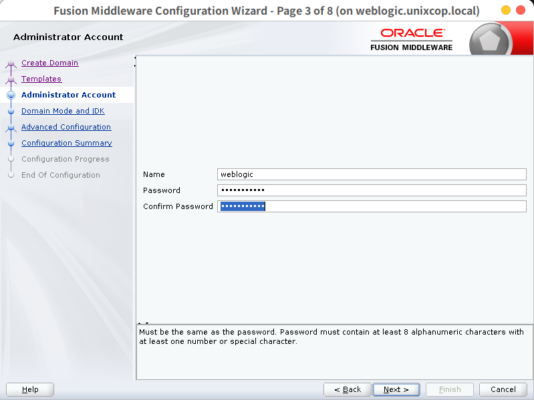
Create an administrative account & choose a strong password, in this case, I have created the user named “weblogic” you can create of your own.

Select the Domain Mode and JDK for your Application Server. Hit Next

Keep this window setting default & go ahead by hitting Next.
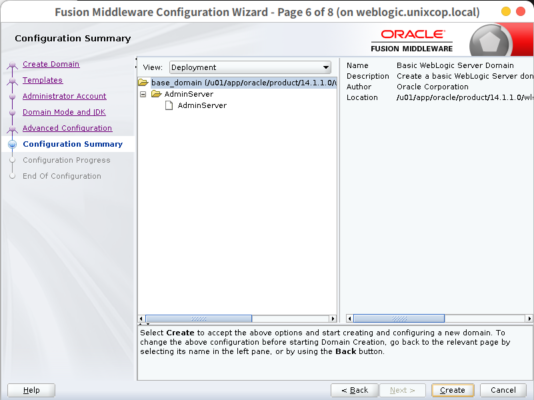
Create the base domain for the user & click Create
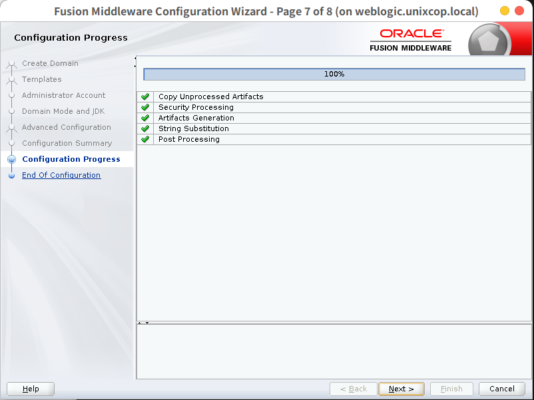
Wait till the configuration finishes & then click Next

You have done the configuration successfully ! Click Finish to close the window.
Now it’s time to start & login to the Weblogic Server
Start & Login
Whenever you start the Weblogic service, it will always ask you for a username / password. To automate it, you can define the credentials in boot.properties file.
mkdir -p $DOMAIN_HOME/servers/AdminServer/security/
mkdir -p $DOMAIN_HOME/servers/AdminServer/security/
echo "username=weblogic" > $DOMAIN_HOME/servers/AdminServer/security/boot.properties
echo "password=unixc0p@321" >> $DOMAIN_HOME/servers/AdminServer/security/boot.properties
Start the WebLogic Server by running the following command
$DOMAIN_HOME/startWebLogic.sh &
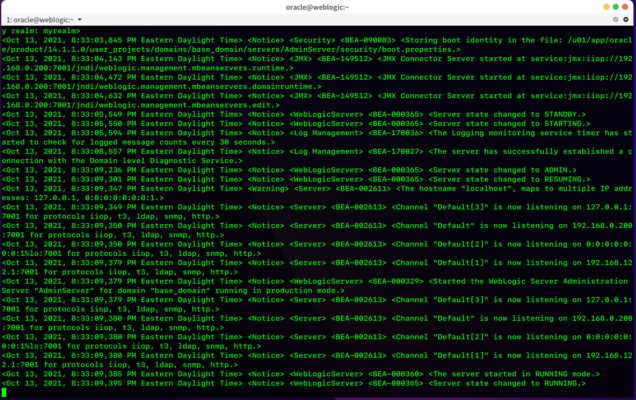
You will get something like the above window on your terminal, note that at the end line, it’s saying that Server state changed to RUNNING. That means we should access the server from the browser
Let’s try !
go the browser & hit http://weblogic.unixcop.local:7001/console
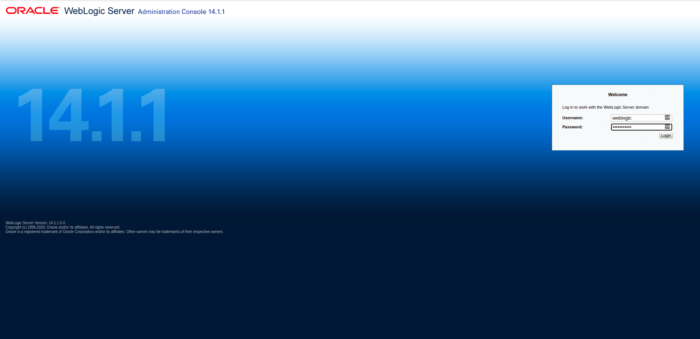
You will get a login page like this. Give it the required credentials that you have set previously & hit login.
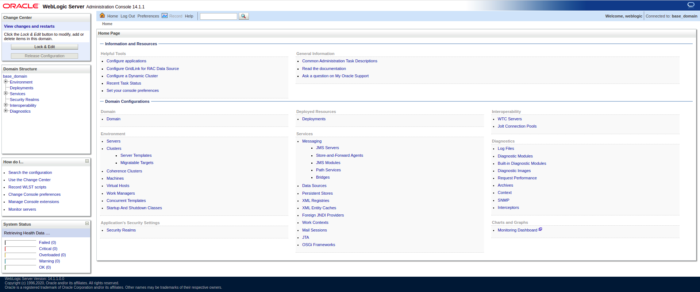
Successful login will give you this page
And you have successfully installed/configured & accessed the weblogic server
That’s it for today. Hope this article will help you to learn a new thing. Share with your friends & if you have any queries let me know in the comment section. Good Day !