
Introduction
It is a common requirement to be able to combine network interfaces into a logical interface to achieve better redundancy and possibly higher throughput. There are two methods to achieve this: NIC Teams and Network Bonding.
NIC Teams works as a form of load-balancer with failover where you have sort of these two pipes that act as one. So if one of them fails, the other one can still handle the traffic. This way, the end user doesn’t experience any downtime. However, configuring network teams doesn’t really guarantee better network throughput. So, if you configure a team from two 1 GB adapters, youwon’t get a 2 GB throughput.
It is in this context that the utility of using a network bond shines. By configuring a network bond, we can potentially get the 2 GB (just an example) of throughput that I mentioned previously. But there’s a slight catch: you need also to have suitable hardware (interfaces, switches, etc.) in order to utilise every feature that network bonds provide. In any case, knowing your way around getting at least some form of a network bond working shall be a useful skill to
learn.
Configuring a network bond
I am going to use the nmcli tool here in this article. Please refer to the link in the references below, if you wish to explore further.
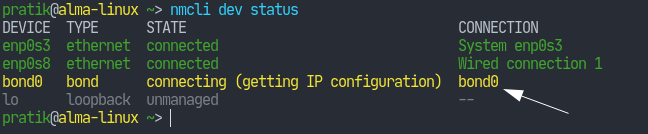
For my setup, I have a VM running Alma Linux which has been given two interfaces: enp0s3 and enp0s8; and I am going to bond them together into a single interface (which I have named here bond0).

So first let’s create a bond interface (# denotes root):
# nmcli connection add type bond con-name bond0 ifname bond0 bond.options "mode=active-backup"
And there’s our bond. Now, our bond requires ports which will basically just be our physical interfaces.
# nmcli connection add type ethernet slave-type bond con-name bond0-port0 ifname enp0s3 master bond0
# nmcli connection add type ethernet slave-type bond con-name bond0-port1 ifname enp0s8 master bond0

Those commands created profiles for our interfaces and assigned them as slaves to the bond0 interface.
Now we can proceed to modify some settings for the bond0 interface. This is done by setting the ipv4.method property of the interface to manual and then configuring the required settings such as setting IP addresses, DNS settings, etc. However, I am just going to use DHCP for now.
# nmcli connection modify bond0 ipv4.method auto
By default, activating the bond0 interface will not activate the ports. We can enable this behaviour with:
# nmcli connection modify bond0 connection.autoconnect-slaves 1
Now we can activate the connection:
# nmcli connection up bond0

And we have successfully setup a bond!
We can also try detaching the slave-interfaces from the host and check if the bond still works. By the way, the status of the bond can also be read from/proc/net/bonding/bond0:
