
What is iSCSI?
iSCSI is a way of connecting storage devices over a network using TCP/IP. It can be used over a local area network (LAN), a wide area network (WAN), or the Internet.
iSCSI devices are disks, tapes, CDs, and other storage devices on another networked computer that you can connect to. Sometimes these storage devices are part of a network called a Storage Area Network (SAN).
If you want to work as a “SAN Device” on software level then you will use “iSCSI“
In the relationship between our computer and the storage device, our computer is called an initiator because it initiates the connection to the device, which is called a target.
What iSCSI provides?
iSCSI provides Remote Block or File Storage. Most data centers keep their storage in centralized SAN racks. iSCSI provides an inexpensive alternative to proprietary SAN hardware.
In iSCSI you will share the space over network without format the partition. And that space will show in the client machine as a physical drive. Then client will format that space locally and mount it locally.
iSCSI Component Terminology
initiator :
An iSCSI client, typically available as software but also implemented as iSCSI
HBAs. Initiators must be given unique names (see IQN).
target :
An iSCSI storage resource, configured for connection from an iSCSI server. Targets must be given unique names (see IQN). A target provides one or more numbered block devices called logical units (see LUN). An iSCSI server can provide many targets concurrently.
ACL :
An Access Control List (entry), an access restriction using the node IQN (commonly the iSCSI Initiator Name) to validate access permissions for an initiator.
Discovery :
Querying a target server to list configured targets. Target use requires an additional access steps (see login).
IQN :
An iSCSI Qualified Name, a worldwide unique name used to identify both
initiators and targets, in the mandated naming format:
iqn . YYYY- MM . com . reversed . domain [ : optional_string ]
iqn – Signifying that this name will use a domain as its identifier.
YYYY-MM – The first month in which the domain name was owned.
com . reversed . domain – The reversed domain name of the organization creating this iSCSI name.
optional_string-An optional, colon-prefixed string assigned by the domain owner as desired while remaining worldwide unique. It may include colons to separate organization boundaries.
login :
Authenticating to a target or LUN to begin client block device use.
LUN :
A Logical Unit Number, numbered block devices attached to and available through a target. One or more LUNs may be attached to a single target, although typically a target provides only one LUN.
node :
Any iSCSI initiator or iSCSI target, identified by its IQN.
Portal :
An IP address and port on a target or initiator used to establish connections.
Some iSCSI implementations use portal and node interchangeably.
TGP :
Target Portal Group, the set of interface IP addresses and TCP ports to which
a specific iSCSI target will listen. Target configuration (e.g., ACLs) can be added to the TPG to coordinate settings for multiple LUNs.
Target server configuration
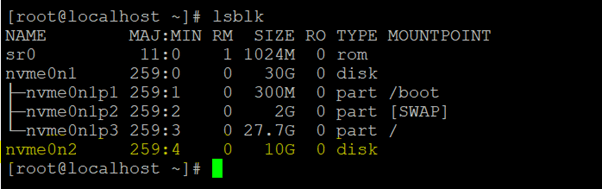
Check available disk to share as block storage
First we need to run lsblk command to check available drives. As the available drive is showing in below picture.
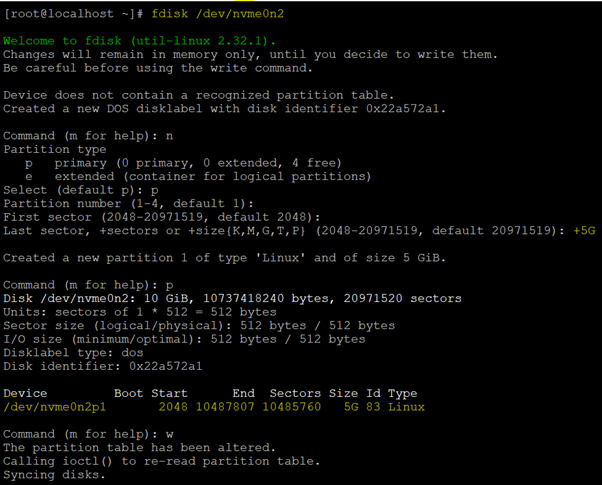
We will run command # fdisk /dev/nvme0n2 Now create the partition. we will not format this partition. because we will share this raw partition over network by using SCSI.
For example here we have created 5GB partition. To share as a block storage.
Installing Targetcli
1. Now the block storage is ready to share, we will start configuring target server now.
# yum install targetcli -yOutput
[root@localhost ~]# yum install targetcli -y
Package targetcli-2.1.fb49-1.el8.noarch is already installed.
Dependencies resolved.
Nothing to do.2. Run command targetcli with no options to enter interactive mode. then run ls command on interactive mode.
# targetcli
/>ls
3. Now go to />backstores/block and create block storage object named as mydisk1 by using disk partition /dev/nvme0n2p1. object name is optional you can choose any name. Then again run ls command to check the created object.

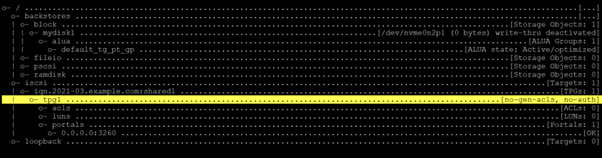
4. Now we will give it a share_name. The share_name is nothing but an iqn name that we have already discussed above. here iqn is (iscsi qualified name) and shared1 is share name by which we will share this storage.
/>iscsi create iqn.2021-03.example.com:shared1When we run above command it will create TPG1(Target Portal Group).

We can share multiple devices with the single share_name. Any device or storage shared over network by using SAN or SCSI is known as “LUN” in technical language (Logical Unit Number).
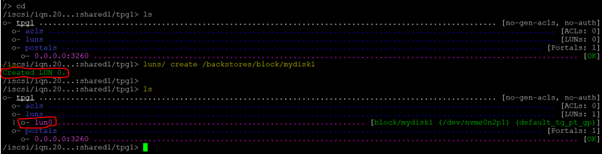
5. Now we run command />cd after that we will use down key and come to “tpg1” then press enter.
/> cd
Creating LUN
6. When we enter in tgp1 after that we will create LUN. As command:
/iscsi/iqn.20...:shared1/tpg1> luns/ create /backstores/block/mydisk1After this again run ls command to confirm that lun0 has been created.
7. Still inside the TPG, create a portal configuration to designate the listening IP address and ports. Now Create a portal by using the system’s public network interface. Here no need to specify a TCP port to use, the portal creation will default use the standard port (3260).

*******************************************************************
NOTE :
It may be possible that you will face one error during creating the portal as “Could not create NetworkPortal in configFS“. This is because, it’s created a default portal listening on all interfaces. So we need to remove that configuration first by command:
/iscsi/iqn.20...:shared1/tpg1> portals/ delete 0.0.0.0 3260
*******************************************************************
8. Now any client can access this storage by using above IP and port number.
But if you want to bind this with a particular client and no one can access this. For this you will use ACL’s. as-
/iscsi/iqn.20...:shared1/tpg1> acls/ create iqn.2021-03.example.com:server1Here server1 is used for identification of the client system name for which we are sharing this storage.

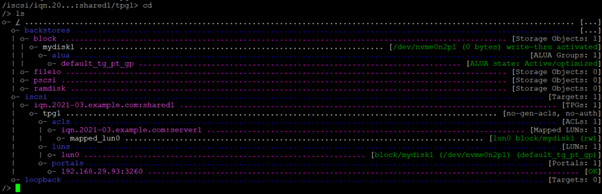
9. Now by using command ls you will see that a new line is added as-

10. Now only those clients can access this storage with whom you’ll share this ACL name.
iqn.2021-03.example.com:server111. Run /> cd command then go to “/” and view the entire configuration, then exit targetcli. targetcli will automatically save upon exit. The resulting persistent configuration file is stored in JavaScript Object Notation (JSON) format.
12. After getting exit from targetcli terminal you need to run the following commands:
# systemctl enable target
# systemctl start target
# firewall-cmd permanent --add-port=3260/tcp
# firewall-cmd --reload
Here target server configuration has been finished.
iSCSI Initiator
Configuring an iSCSI client initiator requires installing the iscsi-initiator-utils package, which includes the iscsi and iscsid services and the /etc/iscsi/iscsid.conf and /etc/iscsi/initiatorname.iscsi configuration files.
1. Package required at client machine.
# yum install iscsi-initiator-utils2. Need to make ACL entry in the file /etc/iscsi/initiatorname.iscsi
vi /etc/iscsi/initiatorname.iscsi

InitiatorName=iqn.2021-03.example.com:server1

:wq!
3. Now you will restart the iscsi service. If you face any kind of error in this service then you can use iscsid.
# systemctl restart iscsi
or
# systemctl restart iscsid
4. If you want to check the iscsi disk then it will not show here. You need to see or list SCSI disks from client machine.
# iscsiadm -m discovery -t sendtargets -p 192.168.29.93:3260The above command will show the shared IQN name.
5. Now you need to login into SCSI disk by using below command.
# iscsiadm -m node -T iqn.2021-03.example.com:shared1 -p 192.168.29.93:3260Now you will run the command # lsblk. Then iSCSI device will show as a physical attached hard drive.
6. Now you will create partition on SCSI disk.
7. Now create a directory /storage then mount partition on it.
8. To mount permanently you need to use UUID.
# vi /etc/fstab
UUID="XXXXXXXXXX" /storage ext4  _netdev  0  0
Comments and suggestions below. Thank you