
Introduction
The cache is often the most critical piece of software for a web-based business.
Varnish Cache is a popular – and powerful – open source HTTP engine/reverse HTTP proxy used by more than 3.4 million websites.
Varnish Cache is an open-source caching HTTP reverse proxy that can help improve a web server’s performance.
In this guide, we will show you how to install Varnish Cache and use it.
So kindly follow the steps below:
Install Apache
- Install Apache HTTP server with command:
dnf install httpd -y- Change Apache port from 80 to 8080. just open httpd.conf and change it.
vim /etc/httpd/conf/httpd.confThe line should be like that :
Listen 8080- Start and enable apache
systemctl start httpd.service
systemctl enable httpd.service
Configure Firewall settings
- Just edit the firewall to allow traffic on port 80
firewall-cmd --zone=public --add-service=http --permanent
firewall-cmd --reload
Check Apache configurations
- Touch a file called unixcop.html
touch /var/www/html/unixcop.html- Use curl to test the server at port 8080.
[root@unixcop ~]# curl -I http://localhost:8080/unixcop.html
HTTP/1.1 200 OK
Date: Wed, 29 Sep 2021 14:59:19 GMT
Server: Apache/2.4.37 (centos)
Last-Modified: Wed, 29 Sep 2021 14:58:59 GMT
ETag: "0-5cd2391f65f14"
Accept-Ranges: bytes
Content-Type: text/html; charset=UTF-8
[root@unixcop ~]#
Install Varnish cache
- Download the EPEL-Release repository.
dnf install epel-release -y- Add the Varnish Cache repo. Open /etc/yum.repos.d/varnish.repo with vim.
vim /etc/yum.repos.d/varnish.repo- Then add the following.
[varnish]
name=varnishcache_varnish
baseurl=https://packagecloud.io/varnishcache/varnish60lts/el/8/x86_64
repo_gpgcheck=1
gpgcheck=0
enabled=1
gpgkey=https://packagecloud.io/varnishcache/varnish60lts/gpgkey
sslverify=1
sslcacert=/etc/pki/tls/certs/ca-bundle.crt
metadata_expire=300- Update the dnf cache for the Varnish repo.
[root@unixcop ~]# dnf -q makecache -y --disablerepo='*' --enablerepo='varnish'
Importing GPG key 0xA750EDCD:
 Userid     : "https://packagecloud.io/varnishcache/varnish60lts (https://packagecloud.io/docs#gpg_signing) <[email protected]>"
 Fingerprint: 48D8 1A24 CB04 56F5 D594 31D9 4CFC FD6B A750 EDCD
 From       : https://packagecloud.io/varnishcache/varnish60lts/gpgkey
[root@unixcop ~]# - Install Varnish cache.
dnf install varnish -y - Verify that Varnish is installed.
[root@unixcop ~]# varnishd -V
varnishd (varnish-6.0.6 revision 29a1a8243dbef3d973aec28dc90403188c1dc8e7)
Copyright (c) 2006 Verdens Gang AS
Copyright (c) 2006-2019 Varnish Software AS
[root@unixcop ~]#- Enable Varnish at system after reboot.
systemctl enable --now varnish- The default port of varnish is 6081. So edit varnish.service then replace it with port 80.
vim /usr/lib/systemd/system/varnish.serviceYou have to edit the ExecStart and replace the port. The line should like like it is shown in the screenshot.
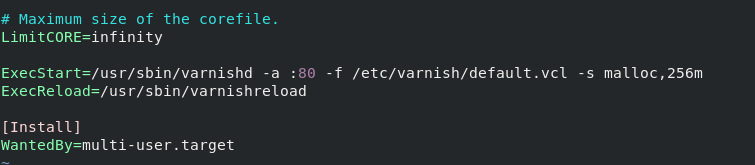
- Restart Varnish.
systemctl restart varnishTest Varnish
- Also use curl to test varnish.
curl -I http://localhost/unixcop.htmlThe output should appear like that.
The X-Varnish: 2 and Via: 1.1 varnish (Varnish/6.0) when Varnish Cache is running.
[root@unixcop ~]# curl -I http://localhost/unixcop.html
HTTP/1.1 200 OK
Date: Wed, 29 Sep 2021 15:08:35 GMT
Server: Apache/2.4.37 (centos)
Last-Modified: Wed, 29 Sep 2021 14:58:59 GMT
ETag: "0-5cd2391f65f14"
Content-Length: 0
Content-Type: text/html; charset=UTF-8
X-Varnish: 2
Age: 0
Via: 1.1 varnish (Varnish/6.0)
Accept-Ranges: bytes
Connection: keep-alive

[root@unixcop ~]#
Make sure that everything is OK
- So Check the ports to verify which process is listening on which port using ss as shown below:
ss -lnpt | grep 80
You may notice that varnishd is listening on port 80 and httpd is on port 8080 as shown in screenshot above.
Test varnish from another server
- You have to use curl to test varnish and provide the server IP that varnish is running on.
[qadry@rhel-pc ~]$ curl -I http://192.168.13.135/unixcop.html
HTTP/1.1 200 OK
Date: Wed, 29 Sep 2021 15:11:26 GMT
Server: Apache/2.4.37 (centos)
Last-Modified: Wed, 29 Sep 2021 14:58:59 GMT
ETag: "0-5cd2391f65f14"
Content-Length: 0
Content-Type: text/html; charset=UTF-8
X-Varnish: 5
Age: 0
Via: 1.1 varnish (Varnish/6.0)
Accept-Ranges: bytes
Connection: keep-alive

[qadry@rhel-pc ~]$
Conclusion
So that’s all..
We illustrated how to install and use varnish cache that can help improve a web server’s performance.
Thank you !!