
Thanks to this post, you will learn how to install Kimai in Linux.
Introduction
Kimai is a Free Time-Tracking App (open-source), With Kimai, the boring process of feeding Excel spreadsheets with your working hours is not only simplified, it also offers dozens of other exciting features that you don’t even know you’re missing so far!
Kimai does not have to run while recording, you can even quit your browser. Your time is still recording until you stop it from any web browser that has access to your installation. It is designed to hold lots of users, but you can also use it for a single user if you want to.
Feature list
The following list is about the features which Kimai offers.
| NAME | DESCRIPTION |
|---|---|
| Mobile ready | The layout is fully responsive, based on bootstrap and made for desktop and mobile usage. |
| Plugins | Kimai was built with extendability in mind, the feature set can be extended with plugins. |
| Multi user | Kimai can be used by as many users as you want: each installation supports unlimited users with different roles (see permissions). |
| Multi language | Kimai can be localized to any language and is already translated to Arabic, Basque, Chinese, Croatian, Czech, Danish, Dutch, English, Esperanto, Finnish, French, German (including Austrian and Swiss), Greek, Hebrew, Hungarian, Italian, Japanse, Korean, Polish, Portuguese (Brazilian), Romanian, Russian, Slovakian, Spanish, Swedish, Turkish and Vietnamese. Feel free to send your self-made language files or contributing to the weblate project below – we’re looking for translators and would appreciate your support! |
| Teams | Teams can be created to group your users into logical groups like departments or project related peer-groups. Customers and projects can be assigned to those teams, which will limit visibility and access for other users. |
| Customers | Manage your customers and set address, contacts, country, currency, visibility (for archiving) and many more fields. |
| Projects | Manage projects for each customer with order number, budget and visibility (for archiving). |
| Activities | Activities (or tasks) are used to assign the unit of work to timesheet entries. Manage activities for each project with order number, budget and visibility (for archiving). Activities can also be global, no more duplications necessary if your projects share the same working unit! |
| Invoicing | Different templates, calculator, invoice number generator and you can add your own templates, in the file formats: XLSX, ODS, CSV, DOCX. |
| Export data | Timesheet data can be exported for usage in other programs or for sharing them with different departments in the formats: XLSX (Excel), PDF, CSV and HTML. On top of that, exported records can be locked and protected against further changes. |
| Expenses | Keep track of your expenses based on customer, project and activity. These spendings can be categorized and included in your invoices. Please note: Expense tracking is available as paid plugin only. |
| SAML | Login and register users via SAML (Single sign on aka SSO) and re-use your existing identity provider, like Google app (G-Suite) or Azure active directory. |
| JSON API | Featuring a JSON API so external apps can communicate with your favorite time-tracker! |
| LDAP | Connect your companies directory server (LDAP or Active directory) to Kimai and use your existing authentication infrastructure. |
| Statistics | Your dashboard will show you several statistics about recorded times and the amount of collected data. And we can always add more charts! |
| Docker | The release includes a docker image for development and there is a separate docker-compose setup for production available. |
| Migration | Data from Kimai v1 can be imported, for a seamless migration of your time-tracker. |
| Limit records | You can record as many times as you want in parallel, but you can also config the allowed limit of active records down to 1. |
| AM/PM format | Kimai uses localized version of the 24 hour format. But if you are used to the am/pm format, you can configure that. |
| Duration only | If your local laws require you to only show durations instead of start and end date-time, you can activate that mode globally. |
| Time-clock | Don’t want your users to log arbitrary timesheet records? Switch to the time-clock mode, which only allows “punch in” and “punch out” records. No more manually given start and end times. |
| Rate calculation | Rates can be calculated based on hourly and fixed amounts, configurable for customers, projects, activities and each timesheet record individually. |
| Timesheet filter | You can filter all time-records by user, customer, project, activity and date. |
| Weekend rates | You can configure global settings for rate factors on single weekdays, e.g. 150% for saturday and sunday. |
| Archiving | Long term users know that old data can pile up in your dropdowns – don’t worry: you can hide them by limiting the visibility of customers, projects and activities. |
| Permissions | Customizable permission structure. Assign different roles to your user, e.g. users can record times, teamleads can print invoices and configure project/activities, admins can configure users and customers. |
| User profile | Personal statistics and per user settings for hourly rate, Kimai theme, password and avatar. |
| Theming | Kimai bundles different color themes and display settings, so every user can tweak it to his personal flavour |
| User registration | Kimai supports user self-registration with email activation. |
| Password reset | Forgot your password? No problem, Kimai got you covered with an password reset functionality via email. |
| Up-to-date | Based on newest web technologies and frameworks: PHP7, Symfony 4, Doctrine, Flex, Bootstrap, Webpack and many more… |
So in this article, we will illustrate how to install and use kimai in Ubuntu 20.04
install Kimai on Linux
Just follow the steps below to get start with kimai.
- Update, prepare your server and install important utilities.
sudo apt update && sudo apt upgrade
sudo apt install git curl vim- Install and setup database, we will install mariadb server, so just run the command below.
apt install mariadb-server- Start and enable mariadb service.
systemctl start mariadb
systemctl enable mariadb- Activate and secure the installation for mariadb with the command below:
mysql_secure_installation- The next step is to create a database and user for Kimai.
mysql -u root -p- Create Database and user for Kimai
CREATE DATABASE kimai_db;
CREATE USER 'kimai_usr'@'localhost' IDENTIFIED BY 'unixcopPassword';
GRANT ALL PRIVILEGES ON kimai_db . * TO 'kimai_usr'@'localhost';
FLUSH PRIVILEGES;
\q- Install and configure a webserver for kimai.
apt install nginx php-fpm- Start and enable ngin webserver.
systemctl start nginx
systemctl enable nginx- Add the recommended PHP Settings
vim /etc/php/7.4/fpm/php.ini- Then edit the below values
memory_limit = 512M
date.timezone = Africa/Cairo- Install all required php extensions
sudo apt install -y php-intl php-gd php-bcmath php-fpm php-json php-curl php-cli php-curl php-xml php-pear php-common php-mysql php-zip php-gd php-mbstring - Install composer which installs PHP dependencies that a project requires.
curl -sS https://getcomposer.org/installer -o composer-setup.php
sudo php composer-setup.php --version=1.10.17 --install-dir=/usr/local/bin --filename=composer
- Install kiami from Git
cd /var/www/html/
sudo git clone -b 1.11.1 --depth 1 https://github.com/kevinpapst/kimai2.git
cd kimai2/
sudo composer install --no-dev --optimize-autoloader- Configure the database connection in the .env file by setting the username, password and database we configured before
sudo vim /var/www/html/kimai2/.env- Then edit the URL of the database and hash the sqlite line as follows:
DATABASE_URL=mysql://kimai_usr:[email protected]:3306/kimai_db
#DATABASE_URL=sqlite:///%kernel.project_dir%/var/data/kimai.sqlite- Run the Kimai installer
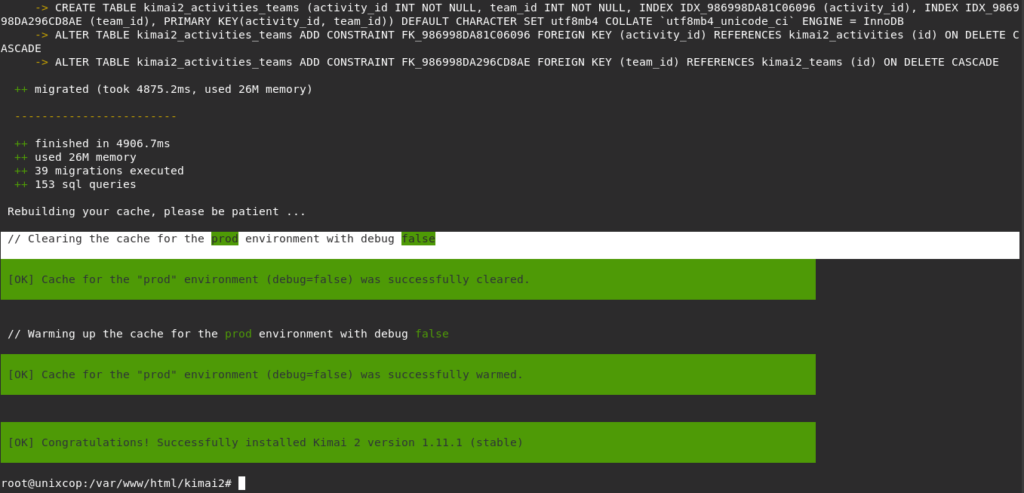
cd /var/www/html/kimai2
bin/console kimai:install -n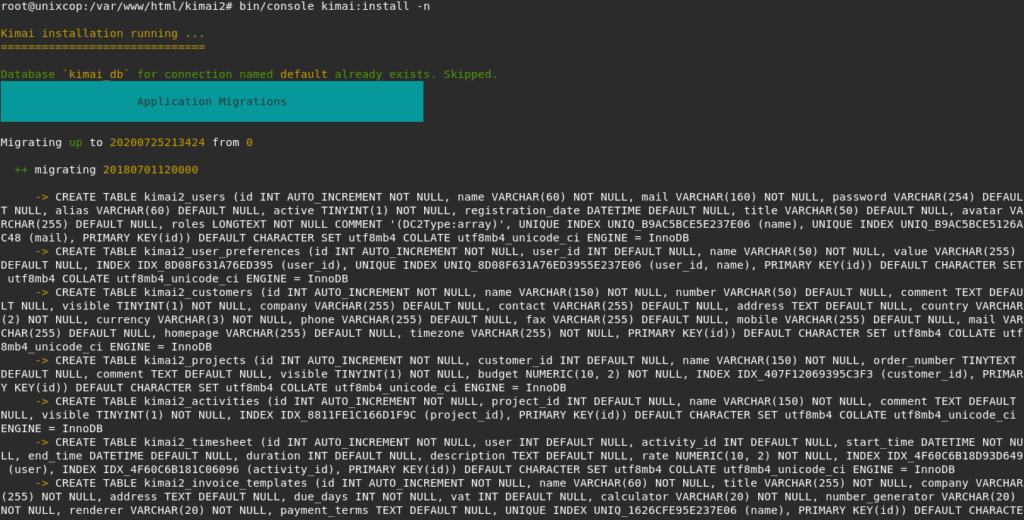
- Create your first user. and make sure its password is more than 8 characters.
sudo bin/console kimai:create-user username admin@unixcop ROLE_SUPER_ADMIN
- Next step is to generate Self-signed SSL/TLS certificates
Once Kimai installer is done, we will generate SSL/TLS certificates for Nginx SSL connection and create Nginx configuration file to define Kimai’s settings. This is just to make things a bit secure.
sudo mkdir /etc/ssl/private
sudo openssl req -x509 -nodes -days 365 -newkey rsa:2048 -keyout /etc/ssl/private/kimai-selfsigned.key -out /etc/ssl/certs/kimai-selfsigned.crt
Once it is done we will next generate Deffie-Hellman group as follows. It will take some time to complete.
sudo openssl dhparam -out /etc/ssl/certs/dhparam.pem 2048Then set the value of types_hash_max_size to 4096 in Nginx configuration file.
sudo sed -i 's/types_hash_max_size 2048/types_hash_max_size 4096/' /etc/nginx/nginx.conf- Now we will configure nginx file for kimai.
cd /etc/nginx/sites-enabled/
sudo mv default /tmp- Create a new file and add the details shown below. If you have an FQDN, replace unixcop.com with it.
sudo vim kimai.conf- Then add the following:
server {
    listen 80;
    server_name kimai.unixcop.com;
    return 301 https://$host$request_uri;
}
server {
    listen 443 ssl;
    server_name kimai.unixcop.com;

    root /var/www/html/kimai2/public/;
    index index.php index.htm index.nginx-debian.html;

        ssl_certificate /etc/ssl/certs/kimai-selfsigned.crt;
    ssl_certificate_key /etc/ssl/private/kimai-selfsigned.key;

    ssl_protocols TLSv1.2 TLSv1.3;
    ssl_prefer_server_ciphers on;
    ssl_dhparam /etc/ssl/certs/dhparam.pem;
    ssl_ciphers ECDHE-RSA-AES256-GCM-SHA512:DHE-RSA-AES256-GCM-SHA512:ECDHE-RSA-AES256-GCM-SHA384:DHE-RSA-AES256-GCM-SHA384:ECDHE-RSA-AES256-SHA384;
    ssl_ecdh_curve secp384r1;
    ssl_session_timeout  10m;
    ssl_session_cache shared:SSL:10m;
    resolver 8.8.8.8 valid=300s;
    resolver_timeout 5s;
    add_header Strict-Transport-Security "max-age=63072000; includeSubDomains; preload";
    add_header X-Frame-Options DENY;
    add_header X-Content-Type-Options nosniff;
    add_header X-XSS-Protection "1; mode=block";

    location ~ /\.ht {
        deny all;
    }
    location / {
                try_files $uri /index.php$is_args$args;
    }

        location ~ ^/index\.php(/|$) {
        fastcgi_pass unix:/run/php/php7.4-fpm.sock;
        fastcgi_index index.php;
        fastcgi_read_timeout 240;
        fastcgi_param SCRIPT_FILENAME $document_root$fastcgi_script_name;
        include fastcgi_params;
        fastcgi_split_path_info ^(.+.php)(/.+)$;
        }
    location ~ \.php$ {
        return 404;
    }
}- Change Kimai’s files permissions
sudo chown -R www-data:www-data /var/www/html/kimai2/public/
sudo chmod -R g+rw /var/www/html/kimai2/var/
sudo chmod -R 755 /var/www/html/kimai2/public/
sudo chmod -R g+rw /var/www/html/kimai2/public/avatars/
sudo systemctl restart nginx php7.4-fpm- Allow ports 80 and 443 on the firewall
sudo ufw allow 80,443/tcpAccess Kimai Web Interface
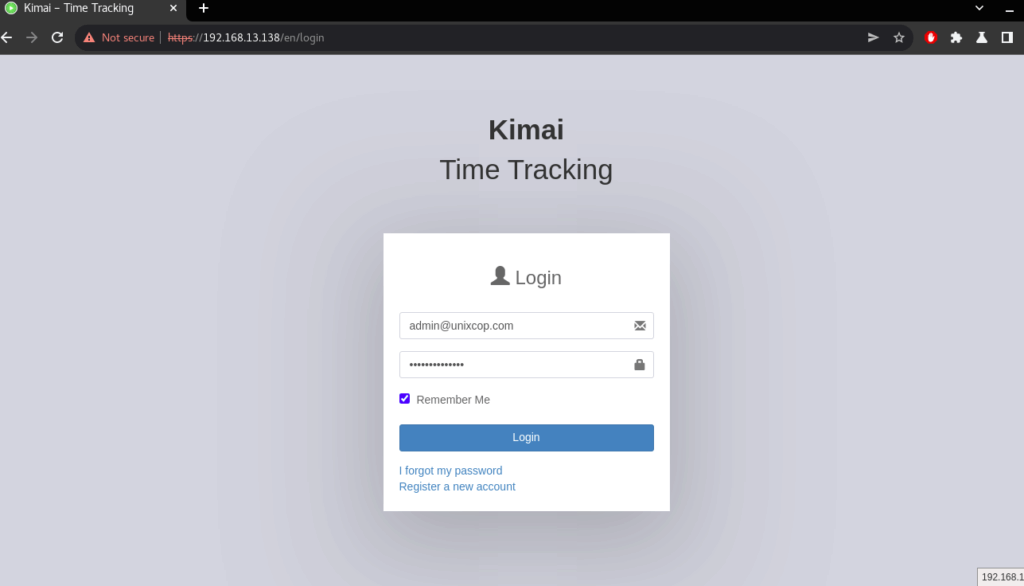
- Open your browser to the IP or domain name of the webserver serving the files. https://[ip-or-domain-name].
- Then Login with the user we created.
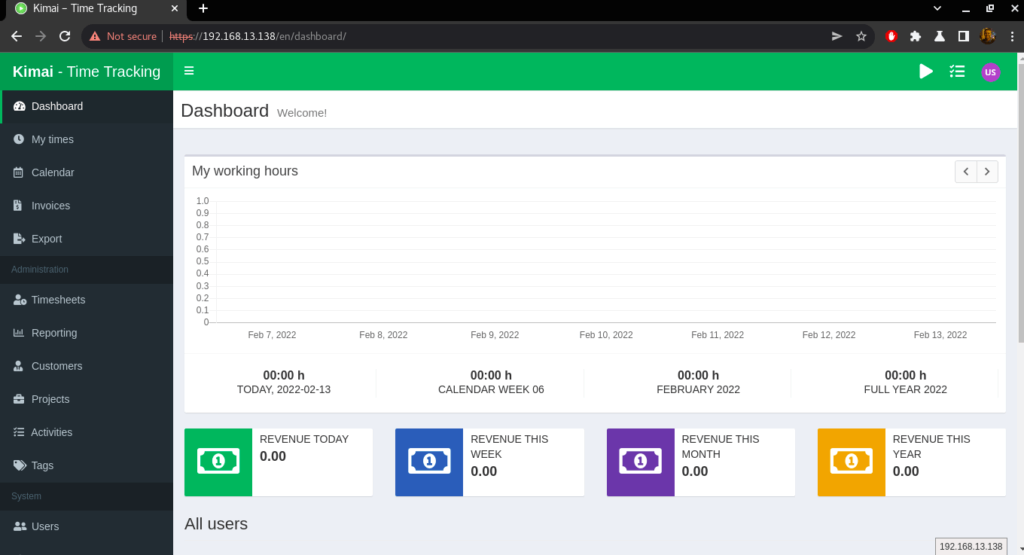
- Access the Dashboard.
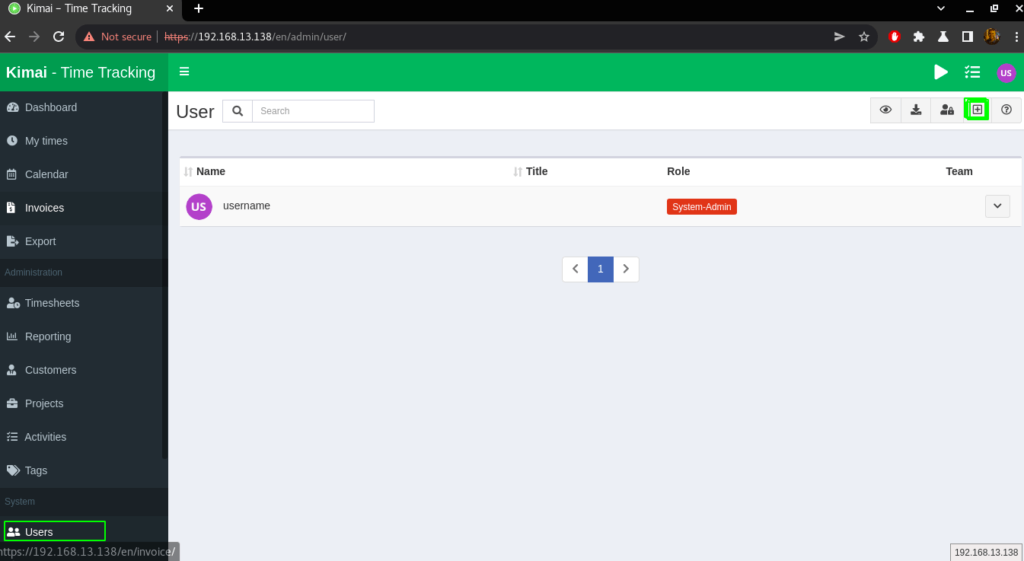
- To create a user, Navigate to the “Users” Tab on the Kimai dashboard and click on it. After that, click on the + to create a new user.
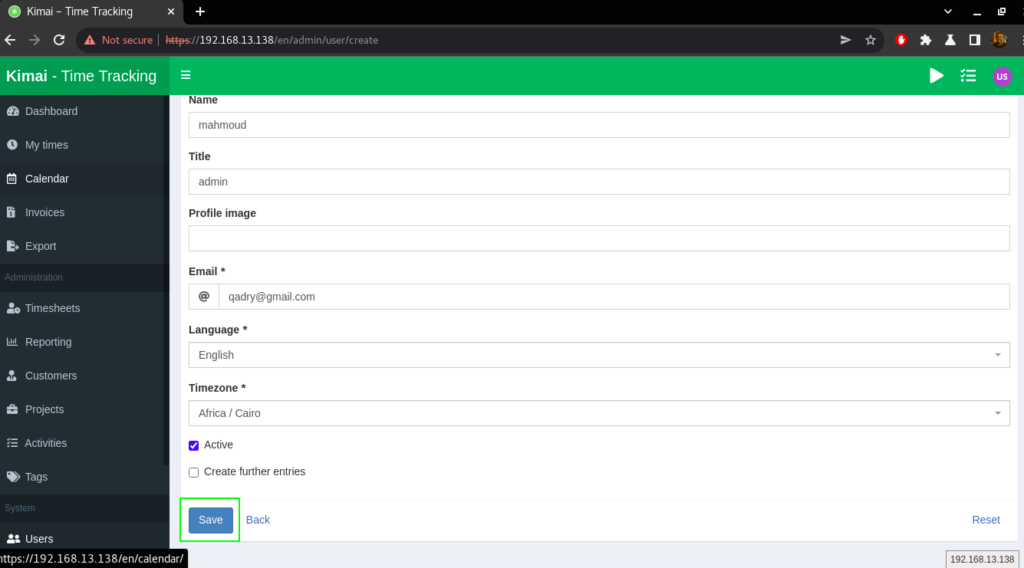
- Enter the details as shown below then click “Save” as shown above
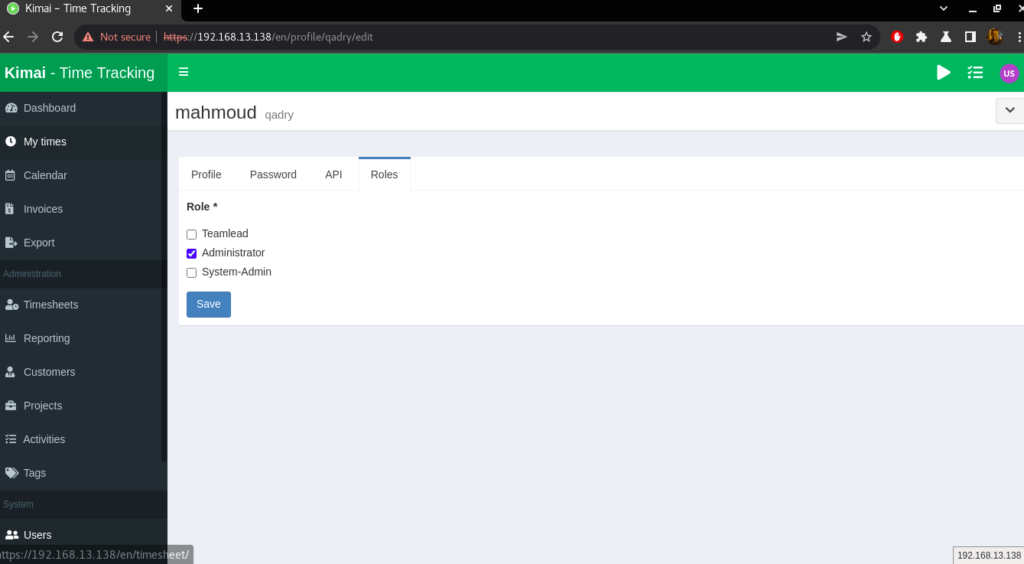
- After saving it, a new page will be presented where you can add “Roles” and the rest. Enter the right roles for the user. Do this for as many users as you have.
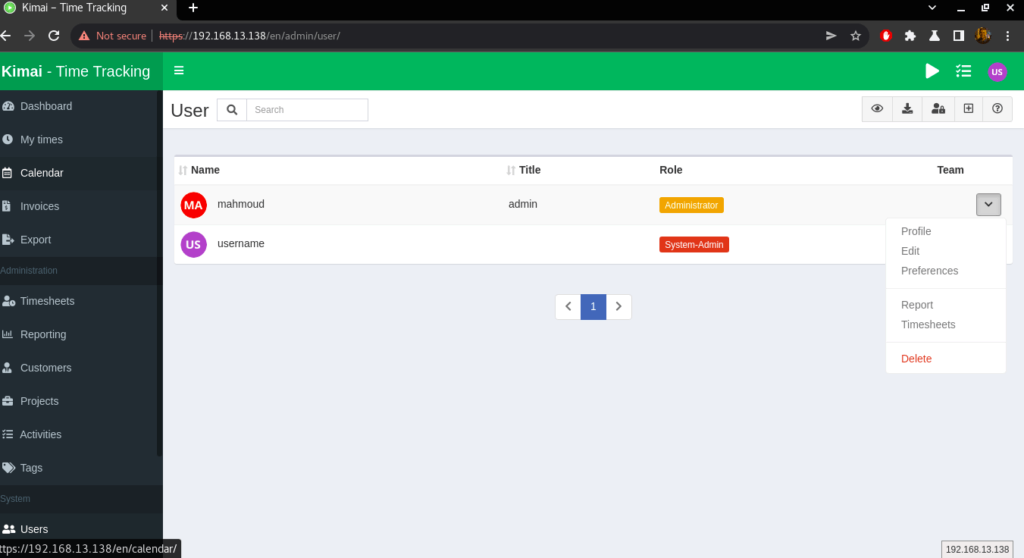
- Click on users again to verify that you created a user as shown below.
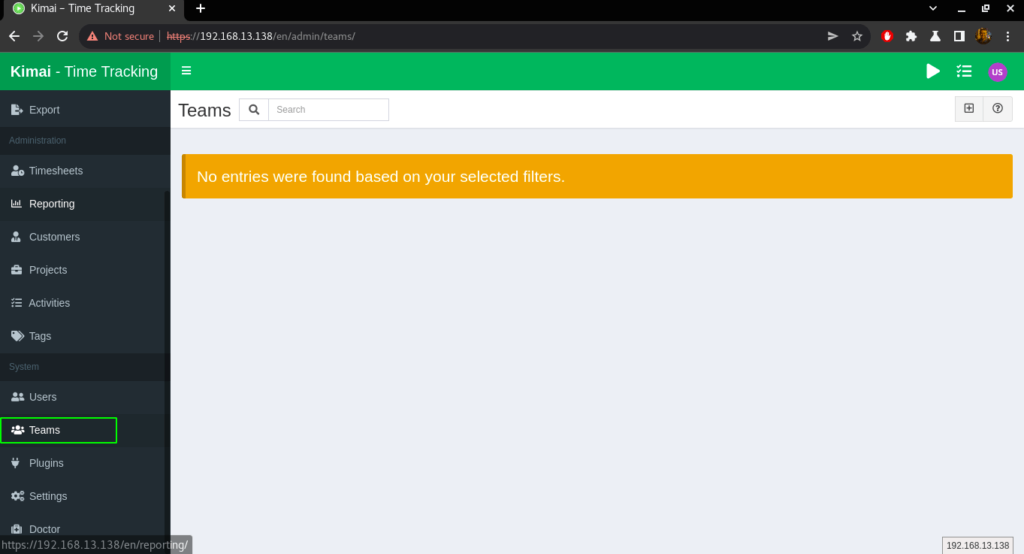
- To create a Team, Team creation is limited to the user roles System-Admin and Administrator. Navigate to the “Teams” Tab on the Kimai dashboard and click on it. Click on the + located at the top right to create a new team.
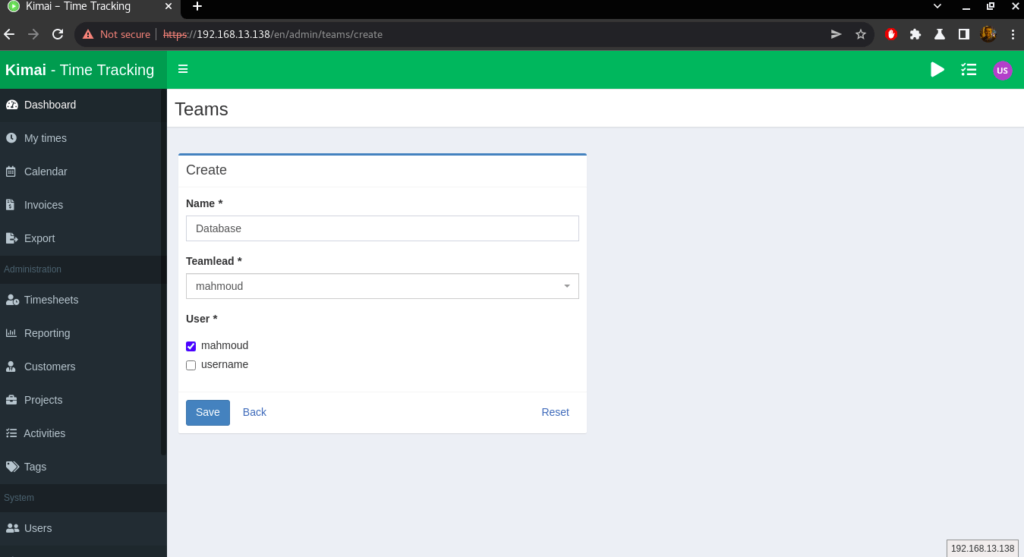
- Enter the details of the team you are creating.
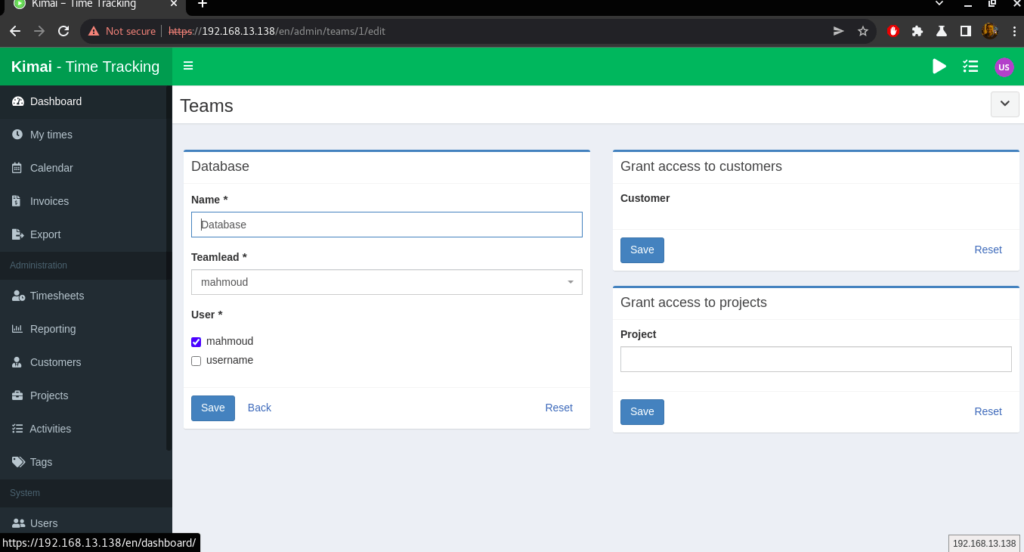
- Also you can add Projects, Activites and plugins.
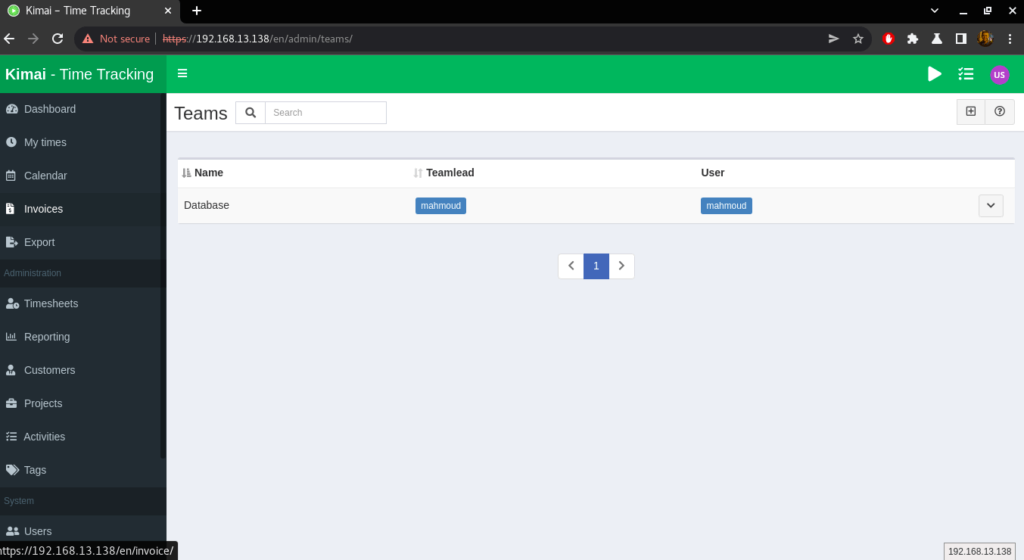
- Check that the team has been created by navigating to Teams
Conclusion
That’s it,
In this guide, we showed you how to install and use kimai on Ubuntu 20.04
Thanks