
Hello, friends. In this post, you will learn how to install Code Server on Ubuntu 22.04, so you will have your IDE in the cloud for your many projects. The procedure is simple, so let’s go for it.
What is Code Server?
As simple as this, in the GitHub profile of the tool you will find this definition
Run VS Code on any machine anywhere and access it in the browser.
And it is a web implementation of VS Code that you can install on a server and then access it from the web.
In this way, you can see that the possibilities are many because it can be implemented for educational purposes but also for personal or even business use.
One of the few disadvantages is that it only accepts one user, so it is quite personal, or at least for small work teams.
Let’s go.
Install Code Server on Ubuntu 22.04
Before you start, connect via SSH to the server and update it
sudo apt update
sudo apt upgrade
Then, you can create a folder where we will download Code Server so as not to confuse it with the rest of the system
mkdir ~/code
cd code
After this, you can download the latest stable version of the tool. First I recommend you to take a look at the GitHub profile to know which is the latest stable version which at the time of writing this post is 4.9.1.
wget https://github.com/coder/code-server/releases/download/v4.9.1/code-server-4.9.1-linux-amd64.tar.gz
--2023-01-05 19:07:43--  https://github.com/coder/code-server/releases/download/v4.9.1/code-server-4.9.1-linux-amd64.tar.gz
Resolving github.com (github.com)... 140.82.121.3
Connecting to github.com (github.com)|140.82.121.3|:443... connected.
HTTP request sent, awaiting response... 302 Found
Location: https://objects.githubusercontent.com/github-production-release-asset-2e65be/172953845/5de7a83c-6f16-4c39-847b-e5e7bb637510?X-Amz-Algorithm=AWS4-HMAC-SHA256&X-Amz-Credential=AKIAIWNJYAX4CSVEH53A%2F20230105%2Fus-east-1%2Fs3%2Faws4_request&X-Amz-Date=20230105T190743Z&X-Amz-Expires=300&X-Amz-Signature=c8ed3f6f9f50f47077420c0c6b40d1b4269a3571685b2818858bafaaa60876c1&X-Amz-SignedHeaders=host&actor_id=0&key_id=0&repo_id=172953845&response-content-disposition=attachment%3B%20filename%3Dcode-server-4.9.1-linux-amd64.tar.gz&response-content-type=application%2Foctet-stream [following]
--2023-01-05 19:07:43--  https://objects.githubusercontent.com/github-production-release-asset-2e65be/172953845/5de7a83c-6f16-4c39-847b-e5e7bb637510?X-Amz-Algorithm=AWS4-HMAC-SHA256&X-Amz-Credential=AKIAIWNJYAX4CSVEH53A%2F20230105%2Fus-east-1%2Fs3%2Faws4_request&X-Amz-Date=20230105T190743Z&X-Amz-Expires=300&X-Amz-Signature=c8ed3f6f9f50f47077420c0c6b40d1b4269a3571685b2818858bafaaa60876c1&X-Amz-SignedHeaders=host&actor_id=0&key_id=0&repo_id=172953845&response-content-disposition=attachment%3B%20filename%3Dcode-server-4.9.1-linux-amd64.tar.gz&response-content-type=application%2Foctet-stream
Resolving objects.githubusercontent.com (objects.githubusercontent.com)... 185.199.111.133, 185.199.108.133, 185.199.109.133, ...
Connecting to objects.githubusercontent.com (objects.githubusercontent.com)|185.199.111.133|:443... connected.
HTTP request sent, awaiting response... 200 OK
Length: 106765319 (102M) [application/octet-stream]
Saving to: ‘code-server-4.9.1-linux-amd64.tar.gz’

code-server-4.9.1-linux-amd64.tar 100%[============================================================>] 101.82M  22.0MB/s    in 4.6s

2023-01-05 19:07:48 (21.9 MB/s) - ‘code-server-4.9.1-linux-amd64.tar.gz’ saved [106765319/106765319]
Now decompress it
tar -xzvf code-server-4.9.1-linux-amd64.tar.gzThe next step is to copy the folder to another, more manageable and more easily named directory on the system.
sudo cp -r code-server-4.9.1-linux-amd64 /usr/lib/code-serverThen, make a symbolic link from the binary to a directory inside the PATH.
sudo ln -s /usr/lib/code-server/bin/code-server /usr/bin/code-serverThen create a folder for Code to store the necessary data in
sudo mkdir /var/lib/code-serverTo improve the way, Code will be handled, it is better to create a system service
sudo nano /lib/systemd/system/code-server.serviceThen, you can add the following content
[Unit]
Description=code-server
After=nginx.service

[Service]
Type=simple
Environment=PASSWORD=angelo123
ExecStart=/usr/bin/code-server --bind-addr 127.0.0.1:8080 --user-data-dir /var/lib/code-server --auth password
Restart=always

[Install]
WantedBy=multi-user.target
In the Environment line is where you define the IDE access password. You can change it to whatever you prefer.
While in the ExecStart line, you define the command and the execution parameters. It is here where you can change the port to use and the data directory.
Save the changes and close the editor, and now enable the new service.
sudo systemctl enable code-serverSample Output
Created symlink /etc/systemd/system/multi-user.target.wants/code-server.service → /lib/systemd/system/code-server.service.Now start it
sudo systemctl start code-serverNext, check the status of the service to see if everything is OK
sudo systemctl status code-server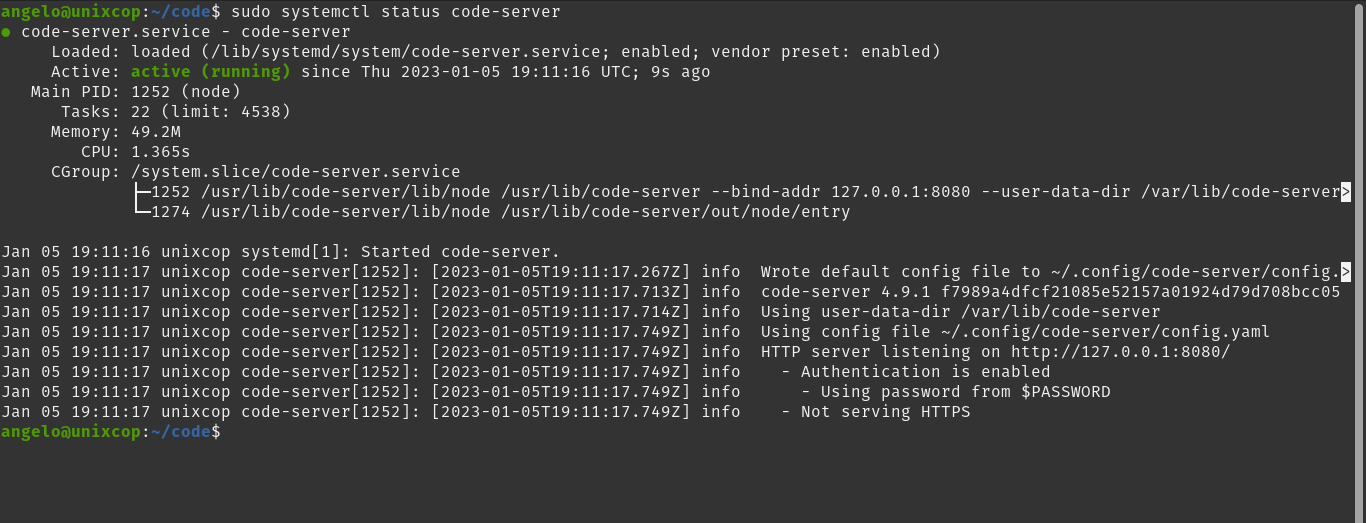
Optional: Configure Nginx as the reverse proxy
This is recommended so that you don’t have to use ports and IP addresses.
sudo apt install nginxNext, create a configuration file for this new site
sudo nano /etc/nginx/sites-available/code-server.confAnd add the following
server {
	listen 80;
	listen [::]:80;

	server_name ide.unixcop.com;

	location / {
	  proxy_pass http://localhost:8080/;
	  proxy_set_header Upgrade $http_upgrade;
	  proxy_set_header Connection upgrade;
	  proxy_set_header Accept-Encoding gzip;
	}
}
Remember to replace server_name with your domain name.
Save the changes and close the editor. Now check the syntax of the editor.
sudo nginx -tIf all goes well, you will see this output on the screen
nginx: the configuration file /etc/nginx/nginx.conf syntax is ok
nginx: configuration file /etc/nginx/nginx.conf test is successful
Enable the new site
sudo ln -s /etc/nginx/sites-available/code-server.conf /etc/nginx/sites-enabled/code-server.confAnd apply the changes by restarting Nginx
sudo systemctl restart nginxDone.
Access Code Server
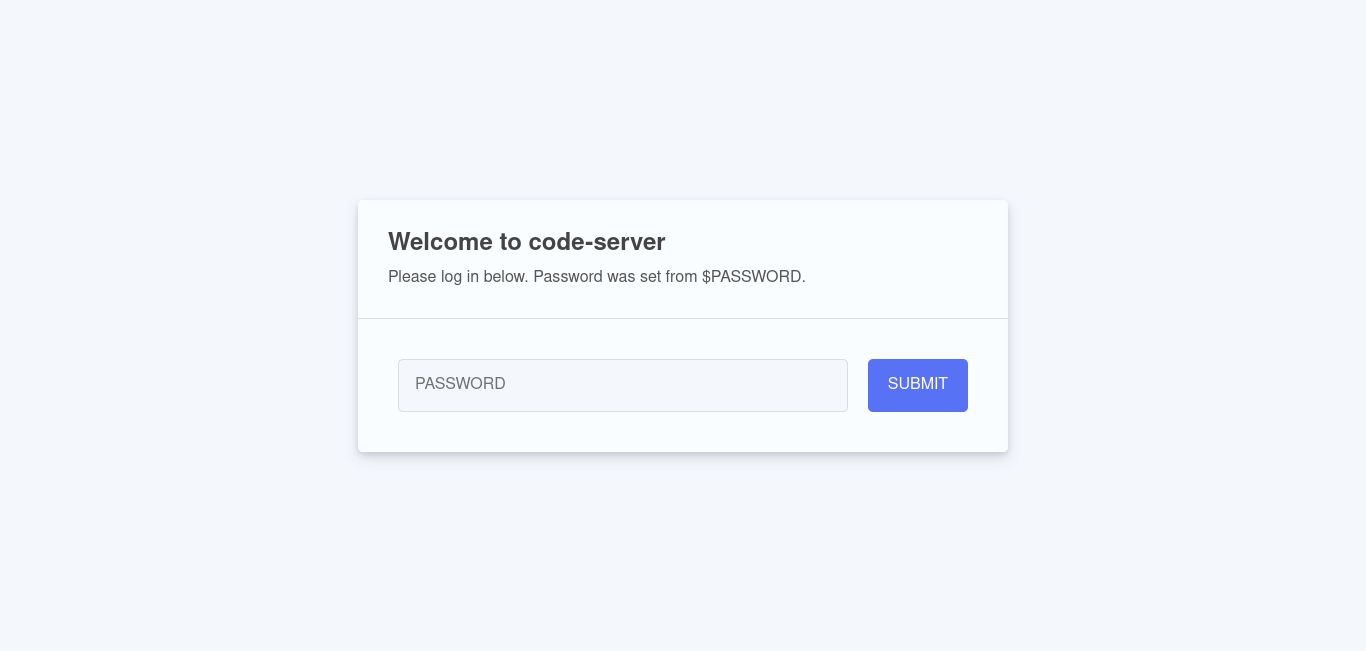
Now, you can access if you open the browser and type your-domain.
The first thing you will see is the login screen, where you will have to enter your password.
Then you will see the editor.
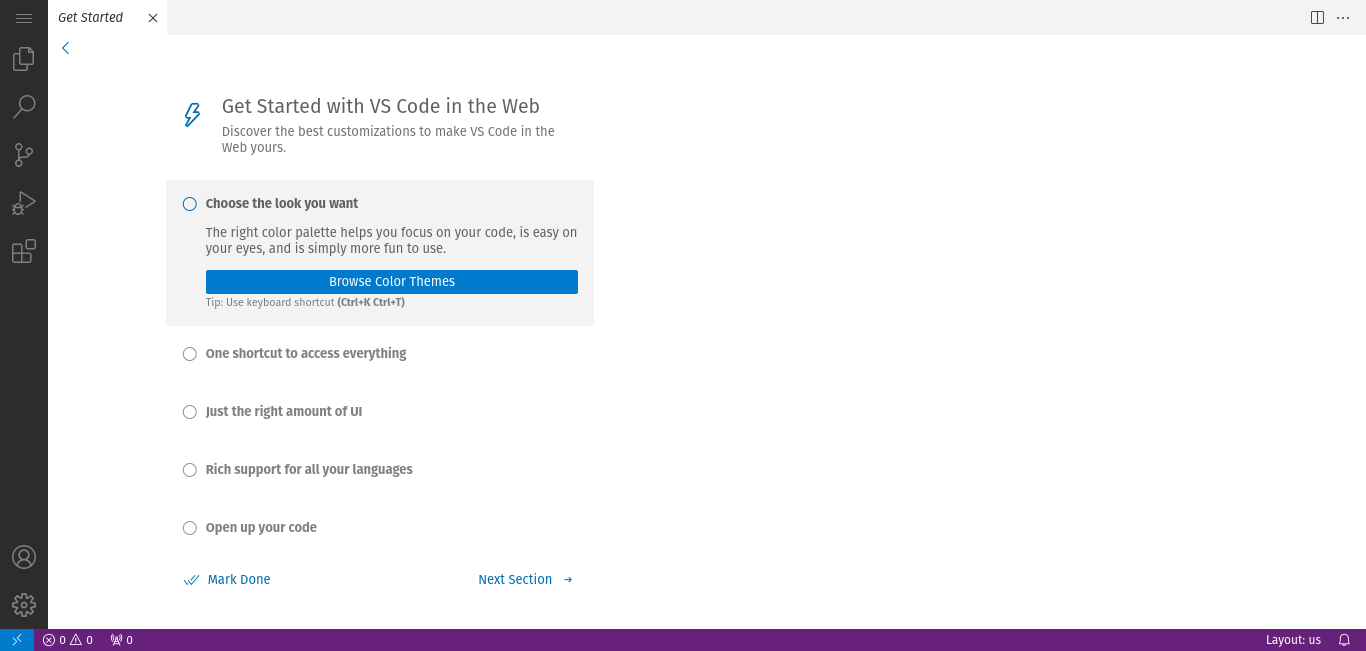
Enjoy it.
Conclusion
In this post, you learned how to have Code Server on your computer to use it remotely.