Today you will learn how to install Apache Hadoop on Ubuntu 22.04
Apache Hadoop is an open-source software which is used to store, manage and process large quantity and datasets for various big data computing applications running in a clustered based system. It is based on Java and uses HDFS (Hadoop Distributed File System) to store it’s data. Hadoop is designed to be deployed across a network of hundreds or more than 1000 of dedicated servers. They all together to deal and process the large quantity and variety of datasets.
Requirements :
- 16GB RAM or more (for SandBox Deployment)
- 16vCore or more CPU (The better CPU in this case should be a priority)
- 32GB or more Space (For Cluster)
Step 1 : Update your server
First step is to update your server which will update some important packages and important security releases for your distribution :
apt-get update-y
apt-get upgrade -y
Step 2 :Install OpenJDK
Hadoop Framework is based and written in Java, and it main services requires Java Runtime Environment (JRE) and JDK (Java Development Kit). Run the following command to install it :
apt install default-jdk
Now, We can verify our installation using the following command :
java –version

Step 3 : Install & Configuring Hadoop
Now, We have main required packages installed to continue the installation of Apache Hadoop :
First we will install OpenSSH server :
apt install openssh-server openssh-client -y
Now, We will create a passwordless user for Hadoop :
adduser hadoop
su – hadoop
Generating a SSH Keypair :
ssh-keygen -t rsa -P ” -f ~/.ssh/id_rsa

Now, We will store the public key as authorized_keys in SSH :
cat ~/.ssh/id_rsa.pub >> ~/.ssh/authorized_keys
chmod 0600 ~/.ssh/authorized_keys
Now, We will download the file from Hadoop (This is the latest version so far now :
wget https://downloads.apache.org/hadoop/common/hadoop-3.3.4/hadoop-3.3.4.tar.gz
Extract the downloaded file :
tar xzf hadoop-3.3.4.tar.gz
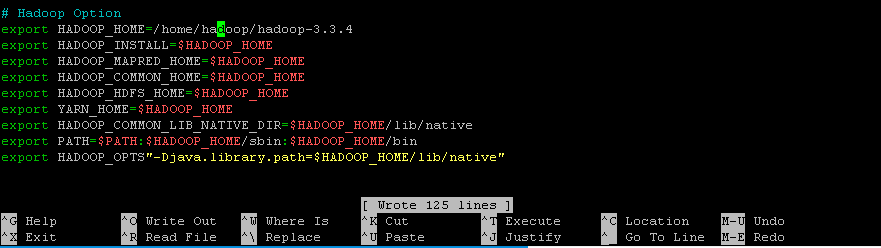
Now, We will configure the Enviroment Variables :
nano .bashrc
Paste the following content at the bottom of the file :
# Hadoop Option
export HADOOP_HOME=/home/hadoop/hadoop-3.3.4
export HADOOP_INSTALL=$HADOOP_HOME
export HADOOP_MAPRED_HOME=$HADOOP_HOME
export HADOOP_COMMON_HOME=$HADOOP_HOME
export HADOOP_HDFS_HOME=$HADOOP_HOME
export YARN_HOME=$HADOOP_HOME
export HADOOP_COMMON_LIB_NATIVE_DIR=$HADOOP_HOME/lib/native
export PATH=$PATH:$HADOOP_HOME/sbin:$HADOOP_HOME/bin
export HADOOP_OPTS”-Djava.library.path=$HADOOP_HOME/lib/native”
Apply the changes by running the following command :
source ~/.bashrc
nano $HADOOP_HOME/etc/hadoop/hadoop-env.sh
Remove the # from the following line :
export JAVA_HOME=/usr/lib/jvm/java-11-openjdk-amd64
Create a symlink :
readlink -f /usr/bin/javac
Edit the core-site.xml and paste the following content :
nano $HADOOP_HOME/etc/hadoop/core-site.xml
<configuration>
<property>
<name>hadoop.tmp.dir
</name>
<value>/home/hadoop/tmpdata
</value> </property>
<property>
<name>fs.default.name
</name>
<value>hdfs://127.0.0.1:9000</value>
</property>
</configuration>

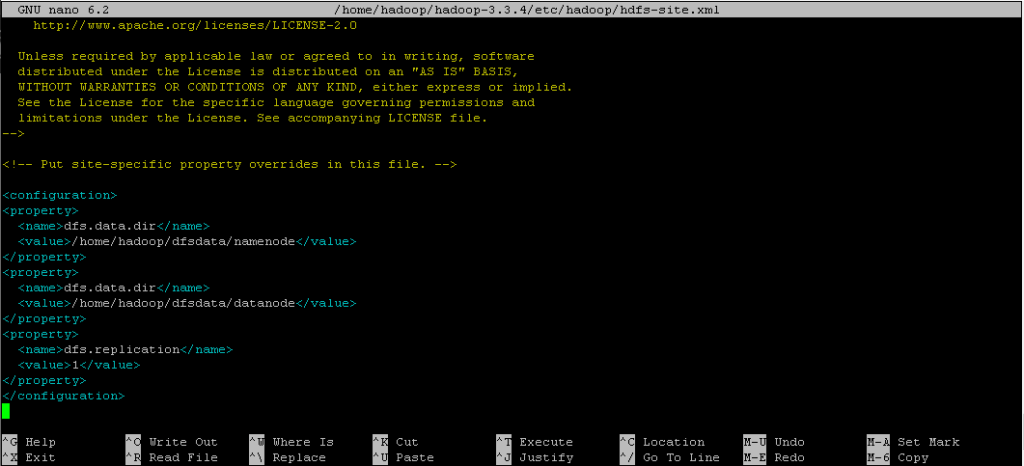
Edit hdfs-site.xml :
nano $HADOOP_HOME/etc/hadoop/hdfs-site.xml
Paste the following content :
<configuration>
<property>
<name>dfs.data.dir
</name> <value>
/home/hadoop/dfsdata/namenode
</value> </property>
<property>
<name>dfs.data.dir
</name> <value>/home/hadoop/dfsdata/datanode
</value> </property> <property>
<name>dfs.replication
</name> <value>1
</value>
</property>
</configuration>
Edit mapred-site.xml :
nano $HADOOP_HOME/etc/hadoop/mapred-site.xml
Paste the following content :
<configuration>
<property>
<name>mapreduce.framework.name</name>
<value>yarn</value>
</property>
</configuration>
Edit yarn-site.xml :
nano $HADOOP_HOME/etc/hadoop/yarn-site.xml
Paste the following content :
<configuration> <property> <name>yarn.nodemanager.aux-services</name> <value>mapreduce_shuffle</value> </property> <property> <name>yarn.nodemanager.aux-services.mapreduce.shuffle.class</name> <value>org.apache.hadoop.mapred.ShuffleHandler</value> </property> <property> <name>yarn.resourcemanager.hostname</name> <value>127.0.0.1</value> </property> <property> <name>yarn.acl.enable</name> <value>0</value> </property> <property> <name>yarn.nodemanager.env-whitelist</name> <value>JAVA_HOME,HADOOP_COMMON_HOME,HADOOP_HDFS_HOME,HADOOP_CONF_DIR,CLASSPATH_PERPEND_DISTCACHE,HADOOP_YARN_HOME,HADOOP_MAPRED_HOME</value> </property> </configuration>
Format HDNS NameNode :
hdfs namenode -format
Start Hadoop Cluster and yarn service :
cd /home/hadoop/hadoop-3.3.4/sbin
./start-dfs.sh
./start-yarn.sh

Check all the daemons are running :
jps

Now, Access the web panel at http://yourserverip:9870
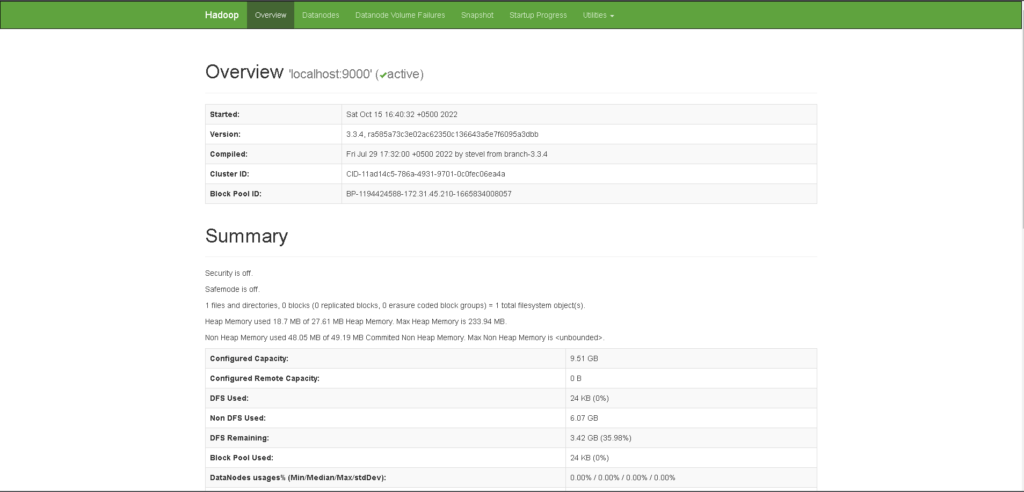
Individual DataNodes will be available at port 9864 :

Conclusion :
You have successfully installed Hadoop 3.3.4 which is the latest version as of now, You have installed Hadoop in a Single Node Deployment, This tutorial first installs the main requisites as root and then installs Hadoop as a user.
More info at the website tool