
So, you want to stream your games or maybe a webcam but don’t like services like youtube or twitch. Or maybe you have privacy concerns or just want more control on your content. In this article I will show you how to create a streaming server in FreeBSD, with Nginx, using the RTMP protocol.
Step One: Install Nginx
Fortunately, the Nginx port includes a module that implements the RTMP protocol for streaming audio and video over the internet. To install the Nginx server run:
[gonz@gonz ~]$ su -
Password:
[root@gonz ~]# cd /usr/ports/www/nginx
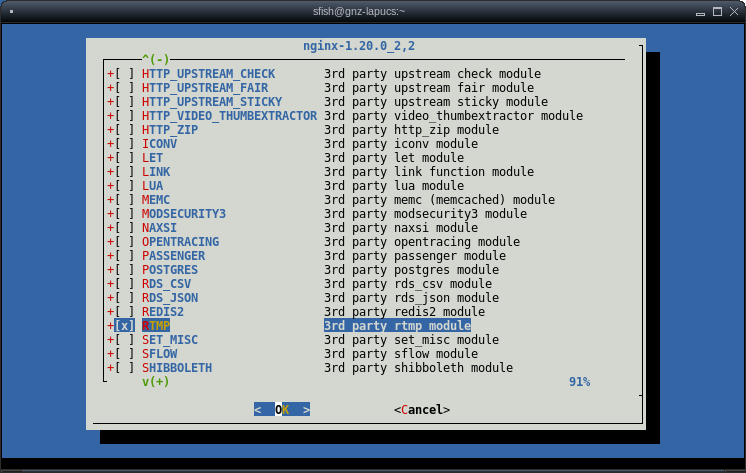
[root@gonz /usr/ports/www/nginx]# make config install cleanIn the port config screen, scroll down and select the option RTMP:
A few minutes later, the compile and installation will be completed:

Step 2: configure Nginx
2.a: Webroot directory
We need a webroot directory from where Nginx will stream our contents, I’m not feeling very creative, so I’m calling mine just “live”:
[root@gonz ~]# mkdir /usr/local/www/live
[root@gonz ~]# chown www:www /usr/local/www/live/
2.b: Configuration files
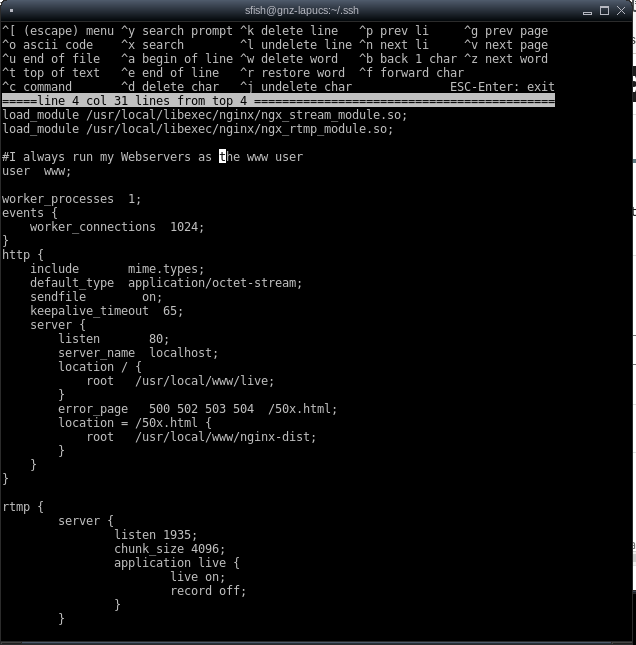
Edit /usr/local/etc/nginx/nginx.conf file and add the following lines at the top:
load_module /usr/local/libexec/nginx/ngx_stream_module.so;
load_module /usr/local/libexec/nginx/ngx_rtmp_module.so;
With those lines nginx will load the modules needed for streaming.
If you are using the ee editor, press ctrl-y to find “location /” and change the webroot path to the one previously created:
        location / {
            root   /usr/local/www/live;
        }
At the bottom of the file add the RTMP settings:
rtmp {
        server {
                listen 1935;
                chunk_size 4096;
                application live {
                        live on;
                        record off;
                }
        }
}
2.c: Enable and start nginx
Save the changes to the nginx.conf file and run the following:
[root@gonz ~]# /usr/local/etc/rc.d/nginx enable
nginx enabled in /etc/rc.conf
[root@gonz ~]# /usr/local/etc/rc.d/nginx start
Performing sanity check on nginx configuration:
nginx: the configuration file /usr/local/etc/nginx/nginx.conf syntax is ok
nginx: configuration file /usr/local/etc/nginx/nginx.conf test is successful
Starting nginx.
Step 3: setting streaming software
With Nginx ready to accept video streams we need to setup the broadcast software. When I was learning how to create an streaming server, I read a lot of tutorials (heavily focused on linux, particularly Ubuntu) and for this step all recommend OBS (Open Broadcaster Software) Studio.
Go to the website to download and find the instructions suitable for your Desktop OS. I have Gentoo Linux on this laptop and my unofficial instructions to install it are as simple as:
# emerge media-video/obs-studioWhen you launch OBS, there will be a first time wizard:
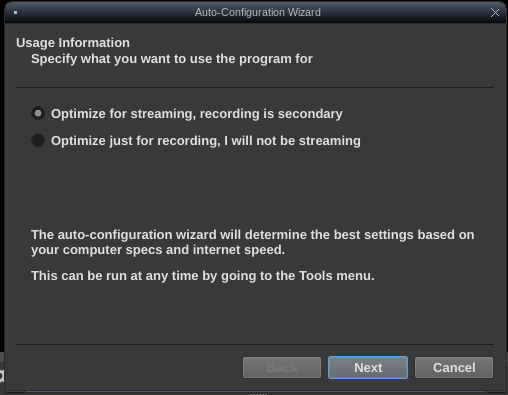
The wizard will try to help you determine the best settings based on your computer. The next screen is about the resolution and the next to that is important:
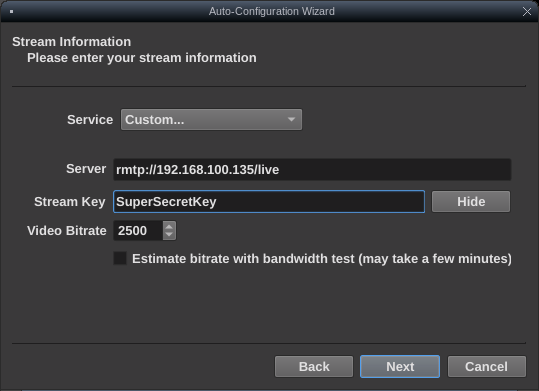
Choose a Custom service and in server fill with RTMP://IP.or.FQDN of your nginx/live . The streamkey is optional.
Test your stream
Go to the bottom left of the OBS window and add a source by click in the + sign:
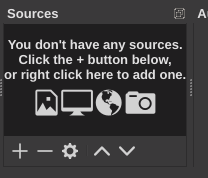
I’ve choose to capture a xterm window. Now with everything configured, we can start to sending our stream to the server. In the controls at the bottom right, click on Start streaming, you should see a green block at the status bar if everything is correct:

Last step: view your stream
The purpose of this tutorial was to you can broadcast to somewhere. Somewhere in this example will be the same PC that is streaming, in my case I’m accessing with VLC. The url I need to open is RTMP://IP.or.FQDN.of.your nginx/live/SuperSecretKey and this is it:
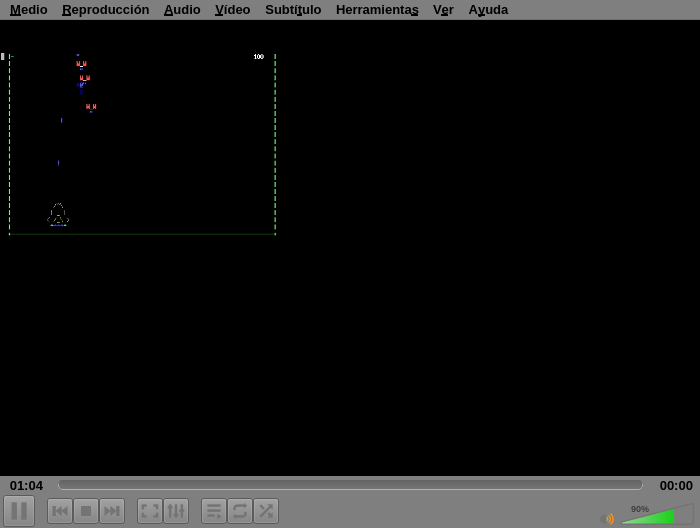
This PC is kinda slow, so in my xterm I’ve just run the ascii-art game alienwave to have something to show.
And this is how I’ve create a streaming server in FreeBSD just for the fun of learning something new.