
Today we will learn how to configure bind with Debian 11. World of the internet is not possible without DNS service. For Linux BIND to that DNS jobs. So what is bind or DNS? Well, its basic role is to patch a specific domain name with a specific IP address. When you are looking for a website over the internet it will resolve the domain name to IP address and vice versa. Usually, 53 is the port number for DNS services. Let’s have a look at how we can configure that service step by step.
Install required package for server.
Prerequisites
I have Debian 11 Virtual machine, with 4 GB RAM and 40 G of storage. My example bind domain name will be rajneeshunix.com.
First, we need to update Debian Server.
# apt update
Check the IP address of the server.
# hostname -I
192.168.135.132
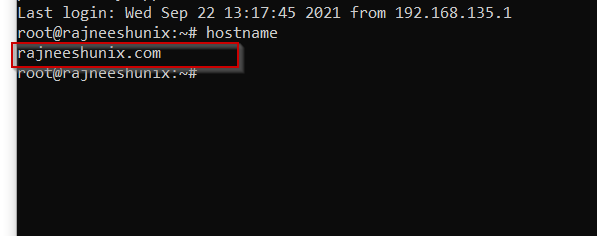
Change the hostname of the server.
# echo 'rajneeshunix.com' > /etc/hostname
Reboot the system and check the hostname.
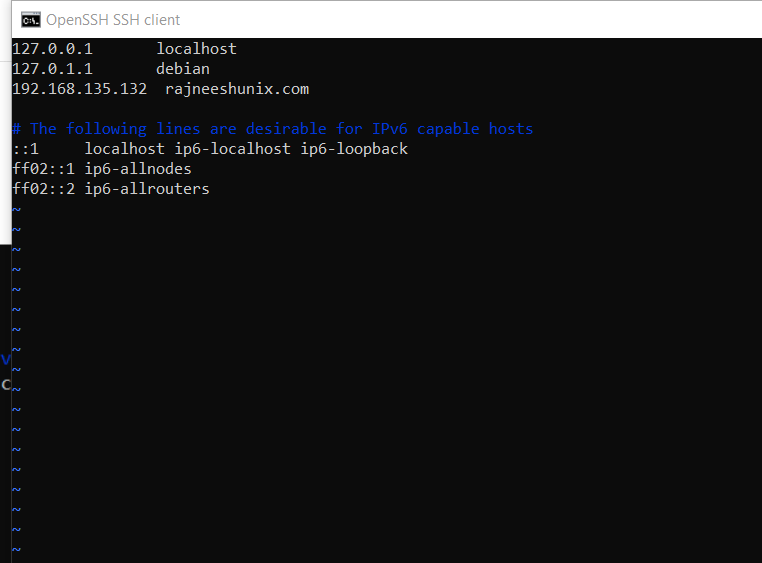
Define domain name in /etc/hosts file.
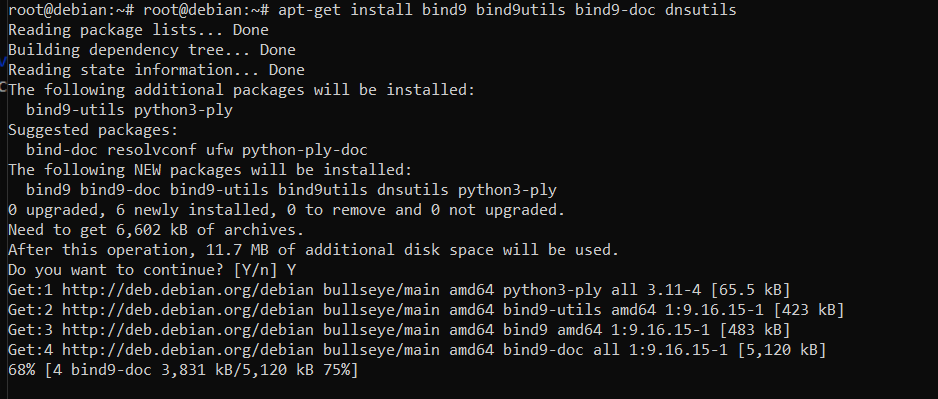
Install required package.
# apt-get install bind9 bind9utils bind9-doc dnsutils
Enable BIND server available on reboot.
# systemctl enable bind9
Allow port 53 on the firewall.
# ufw allow 53
Check service status.
# systemctl status bind9
Define server parameters in conf file.
For the BIND master server, both forward and reverse configuration file configurations are required.
Let’s have a look at what files are available in /etc/bind, and which files we are required to configure.
# cd /etc/bind && ls

two files named.conf and named.conf.local, are visible in /etc/bind directory. for the local bind server, we will edit and use named.conf.local file only.
# vim /etc/bind/named.conf.local
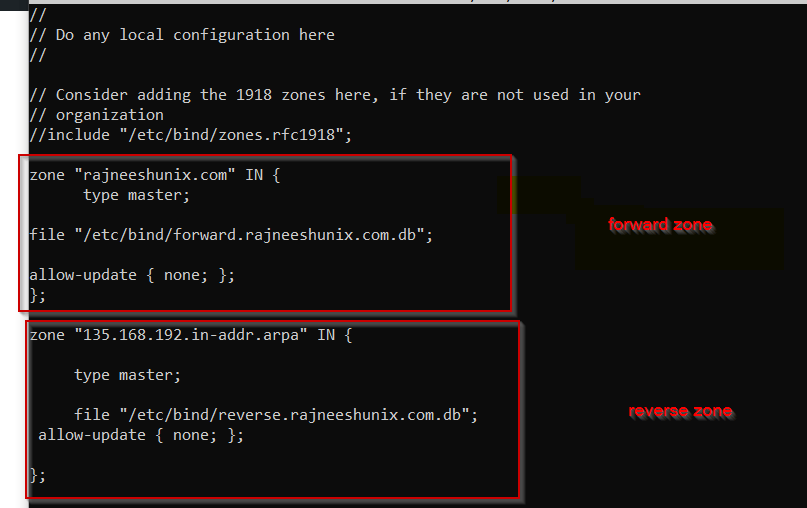
Define forward zone. The zone file for the forward zone will be /etc/bind/forward.rajneeshunix.com.db.
zone "rajneeshunix.com" IN {
      type master;

file "/etc/bind/forward.rajneeshunix.com.db";

allow-update { none; };
};
Define reverse zone. The configuration file for the reverse zone will be /etc/bind/reverse.rajneeshunix.com.db.
zone "135.168.192.in-addr.arpa" IN {

     type master;

     file "/etc/bind/reverse.rajneeshunix.com.db";
 allow-update { none; };

};
Configure zone files as forward and reverse.
In the previous step, we have defined zone files for forward and reverse zones. Let’s configure the forward zone first. Copy example forward zone file to the defined file name.
# cp db.local forward.rajneeshunix.com.db
Edit configuration file.
# vim

forward.rajneeshunix.com.db
The configuration file should look like this.
  GNU nano 5.4                                   forward.rajneeshunix.com.db                                            ;
; BIND data file for local loopback interface
;
$TTL    604800
@       IN      SOA     rajneeshunix.com. root.rajneeshunix.com. (
                              2         ; Serial
                         604800         ; Refresh
                          86400         ; Retry
                        2419200         ; Expire
                         604800 )       ; Negative Cache TTL

@       IN      NS      rajneeshunix.com.
@       IN      A       192.168.135.132

ns1     IN      A       192.168.135.132
mail    IN      A       192.168.135.132
www     IN      A       192.168.135.132
Check if any error in the conf file.
# named-checkzone rajneeshunix.com forward.rajneeshunix.com.db
The output will look something like this.

Let’s configure the reverse zone. In a similar manner copy example file ‘db.127’ to the defined reverse zone file.
# cp db.127 reverse.rajneeshunix.com.db
Edit file as per required settings.
# vim db.127 reverse.rajneeshunix.com.db
;
; BIND reverse data file for local loopback interface
;
$TTL    604800
@       IN      SOA     ns1.rajneeshunix.com. root.ns1.rajneeshunix.com. (
                              1         ; Serial
                         604800         ; Refresh
                          86400         ; Retry
                        2419200         ; Expire
                         604800 )       ; Negative Cache TTL
;
@       IN      NS      ns1.rajneeshunix.com.
ns1     IN      A       192.168.135.132
132     IN      PTR     ns1.rajneeshunix.com.
Check if the zone files are correct or not.
# named-checkzone 135.168.192-in.addr.arpa reverse.rajneeshunix.com.db
All of the settings are done as per requirement.
Test BIND/DNS service.
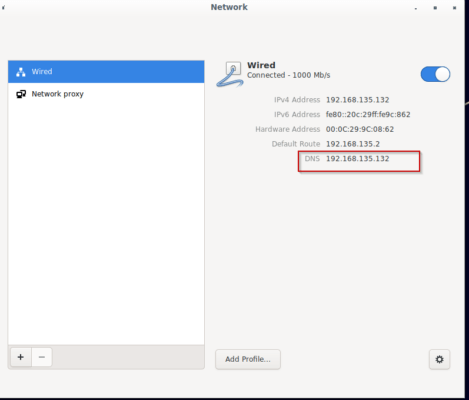
We have configured a bind for the local area network. We must define server IP (192.168.135.132) address as LAN DNS too. If we are not doing this problems may occur.
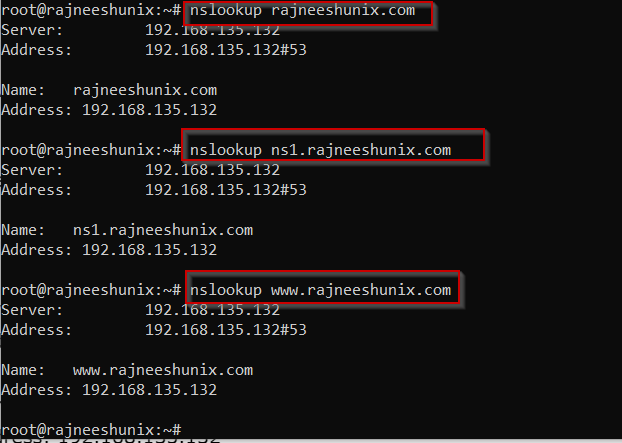
Use the nslookup command to check the bind service.
# nslookup rajneeshunix.com
Server:         192.168.135.132
Address:        192.168.135.132#53

Name:   rajneeshunix.com
Address: 192.168.135.132
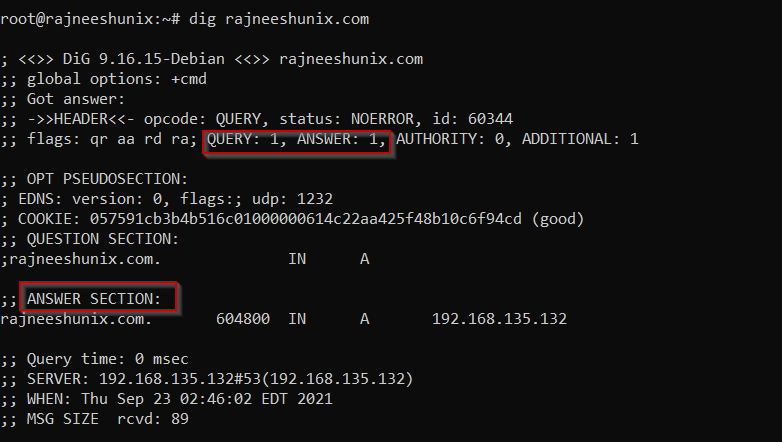
Use the dig command
# dig rajneeshunix.com
Dig query has been resolved as visible in the answer section. Command will return with an answer as ‘0’ if it’s not been resolved.
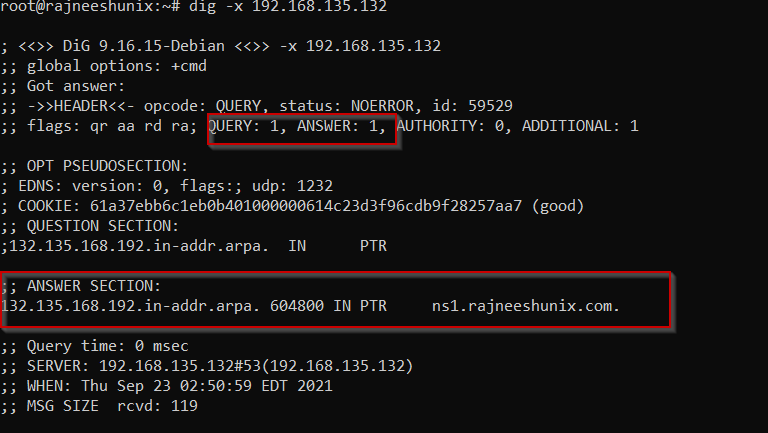
Use dig command using an IP Address.
# dig -x 192.168.135.132
The output will resolve query based on reverse zone, have a look.
Use the dig command with the +short option to have brief information.
# dig -x 192.168.135.132 +short
Output
ns1.rajneeshunix.com.
For domain name.
# dig rajneeshunix.com +short
Output
192.168.135.132

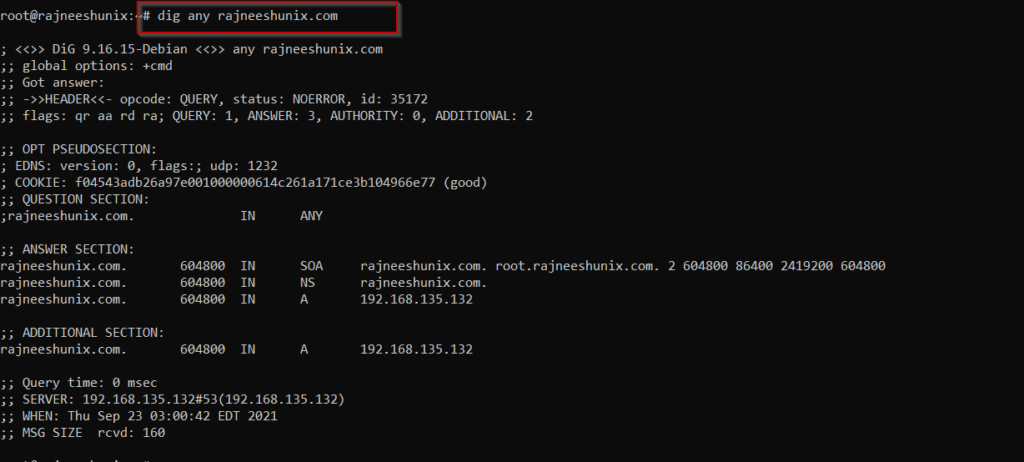
Resolve all information with ‘any’ option.
# dig any rajneeshunix.com
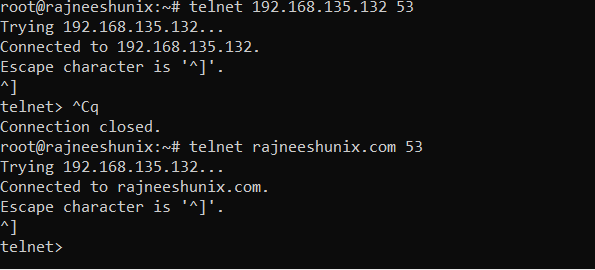
Use telnet command to test bind server.
# telnet 192.168.135.132 53
Output
Trying 192.168.135.132...
Connected to 192.168.135.132.
Escape character is '^]'.
^]
telnet>
Use telnet with the domain name.
# telnet rajneeshunix.com 53
Output
Trying 192.168.135.132...
Connected to rajneeshunix.com.
Escape character is '^]'.
^]
telnet>
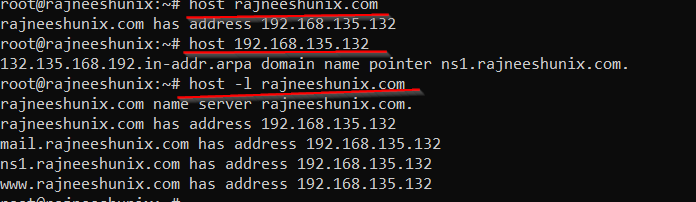
Use host command to test bind service.
Check with the domain name.
# host rajneeshunix.com
Use host command with IP address.
# host 192.168.135.132
Use host command with -l option and domain name.
# host -l rajneeshunix.com
Conclusion
We have successfully deployed the Bind configuration. Few things to keep in mind:
- Network dns ip address must be same as bind server.
- Allow port 53 on firewall.
- Allow ssh for root.
- Define ‘A’ record proper, or else it might show configuration error sometimes.
Stay tuned.