This document explains how to create a diskless clients installation of CentOS 7.
Introduction
It is a guide to building a basic read-write installation to host an NFS filesystem for a single computer.
However, this document does not explain how to set up an NFS or a TFTP server.
Prerequisites
• a DHCP server
The DHCP Server dynamically assigns the IP address to the client stations
demanding it. When a client station sends a request to the DHCP server, it acknowledges
the client station by allocating a random IP from the list of available IP addresses.
• a TFTP server
It stores the boot image file for the respective operating system. This boot image file is then used by the client stations to initiate the operating system. It stores the necessary boot files, which the client stations utilize to initiate the OS. At first, a new directory must be created at the / partition with the name “tftpboot.” The tftpboot directory comprises of following files and directory:
1. initrd.img (file)
2. vmlinuz (file)
3. pxelinux.0 (file)
4. pxelinux.cfg (directory)
The initrd.img and vmlinuz can be obtained from “http://mirror.centos.org/”. The pxelinux.0, a syslinux derivative mainly used for achieving the network boot following the Intel PXE Specifications,
can be copied from “/usr/share/syslinux” directory. pxelinux.cfg is the directory within the tftpboot, which consists of the configuration file, i.e., “default” in our case.
The file “default” can be renamed with ‘IP’, ‘UUID’ or ‘MAC-ID’ of the respective client. The IP address must be mentioned in the uppercase hexadecimal values.
• PXE file tree1 with menu.c32, pxelinux.0 and the pxelinux.cfg directory.
• an NFS server
This stores the root file system of all the users. It is utilized for mounting the local file systems of the respective client stations over the network.
Required packages
[root@unixcop ~]# yum -y install dracut-network nfs-utilsBuild a system for diskless clients on the PXE server.
[root@unixcop ~]# mkdir -p /var/lib/tftpboot/centos/root
[root@unixcop ~]# yum groups -y install "Server with GUI" --releasever=7 --installroot=/var/lib/tftpboot/centos/root/
# generate encrypted root password (remeber it)
[root@unixcop ~]# python -c 'import crypt,getpass; \
print(crypt.crypt(getpass.getpass(), \
crypt.mksalt(crypt.METHOD_SHA512)))'
Password:
$6$EC1T.oKN5f3seb20$y1WlMQ7Ih424OwOn.....
[root@unixcop ~]# vi /var/lib/tftpboot/centos/root/etc/shadow
# set root password generated above
root:$6$EC1T.oKN5f3seb20$y1WlMQ7Ih424OwOn.....:16372:0:99999:7:::
[root@unixcop ~]# vi /var/lib/tftpboot/centos/root/etc/fstab
none    /tmp        tmpfs   defaults   0 0
tmpfs   /dev/shm    tmpfs   defaults   0 0
sysfs   /sys        sysfs   defaults   0 0
proc    /proc       proc    defaults   0 0

[root@unixcop ~]# wget -P /var/lib/tftpboot/centos/ \
http://mirror.centos.org/centos/7/os/x86_64/images/pxeboot/vmlinuz \
http://mirror.centos.org/centos/7/os/x86_64/images/pxeboot/initrd.img
[root@unixcop ~]# vi /var/lib/tftpboot/pxelinux.cfg/default
# create new
default centos

label centos
    kernel centos/vmlinuz
    append initrd=centos/initrd.img root=nfs:10.0.2.15:/var/lib/tftpboot/centos/root rw selinux=0
Configure the NFS server to share system files with clients
[root@unixcop ~]# vi /etc/exports
/var/lib/tftpboot/centos7/root 10.0.2.0/24(rw,no_root_squash)
[root@unixcop ~]# systemctl start rpcbind nfs-server
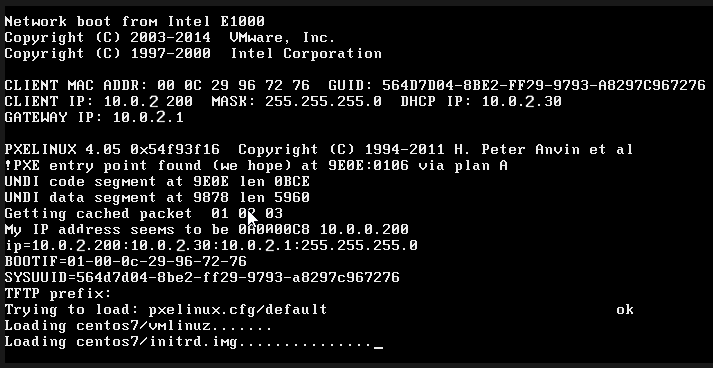
[root@unixcop ~]# systemctl enable rpcbind nfs-serverStart a diskless computer which is enabled network booting on BIOS settings, then the system will boot as follows.