Introduction
Kubernetes is a cluster and orchestration engine for Docker containers. In other words Kubernetes is an open source software or tool which is used to orchestrate and manage Docker containers in cluster environment. Kubernetes is also known as k8s and it was developed by Google and donated to “Cloud Native Computing foundation”
Objective
This setup of kubernetes cluster will have 1 master node with CentOS 7 and 2 worker nodes also known as minions having Windows 2k19 Servers operating system.
We will install and configure kubernetes cluster on datacenter VM’s to manage Docker containers. This cluster includes 1 master (Linux) and 2 worker nodes (windows), master will be controlling the schedules and pod deployments on workers nodes.
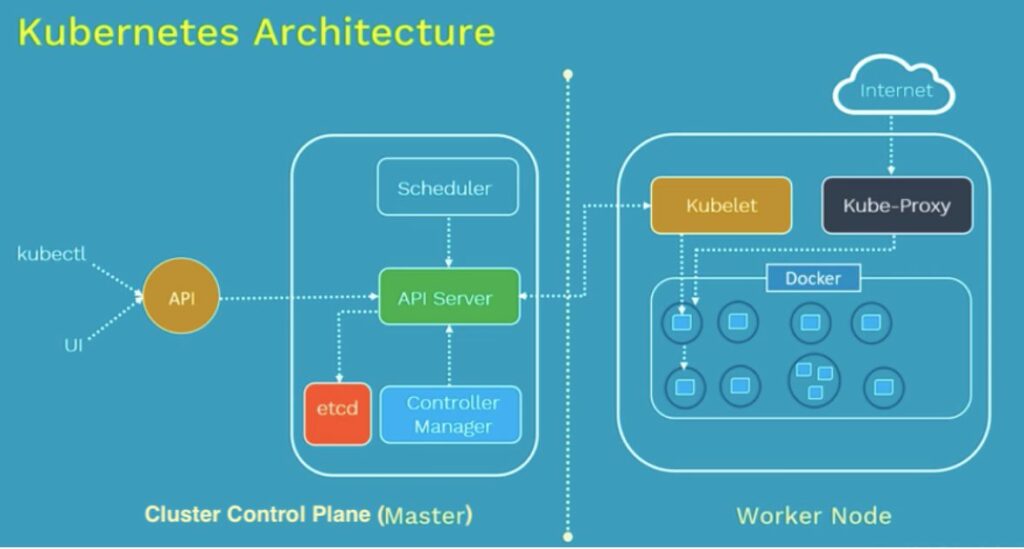
Kubernetes Architecture diagram
Some important Kubernetes Terminology need to know before starting configuration
ETCD (Cluster Node): Kubernetes uses “etcd” as a key-value database store. It stores the configuration of the Kubernetes cluster in “etcd”.
kube-controller-manager: The Kubernetes controller manager is a daemon that embeds the core control loops shipped with Kubernetes. In Kubernetes, a controller is a control loop that watches the shared state of the cluster through the “apiserver” and makes changes attempting to move the current state towards the desired state. Examples of controllers that ship with Kubernetes today are the replication controller, endpoints controller, namespace controller, and service accounts controller
kube-apiserver: The Kubernetes API server validates and configures data for the api objects which include pods, services, replication controllers, and others. The API Server services REST operations and provides the frontend to the cluster’s shared state through which all other components interact.
kube-scheduler: The Kubernetes scheduler is a policy-rich, topology-aware, workload-specific function that significantly impacts availability, performance, and capacity. The scheduler needs to take into account individual and collective resource requirements, quality of service requirements, hardware/software/policy constraints, affinity and anti-affinity specifications, data locality, inter-workload interference, deadlines, and so on.
kubelet: The “kubelet” is the primary “node agent” that runs on each node. It can register the node with the apiserver using one of: the hostname; a flag to override the hostname; or specific logic for a cloud provider.
kube-proxy: The Kubernetes network proxy runs on each node. This reflects services as defined in the Kubernetes API on each node and can do simple TCP, UDP, and SCTP stream forwarding or round robin TCP, UDP, and SCTP forwarding across a set of back ends.
Kubernetes cluster setup description
In Kubernetes setup we have 1 master (CentOS 7) and 2 worker (Win 2k19) nodes. From the master node we can manage the cluster and its nodes using ‘kubeadm ‘and ‘kubectl ‘command.
Kubernetes can be installed and deployed using following methods:
- Minikube ( It is a single node kubernetes cluster)
- Kops ( Multi node kubernetes setup into AWS )
- Kubeadm ( Multi Node Cluster in our own premises)
In this article we will install latest version of Kubernetes 1.16 on CentOS 7 / RHEL 7 with kubeadm utility. In this setup we are taking 1 CentOS 7 and 2 Windows 2k19 servers with minimal installation. One server will acts master node and rest two servers will be minion or worker nodes
On the Master Node following components will be installed
- API Server – It provides kubernetes API using Jason / Yaml over http, states of API objects are stored in etcd
- Scheduler – It is a program on master node which performs the scheduling tasks like launching containers in worker nodes based on resource availability
- Controller Manager – Main Job of Controller manager is to monitor replication controllers and create pods to maintain desired state.
- etcd – It is a Key value pair data base. It stores configuration data of cluster and cluster state.
- Kubectl utility – It is a command line utility which connects to API Server on port 6443. It is used by administrators to create pods, services etc.
On Worker Nodes following components will be installed
- Kubelet – It is an agent which runs on every worker node, it connects to Docker and takes care of creating, starting, deleting containers.
- Kube-Proxy – It routes the traffic to appropriate containers based on IP address and port number of the incoming request. In other words we can say it is used for port translation.
- Pod – Pod can be defined as a multi-tier or group of containers that are deployed on a single worker node or Docker host.
Installations Steps of Kubernetes 1.16 on CentOS 7
Step 1: Set hostname, disable SELinux & setup firewall, in our case firewall and SELinux is in disabled state and hostname is set as kube-master. And make sure all the nodes are


Step 2: Configure Kubernetes Repository
Kubernetes packages are not available in the default CentOS 7 & RHEL 7 repositories, Use below urls to configure its package repositories.

Step 3: Install Kubeadm and Docker using below command
# yum install kubeadm docker -yThen start and enable kubectl and docker service using below commands.
# systemctl restart docker && systemctl enable docker
# systemctl restart kubelet && systemctl enable kubelet
Step 4: Initialize Kubernetes Master with ‘kubeadm init’

Output of above command would be something like below
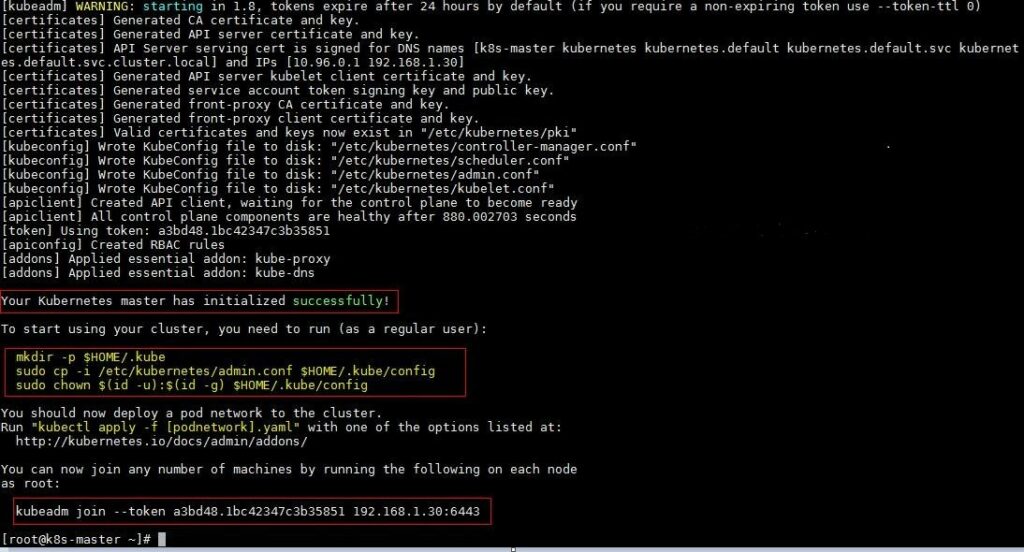
As we can see in the output that kubernetes master has been initialized successfully. Execute the beneath commands to use the cluster as root user.

Step 5: Deploy pod network to the cluster
Try to run below commands to get status of cluster and pods.
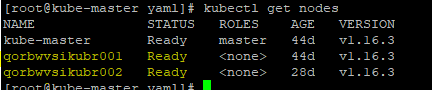
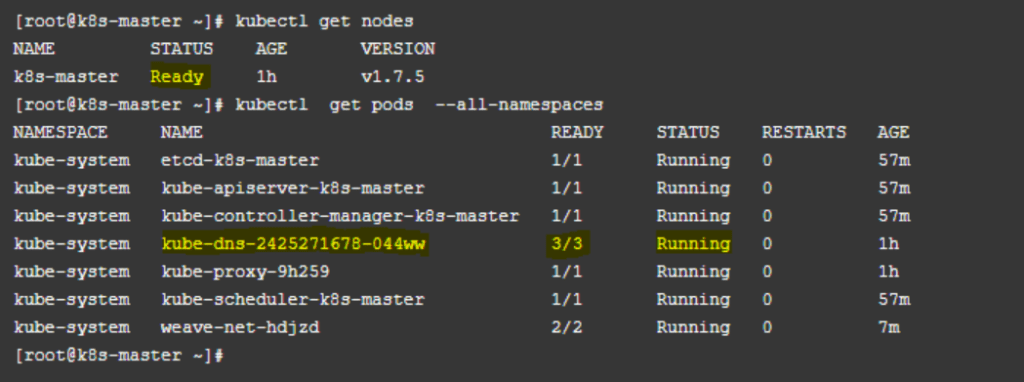
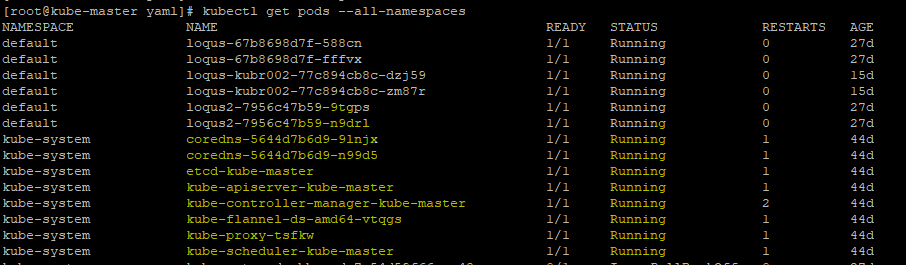
kubectl get nodes
kubectl get pods –all-namespaces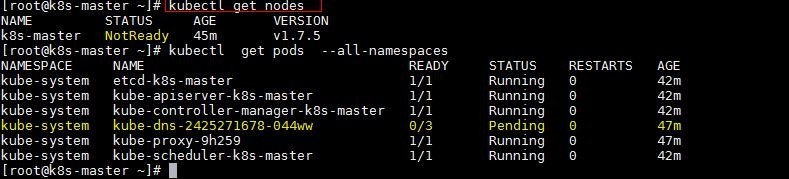
To make the cluster status ready and kube-dns status running, deploy the pod network so that containers of different host communicated each other. POD network is the overlay network between the worker nodes.
Run the beneath command to deploy network.
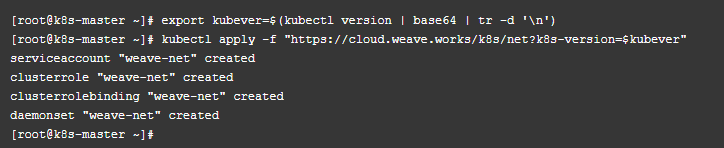
Now run the following commands to verify the status. As we can see master node is now in ready state, now we will add worker nodes to this kubernetes cluster.
Kubernetes cluster Network Solution selection and configuration
Once you have setup a Kubernetes master node you are ready to pick a networking solution. There are multiple ways to make the virtual cluster subnet routable across nodes. Pick one of the following options for Kubernetes on Windows today:
- Use a CNI plugin such as Flannel to setup an overlay network for you.
- Use a CNI plugin such as Flannel to program routes for you (uses l2bridge networking mode).
- Configure a smart top-of-rack (ToR) switch to route the subnet.
Flannel in vxlan mode
Flannel in vxlan mode can be used to setup a configurable virtual overlay network which uses VXLAN tunneling to route packets between nodes.
Prepare Kubernetes master for Flannel
Some minor preparation is recommended on the Kubernetes master in our cluster. It is recommended to enable bridged IPv4 traffic to iptables chains when using Flannel. This can be done using the following command:
# sudo sysctl net.bridge.bridge-nf-call-iptables=1Download & configure Flannel
Download the most recent Flannel manifest using below command:
wget https://raw.githubusercontent.com/coreos/flannel/master/Documentation/kube-flannel.yml
There are two sections you should modify to enable the vxlan networking backend:
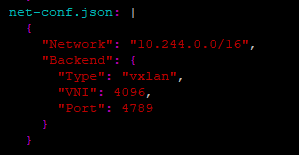
- In the net-conf.json section of your kube-flannel.yml, double-check:
- The cluster subnet (e.g. “10.244.0.0/16”) is set as desired.
- VNI 4096 is set in the backend
- Port 4789 is set in the backend
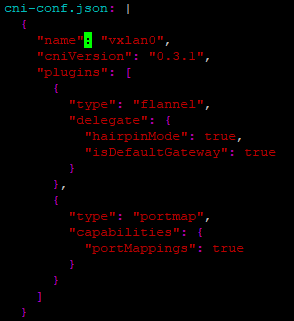
- In the cni-conf.json section of your kube-flannel.yml, change the network name to “vxlan0”.
After applying the above steps, your net-conf.json should look as follows:
Your cni-conf.json should look as follows:
Launch Flannel & validate
Launch Flannel using command
# kubectl apply -f kube-flannel.ymlNext, since the Flannel pods are Linux-based, apply our Linux NodeSelector patch to kube-flannel-ds DaemonSet to only target Linux using below commands to download and setting NodeSelector
# wget https://github.com/microsoft/SDN/blob/master/Kubernetes/flannel/l2bridge/manifests/node-selector-patch.yml# kubectl patch ds/kube-flannel-ds-amd64 --patch "$(cat node-selector-patch.yml)" -n=kube-systemAfter a few minutes, you should see all the pods as running if the Flannel pod network was deployed.
Joining Windows worker nodes to kubernetes cluster
Once you have setup a Kubernetes master node and selected your desired network solution, you are ready to join Windows Server nodes to form a cluster. This requires some preparation on the Windows nodes before joining.
Preparing a Windows node
Install Docker (requires reboot)
Kubernetes uses Docker as its container engine, so we need to install it. You can follow the official Docs instructions, the Docker instructions, or try below steps:
Install-Module -Name DockerMsftProvider -Repository PSGallery -Force
Install-Package -Name Docker -ProviderName DockerMsftProvider
Restart-Computer –Force
If you are behind a proxy, the following PowerShell environment variables must be defined:
[Environment]::SetEnvironmentVariable(“HTTP_PROXY”, “http://proxy.example.com:80/”, [EnvironmentVariableTarget]::Machine)
[Environment]::SetEnvironmentVariable(“HTTPS_PROXY”, “http://proxy.example.com:443/”, [EnvironmentVariableTarget]::Machine)
If after reboot you see the following error:
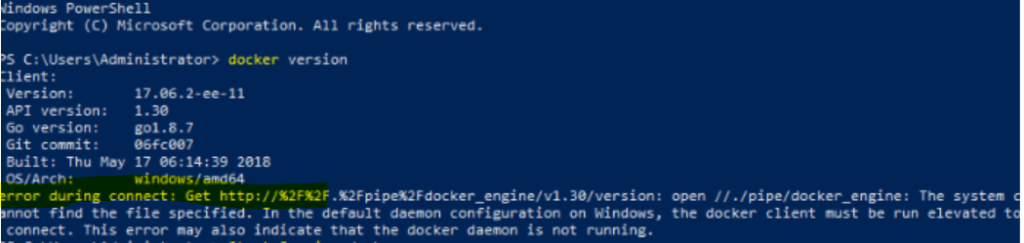
Then start the docker service manually:
Start-Service docker
Prepare Kubernetes for Windows directory
Create a “Kubernetes for Windows” directory to store Kubernetes binaries as well as any deployment scripts and config files.
mkdir c:\kCopy Kubernetes certificate
Copy the Kubernetes certificate file ($HOME/.kube/config) from master to this new C:\k directory.
Download Kubernetes binaries
To be able to run Kubernetes, you first need to download the kubectl, kubelet, and kube-proxy binaries. You can download these from the links in the CHANGELOG.md file of the latest releases.
- For example, here are the v1.14 Node Binaries.
- Use a tool like Expand-Archive to extract the archive and place the binaries into
C:\k\.
(Optional) Setup kubectl on Windows
Should you wish to control the cluster from Windows, you can do so using the kubectl command. First, to make kubectl available outside of the C:\k\ directory, modify the PATH environment variable:
$env:Path += ";C:\k"If you would like to make this change permanent, modify the variable in machine target:
[Environment]::SetEnvironmentVariable("Path", $env:Path + ";C:\k", [EnvironmentVariableTarget]::Machine)Next, we will verify that the cluster certificate is valid. In order to set the location where kubectl looks for the configuration file, you can pass the --kubeconfig parameter or modify the KUBECONFIG environment variable. For example, if the configuration is located at C:\k\config:
$env:KUBECONFIG="C:\k\config"To make this setting permanent for current user’s scope:
[Environment]::SetEnvironmentVariable("KUBECONFIG", "C:\k\config", [EnvironmentVariableTarget]::User)Finally, to check if the configuration has been discovered properly, you can use:
kubectl config viewIf you are receiving a connection error
Unable to connect to the server: dial tcp [::1]:8080: connectex: No connection could be made because the target machine actively refused it.You should double-check the kubeconfig location or try to copy it over again.
If you see no errors the node is now ready to join the cluster.
Joining the Windows node
Depending on networking solution you chose, you can:
- Join Windows Server nodes to a Flannel (vxlan or host-gw) cluster (We are using this solution)
- Join Windows Server nodes to a cluster with a ToR switch
Joining a Flannel cluster
There is a collection of Flannel deployment scripts on this Microsoft repository that helps you join this node to the cluster.
Download the Flannel start.ps1 script, the contents of which should be extracted to C:\k:
[Net.ServicePointManager]::SecurityProtocol = [Net.SecurityProtocolType]::Tls12
wget https://raw.githubusercontent.com/Microsoft/SDN/master/Kubernetes/flannel/start.ps1 -o c:\k\start.ps1
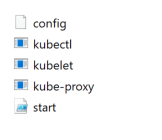
Assuming you prepared your Windows node, and your c:\k directory looks as below, you are ready to join the node.
Join windows node
To simplify the process of joining a Windows node, you only need to run a single Windows script to launch kubelet, kube-proxy, flanneld, and join the node.
cd c:\k
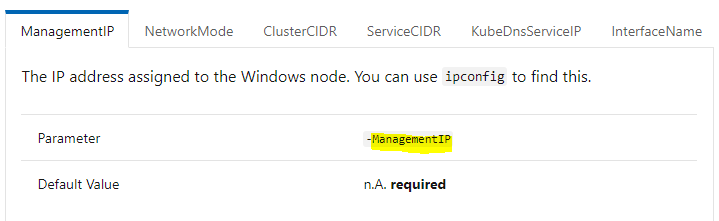
.\start.ps1 -ManagementIP <Windows Node IP> -NetworkMode <network mode> -ClusterCIDR <Cluster CIDR> -ServiceCIDR <Service CIDR> -KubeDnsServiceIP <Kube-dns Service IP> -LogDir <Log directory>
After running this you should be able to:
- View joined Windows nodes using kubectl get nodes
- See 3 powershell windows open, one for kubelet, one for flanneld, and another for kube-proxy
- See host-agent processes for flanneld, kubelet, and kube-proxy running on the node