In this article, we’re going to see how to apply rate limiting to our websites using Nginx. Rate limiting can be an effective way to prevent denial of service attacks as well as throttle brute force attempts for pages like login forms.
Defining a rate limit zone
The first thing we need to do is, within the http context of our nginx configuration, define the limit_req_zone directive. The first argument it takes is on what basis the rate limits can be applied. Some useful values for
the first argument can be:
$remote_addr– The IP address of the remote client in string format$binary_remote_addr– The IP address of the remote client in binary
(big-endian integer) format$request_uri– The URI used to access the resource
The next argument is, like with caches in my previous articles, defining a zone. This is done with the zone argument; e.g., zone=RATE_LIMIT:10m, where 10m is the size for storing the states. And the last argument is the rate such as rate=10r/s. Here the rate is 10 requests per second above which the rate limiting will be applied.
A sample directive would be:
limit_req_zone $request_uri zone=STATES:10m rate=100r/s;Using the zone in location blocks
Now we can use the STATES zone in our location blocks with the limit_req directive. For example:
location /login.php {
    limit_req STATES;
}
Now the login.php resource can be requested by 100 different clients (regardless of the IP) within one second. If a 101th request is made within the same second, then it will be rejected.
To test it out, I’ve installed a tool called siege on my client system. You can download it here.

I have given the following flags to siege:
-c: number of concurrent requests-r: number of times the requests are to be repeated
Here, siege sends 5 requests to the server, and we see that the first one is served but the additional 4 are rejected since all of the 5 requests occurred within one second.
If this is not what we want then the limit_req directive can be supplied a few additional arguments. Note that these arguments can also be supplied globally within the limit_req_zone directive.
burst
This specifies the number of requests to be fulfilled along with the value of rate. In other words, if requests exceed the limit specified by rate, then they won’t be immediately rejected. Instead, they’ll be kept in a queue and responded to according to the rate limit. If we use option with a rate=1r/s, like so:
   location /login.php {
       limit_req STATES burst=5;
}Note: I’m using the rate of 1r/s here.
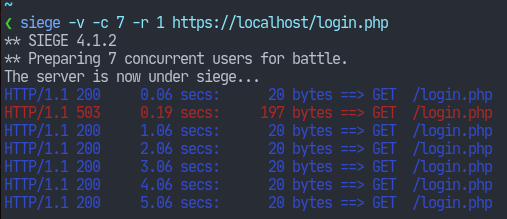
Now nginx will keep 5 requests which exceed the 1r/s limit, and they’ll be responded to complying (i.e. with the required delay) that limit. So in total nginx will serve 6 requests in total per second.

Here, we see that the 7th request is rejected whereas the first one is served immediately, the other 5 suffering some delay.
nodelay
This is applicable to an already defined burst limit. Basically, it allows us to serve the burst requests as quickly as possible but it will allocate slots for the responded requests. The slots won’t be freed until the
configured rate limit is over.

In this screenshot, the first 6 requests were served immediately. I re-ran the command after some time and we see that the first request was freed as one slot must have been freed.
That’s basically all we need for rate-limiting. You can read more from this article. Thank you for reading.


