
Today you will learn how to install Velociraptor on Linux.
Learning from these early projects, Velociraptor was released in 2019. Similar to GRR, Velociraptor also allows for hunting across many thousands of machines. Inspired by OSQuery, Velociraptor implements a new query language dubbed VQL (Velociraptor Query Language) which is similar to SQL but extends the query language in a more powerful way. Velociraptor also emphasizes ease of installation and very low latency — typically collecting artifacts from thousands of endpoints in a matter of seconds.
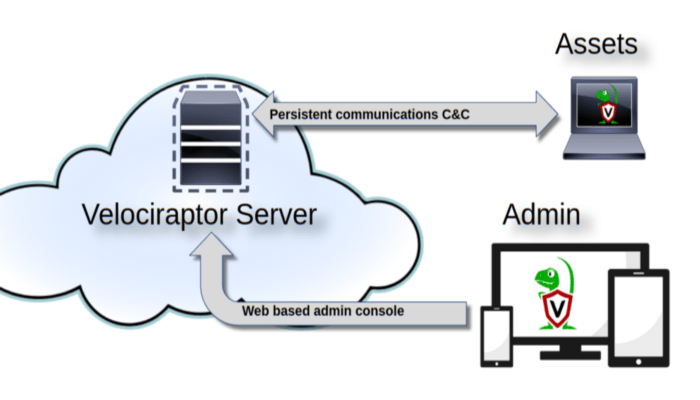
Above shows an overview of the Velociraptor architecture. The Velociraptor server maintains communications with the endpoint agents (called Clients) for command and control. The web based administration user interface is used to task individual clients, run hunts and collect data.
Ultimately, Velociraptor agents are simply VQL engines — all tasks to the agent are simply VQL queries that the engine executes. VQL queries, just like database queries, result in a table, with columns (as dictated by the query) and multiple rows. The agent will execute the query, and send back the results to the server which simply stores them as files. This approach means the server is not really processing the results other than just storing them in files. Therefore the load on the server is minimal allowing for vastly scalable performance.
Installation
Velociraptor has six main components:
- Frontend – Frontend receives connections from clients.
- Gui – Web UI for accessing velociraptor.
- Client – Velociraptor endpoint agents
- VQL Engine (VFilter) – Velociraptor Query Language used to query.
- Data store – locations where Velociraptor is going to save its files.
- File store – used by velociraptor for long term storage
Install Velociraptor by Gettig the Linux binary
mkdir velociraptor
cd velociraptor
wget https://github.com/Velocidex/velociraptor/releases/download/v0.5.3/velociraptor-v0.5.3-linux-amd64
Make the Binary executable
So, once the download of the binary installer is complete, make it executable by running the command below;
chmod +x velociraptor-v0.5.3-linux-amd64 Generate a server Config File
Generate server configuration file using the command below:

 ./velociraptor-v0.5.3-linux-amd64 config generate > /etc/velociraptor.config.yaml
To customize the configuration file generation use the command:
 ./velociraptor-v0.5.3-linux-amd64 config generate config generate -i
Optionally edit the Configuration file once its created to suite your deployment. For instance you can change the server url and the server’s IP where the addresses are binding to
vim /etc/velociraptor.config.yaml...
Client:
server_urls:
- https://192.168.56.102:8000/
...
API:
bind_address: 192.168.56.102
...
GUI:
bind_address: 192.168.56.102
...
Monitoring:
bind_address: 192.168.56.102
...Additionally Datastore location can be edited to change the location where Velociraptor is going to save its files.
Datastore:
  implementation: FileBaseDataStore
  location: /var/tmp/velociraptor
  filestore_directory: /var/tmp/velociraptor
Its important to note client – server communications are encrypted over HTTPS. The keys are embedded in the configuration file.
Create GUI user
Then, create a user to access the GUI by running the command below;
./velociraptor-v0.5.3-linux-amd64 --config /etc/velociraptor.config.yaml user add unixcop --role administratornter a password for the user when prompted:
The above command adds the user admin with the administrator role. Other available roles are:
- reader
- analyst
- investigator
- artifact_writer
Start Velociraptor Frontend
Start Velociraptor server using frontend command, -v flag is used to show verbose output on the terminal.
./velociraptor-v0.5.3-linux-amd64 --config /etc/velociraptor.config.yaml frontend -vAccessing Velociraptor Web Interface
Access the server on https://SERVER-IP:8889. Use the user and password created earlier. GUI communications are authenticated with basic Auth.
Install Systemd Service for Verociraptor
Additionally you can create systemd service to start Velociraptor as a service. For easier management you can copy the binary to /usr/local/bin as velociraptor.
cp velociraptor-v0.5.3-linux-amd64 /usr/local/bin/velociraptor
 vim  /lib/systemd/system/velociraptor.service
Add the content below:
[Unit]
Description=Velociraptor linux amd64
After=syslog.target network.target

[Service]
Type=simple
Restart=always
RestartSec=120
LimitNOFILE=20000
Environment=LANG=en_US.UTF-8
ExecStart=/usr/local/bin/velociraptor --config /etc/velociraptor.config.yaml frontend -v

[Install]
WantedBy=multi-user.target
systemctl daemon-reloadStart and enable velociraptor to start at boot time:
systemctl enable --now velociraptor
Check the status of velociraptor.
systemctl status velociraptor
● velociraptor.service - Velociraptor linux amd64
Loaded: loaded (/lib/systemd/system/velociraptor.service; enabled; vendor preset: enabled)
Active: active (running) since Wed 2020-12-09 21:10:37 EAT; 6s ago
Main PID: 21354 (velociraptor)
Tasks: 7 (limit: 595)
CGroup: /system.slice/velociraptor.service
└─21354 /usr/local/velociraptor --config /etc/velociraptor.config.yaml frontend -v
Dec 09 21:10:38 user1-VirtualBox velociraptor[21354]: [INFO] 2020-12-09T21:10:38+03:00 Starting Server Artifact Runner Service
Dec 09 21:10:38 user1-VirtualBox velociraptor[21354]: [INFO] 2020-12-09T21:10:38+03:00 Starting gRPC API server on 192.168.56.102:8001
Dec 09 21:10:38 user1-VirtualBox velociraptor[21354]: [INFO] 2020-12-09T21:10:38+03:00 Launched Prometheus monitoring server on 192.168.56
Dec 09 21:10:38 user1-VirtualBox velociraptor[21354]: [INFO] 2020-12-09T21:10:38+03:00 GUI is ready to handle TLS requests on https://192.
Dec 09 21:10:38 user1-VirtualBox velociraptor[21354]: [INFO] 2020-12-09T21:10:38+03:00 Collecting Server Event Artifact: Server.Monitor.He
Dec 09 21:10:38 user1-VirtualBox velociraptor[21354]: [INFO] 2020-12-09T21:10:38+03:00 Frontend is ready to handle client TLS requests at
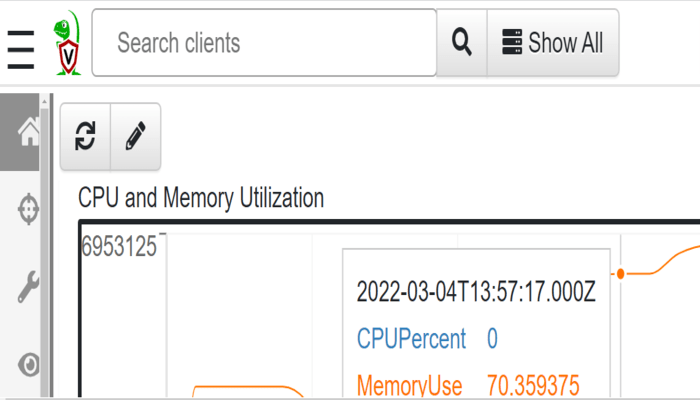
Dec 09 21:10:38 user1-VirtualBox velociraptor[21354]: [INFO] 2020-12-09T21:10:38+03:00 Compiled all artifactsAccess the GUI and login into the interface, you’ll see Velociraptor GUI dashboard.
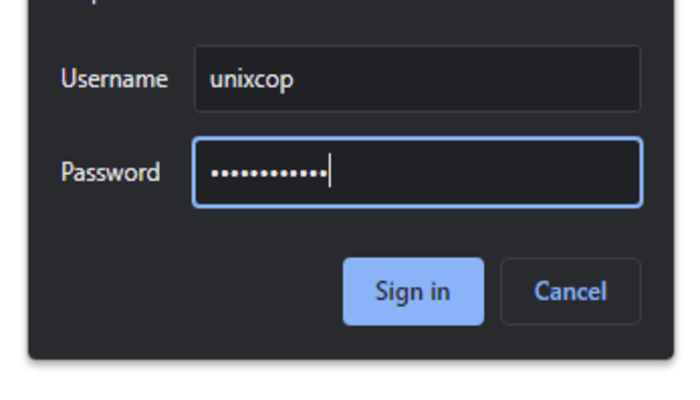
The command for creating the velociraptor user actually creates a user with the name “unixcop” not Admin