
Hello, friends. There are too many monitoring tools for Linux. However, this allows us to choose the best and easy to use. In this post, we will tell you about Netdata on Debian 11.
Introducing to Netdata
Netdata is free software (a daemon) that gathers real-time performance data from Linux systems, applications, and SNMP devices, and displays it in a web-based interface. It provides a wealth of information displayed in a convenient and modern web interface.
One of the best things about Netdata is that it is designed not to consume a lot of resources because it is a built-in C language. So we can be sure that it will work well in many circumstances.
Another advantage of Netdata is that we will be able to configure it to emit alerts when something does not happen properly. So we will not miss anything.
So, let’s install and tune it up with this application.
Install Netdata on Debian 11
Since Netdata has been included in the official Debian repositories, we don’t have to do much to install it. In other words, we don’t have to add repositories or anything similar to that.
So, open an SSH connection to your server and update it.
sudo apt update
sudo apt upgrade
After that, run the following command to install Netdata on Debian 11.
sudo apt install netdata
This will simply install Netdata.
Working with the Netdata service
The installation of Netdata also includes the installation of a service with which we can manage the Netdata execution.
So, to start it you have to execute
sudo systemctl start netdata
It is also advisable to leave it enabled to start with the system
sudo systemctl enable netdata
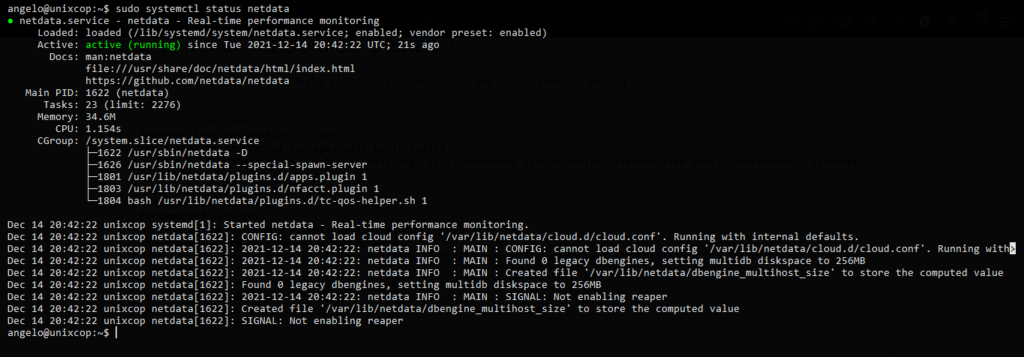
To check if the service and therefore the program is running, you can use the following command
sudo systemctl status netdata
If we get an output similar to this, then we can be sure that the program is running properly.
If you want to stop the program then run
sudo systemctl stop netdata
Then you can with the help of the systemctl command manage the operation of Netdata.
Configure Netdata to be accessible from any host
The Netdata configuration file is /etc/netdata/netdata.conf and inside it, we have a value to modify.
So, make a backup of this before using it.
sudo cp /etc/netdata/netdata.conf /etc/netdata/netdata.conf.bak
And now if you edit it
sudo nano /etc/netdata/netdata.conf
The value you have to modify is bind socket to IP to which you have to assign the IP address of the server where you are running it.
bind socket to IP = X.X.X.X.X.X
Save the changes and close the editor.
Apply the changes by restarting the service
sudo systemctl restart netdata
Setting the Firewall before using it
Now we have to add a rule in the Firewall to make Netdata accessible. In short, we have to open port 19999 of the TCP protocol for this.
So, run
sudo ufw allow 19999/tcp
Apply the changes by running
sudo ufw reload
Access to Netdata on Debian 11
Now you can open a web browser from one of the clients and access Netdata. To do this, go to the address http://IP-SERVER:19999.
And you will see the following
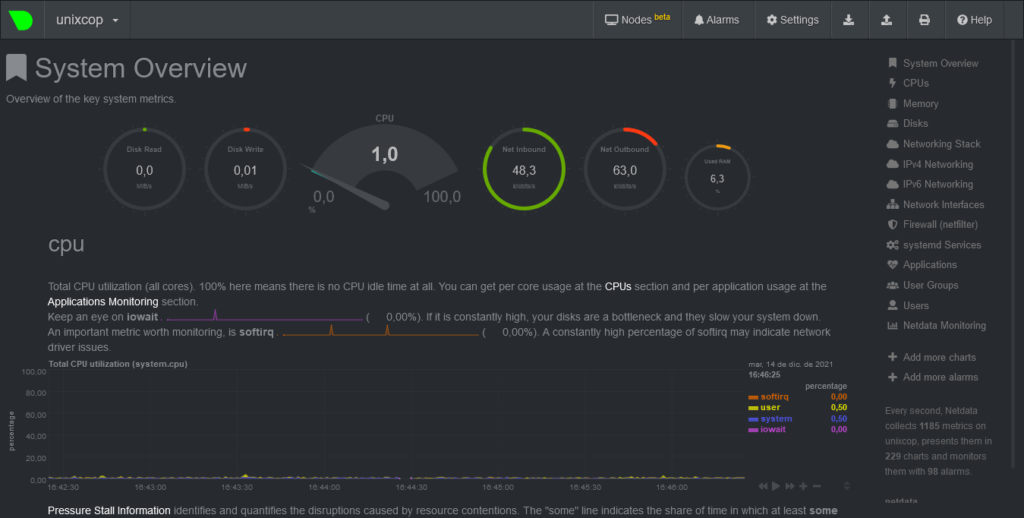
That is, Netdata has been successfully installed. And now you will be able to monitor your server in a stable way and with a lot of metrics at your disposal.
Conclusion
Now thanks to this post, you know how to install Netdata on Debian 11 from a freshly installed server. You have also configured it to be accessible from another internet node.
So, enjoy it.