
Introduction
Flectra is a free and open-source CRM and ERP software that provides a lot of flexibility and customization that lets you meet the unique needs of your business.
Also Flectra is the next generation business information system helps you grow your business, with powerful modular design covering all essential aspects of a busines.
Flectra is a fork of Odoo Community and its main goal was to implement many features from Odoo Enterprise while still keeping it open for everyone to use.
Update Packages
Run the following commands to upgrade all installed packages on your VPS:
sudo apt-get update -y && sudo apt-get upgrade -yInstall Required Dependencies
You will need to install the Python package and other Flectra dependencies in your system. Run this command:
sudo apt-get install gcc python3-venv build-essential python3-pillow python3-wheel python3-lxml python3-dev python3-pip python3-setuptools npm nodejs git gdebi libldap2-dev libsasl2-dev libxml2-dev libxslt1-dev libjpeg-dev libpq-dev -yAlso you will need to install wkhtmltopdf tool in your system.
You can download and install it with the following command:
qadry@unixcop:~$ wget https://github.com/wkhtmltopdf/packaging/releases/download/0.12.6-1/wkhtmltox_0.12.6-1.focal_amd64.deb
--2021-08-20 05:44:26--  https://github.com/wkhtmltopdf/packaging/releases/download/0.12.6-1/wkhtmltox_0.12.6-1.focal_amd64.deb
Resolving github.com (github.com)... 140.82.121.4
Connecting to github.com (github.com)|140.82.121.4|:443... connected.
HTTP request sent, awaiting response... 302 Found
Location: https://github-releases.githubusercontent.com/131323182/10e1d800-ab93-11ea-862e-4f209c09ebf0?X-Amz-Algorithm=AWS4-HMAC-SHA256&X-Amz-Credential=AKIAIWNJYAX4CSVEH53A%2F20210820%2Fus-east-1%2Fs3%2Faws4_request&X-Amz-Date=20210820T124427Z&X-Amz-Expires=300&X-Amz-Signature=17fe5ac9c52a75f405aa1915db96e68c7af0126b1e3f3b5f5de32bb2c9060ae2&X-Amz-SignedHeaders=host&actor_id=0&key_id=0&repo_id=131323182&response-content-disposition=attachment%3B%20filename%3Dwkhtmltox_0.12.6-1.focal_amd64.deb&response-content-type=application%2Foctet-stream [following]
--2021-08-20 05:44:27--  https://github-releases.githubusercontent.com/131323182/10e1d800-ab93-11ea-862e-4f209c09ebf0?X-Amz-Algorithm=AWS4-HMAC-SHA256&X-Amz-Credential=AKIAIWNJYAX4CSVEH53A%2F20210820%2Fus-east-1%2Fs3%2Faws4_request&X-Amz-Date=20210820T124427Z&X-Amz-Expires=300&X-Amz-Signature=17fe5ac9c52a75f405aa1915db96e68c7af0126b1e3f3b5f5de32bb2c9060ae2&X-Amz-SignedHeaders=host&actor_id=0&key_id=0&repo_id=131323182&response-content-disposition=attachment%3B%20filename%3Dwkhtmltox_0.12.6-1.focal_amd64.deb&response-content-type=application%2Foctet-stream
Resolving github-releases.githubusercontent.com (github-releases.githubusercontent.com)... 185.199.110.154, 185.199.109.154, 185.199.108.154, ...
Connecting to github-releases.githubusercontent.com (github-releases.githubusercontent.com)|185.199.110.154|:443... connected.
HTTP request sent, awaiting response... 200 OK
Length: 15721382 (15M) [application/octet-stream]
Saving to: ‘wkhtmltox_0.12.6-1.focal_amd64.deb.1’

wkhtmltox_0.12.6-1.focal_amd64.deb.1  100%[=======================================================================>]  14.99M   367KB/s    in 42s

2021-08-20 05:45:10 (364 KB/s) - ‘wkhtmltox_0.12.6-1.focal_amd64.deb.1’ saved [15721382/15721382]

qadry@unixcop:~$
Install PostgreSQL
Flectra PostgreSQL in order to store its data in a database. install it with the following command:
sudo apt-get install postgresql -yUse the PostgreSQL and create a user for Flectra. I named user flectra, but you can use any name you like:
su - postgres -c "createuser -s flectra"Install Flectra
First, create a separate user for Flectra. The name of this user should be the same as your PostgreSQL user:
useradd -m -U -r -d /opt/flectra -s /bin/bash flectraYou have to log in with your Flectra user and download the Flectra source from the official Git repository:
root@unixcop:~# su - flectra
flectra@unixcop:~$ git clone --depth=1 --branch=1.0 https://gitlab.com/flectra-hq/flectra.git flectra
Cloning into 'flectra'...
remote: Enumerating objects: 26592, done.
remote: Counting objects: 100% (26592/26592), done.
remote: Compressing objects: 100% (18809/18809), done.
Receiving objects:   60% (15931/26592), 5.26 MiB | 943.00 KiB/s
Then create a Flectra virtual environment with python with below command:
python3 -m venv flectra-venvAlso activate the virtual environment.
Note: By default, Ubuntu 20.04 comes with Python version 3.8.2. So you will need to update the requirements.txt file to prevent the psucopg2 error when installing Flectra
You can prevent this error with two solutions:
(1):
Open the file with text editor you have
(flectra-venv) flectra@unixcop:~$ vim flectra/requirements.txtThen you can skip all error by deleting all contents of requirements.txt file and adding this content to it.
Babel==2.3.4
decorator==4.0.10
docutils==0.12
ebaysdk==2.1.5
feedparser==5.2.1
gevent==1.1.2 ; sys_platform != 'win32' and python_version < '3.7'
gevent==1.5.0 ; python_version >= '3.7'
greenlet==0.4.10 ; python_version < '3.7'
greenlet==0.4.14 ; python_version >= '3.7'
html2text==2016.9.19
Jinja2==2.10.1
lxml==3.7.1 ; sys_platform != 'win32' and python_version < '3.7'
lxml==4.6.3 ; sys_platform != 'win32' and python_version >= '3.8'
lxml ; sys_platform == 'win32'
Mako==1.0.4
MarkupSafe==0.23
mock==2.0.0
num2words==0.5.6
ofxparse==0.16
passlib==1.6.5
Pillow==4.0.0 ; python_version < '3.7'
Pillow==6.1.0 ; python_version >= '3.7'
psutil==4.3.1; sys_platform != 'win32' and python_version >= '3.7'
psutil==5.6.3; sys_platform == 'win32'
psycopg2==2.8.5; sys_platform != 'win32' and python_version >= '3.7'
psycopg2==2.8.5; sys_platform != 'win32' and python_version >= '3.8'
psycopg2==2.8.5; sys_platform == 'win32'
pydot==1.2.3
pyldap==2.4.28; sys_platform != 'win32'
pyparsing==2.1.10
PyPDF2==1.26.0
pyserial==3.1.1
python-dateutil==2.5.3
# vatnumber requirement. Last version compatible
python-stdnum<=1.14
pytz==2016.7
pyusb==1.0.0
PyYAML==3.12 ; python_version < '3.7'
PyYAML==3.13 ; python_version >= '3.7'
qrcode==5.3
reportlab==3.3.0
requests==2.20.0
suds-jurko==0.6
vatnumber==1.2
vobject==0.9.3
Werkzeug==0.11.15 ; sys_platform != 'win32'
Werkzeug==0.16.0  ; sys_platform == 'win32'
XlsxWriter==0.9.3
xlwt==1.3.*
xlrd==1.0.0
pypiwin32 ; sys_platform == 'win32'
oauthlib==2.0.7
pycrypto==2.6.1
validate-email==1.3
unittest2==1.1.0
numpy==1.14.3
This content shown above is the default one of the file but i edited it carefully and skkiped all errors that faced me while the installation (Errors such as : version compatibility and duplicated lines …etc)
If you want to complete the installation with no errors, I recommend with this solution.
(2):
The second soluiton by modifying default requirements.txt file:
vim flectra/requirements.txtFind the following lines:
psycopg2==2.7.3.1; sys_platform != 'win32'
psycopg2==2.8.3; sys_platform == 'win32'
Replace them with the following lines:
psycopg2==2.8.5; sys_platform != 'win32'
psycopg2==2.8.5; sys_platform == 'win32'
If you got an errors with duplicated lines or something like that, you can delete them then save file and quit.
After that install the wheel module with command:
(flectra-venv) flectra@unixcop:~$ pip3 install wheelFinally Install all required Python modules with:
(flectra-venv) flectra@unixcop:~$ pip3 install -r flectra/requirements.txtOnce all the modules are installed, deactivate from the virtual environment
(flectra-venv) flectra@unixcop:~$ deactivateNext, exit from the Flectra user
flectra@unixcop:~$ exit
logout
root@unixcop:~#
Configure Flectra
We need to create a directory structure for Flectra to store addons, configuration files and logs.
Create it with these commands:
mkdir /opt/flectra/flectra-custom-addons
mkdir /var/log/flectra
touch /var/log/flectra/flectra.log
mkdir /etc/flectra
Change the ownership of the above directories to Flectra as shown:
chown -R flectra:flectra /opt/flectra/flectra-custom-addons
chown -R flectra:flectra /var/log/flectra/
chown -R flectra:flectra /etc/flectra
Then create a Flectra configuration file
vim /etc/flectra/flectra.confAnd add the following lines:
options]
admin_passwd = unixcop@password
db_host = False
db_port = False
db_user = flectra
db_password = False
logfile = /var/log/flectra/flectra.log
logrotate = True
proxy_mode = True
addons_path = /opt/flectra/flectra/addons, /opt/flectra/flectra-custom-addons
Save and close the file.
Create a Systemd Service File for Flectra
We will create a systemd service file to manage the Flectra service. Create a new service file with this command:
vim /etc/systemd/system/flectra.serviceThen add the following lines:
[Unit]
Description=flectra

[Service]
Type=simple
SyslogIdentifier=flectra
PermissionsStartOnly=true
User=flectra
Group=flectra
ExecStart=/opt/flectra/flectra-venv/bin/python3 /opt/flectra/flectra/flectra-bin -c /etc/flectra/flectra.conf
StandardOutput=journal+console

[Install]
WantedBy=multi-user.target
Then Reload the systemd daemon list. and start the Flectra service and enable it to start at boot.
systemctl daemon-reload
systemctl start flectra
systemctl enable flectra
Verify the port that Flectra is listening on using below command:
root@unixcop:~# netstat -plntu | grep 7073
tcp        0      0 0.0.0.0:7073            0.0.0.0:*               LISTEN      23821/python3
root@unixcop:~#
Now, open your web browser and type the http://IP_address:7073 You will be redirected to the following page:
Note:
I replaced IP address with flectra.unixcop.com in /etc/hosts
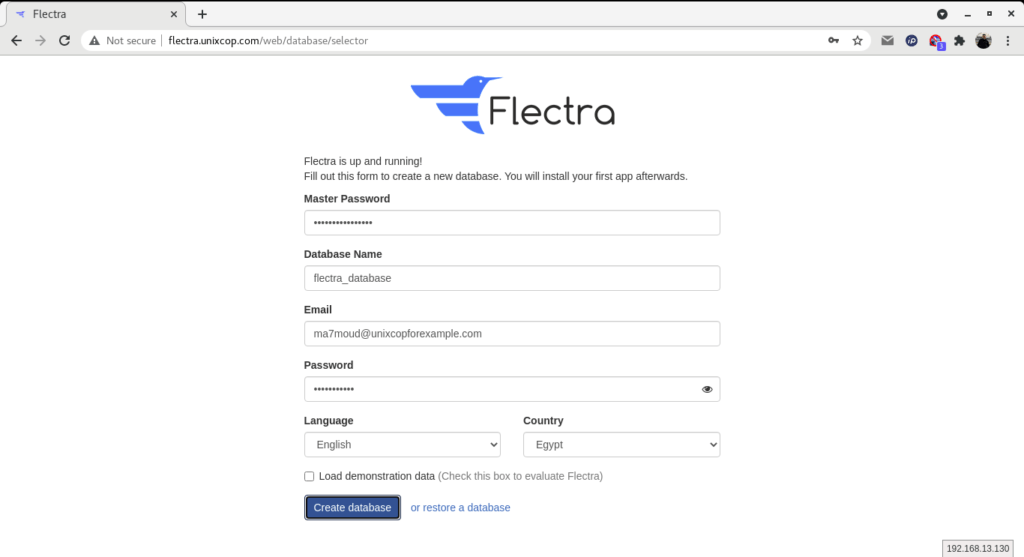
# echo "192.168.13.130 flectra.unixcop.com" > /etc/hostsIf you follow this step, then open browser and type:
flectra.unixcop.com:7073
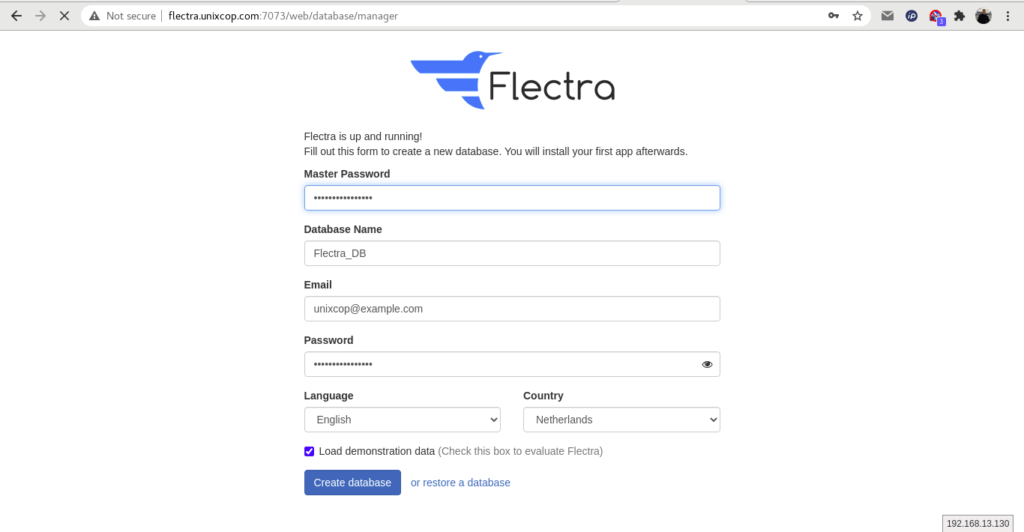
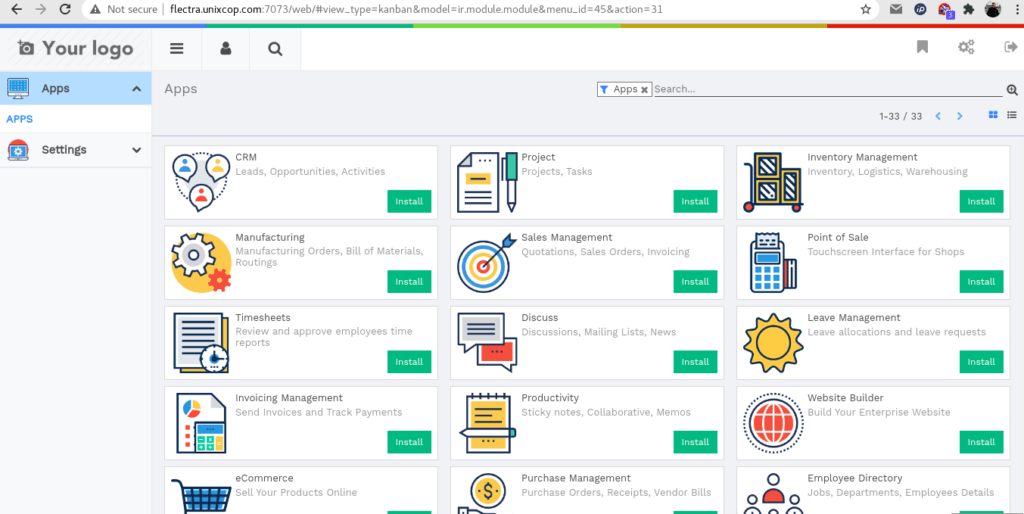
Then Provide your Master password that you added it in flectra.conf file , database details, email, and password and click on the Create database button. You will be redirected to the Flectra dashboard, as shown below:
Install Nginx as a Reverse Proxy for Flectra
Flectra is now running, however it is only accessible at our IP address using the port 7073. This may be okay for some, but it would be ideal if Flectra could be directly accessible using a domain name with the default port (80). To do this, we’ll set up Nginx as a reverse proxy. Install the Nginx web server using the following command:
sudo apt-get install nginx -ycreate a new Nginx virtual host
vim /etc/nginx/sites-available/example.confAdd the following lines.
#flectra server
upstream flectra {
 server 127.0.0.1:7073;
}

server {
   listen 80;
   server_name flectra.unixcop.com;

proxy_read_timeout 720s;
 proxy_connect_timeout 720s;
 proxy_send_timeout 720s;

 # Add Headers for flectra proxy mode
 proxy_set_header X-Forwarded-Host $host;
 proxy_set_header X-Forwarded-For $proxy_add_x_forwarded_for;
 proxy_set_header X-Forwarded-Proto $scheme;
 proxy_set_header X-Real-IP $remote_addr;

 # log
 access_log /var/log/nginx/flectra.access.log;
 error_log /var/log/nginx/flectra.error.log;

 # Redirect requests to flectra backend server
 location / {
   proxy_redirect off;
   proxy_pass http://flectra;
 }

 # common gzip
 gzip_types text/css text/less text/plain text/xml application/xml application/json application/javascript;
 gzip on;
}
Make sure to replace flectra.unixcop.com with your own domain name
Then activate the Nginx virtual host file.
ln -s /etc/nginx/sites-available/example.conf /etc/nginx/sites-enabled/The final step to restart nginx service
systemctl restart nginxAccess the Flectra Web UI
Now open your browser then type:
flectra.unixcop.com

Flectra has been installed, so you can start using it and improve your business’ productivity.
That’s all !!