
What is Tomcat?
In this article, we will be demonstrating how to install Apache Tomcat on CentOS 8.Before we begin, let’s define exactly what Apache Tomcat is. Apache defines Tomcat as: “An open-source, servlet container, JavaServer Pages, Java Expression Language, and WebSocket technology that also acts as a web server.It affords a “pure Java” based HTTP server environment in which Java can be executed.” Tomcat works with the Java programming language and is associated with web applications written in Java.
Prerequisites
Our first task is to make sure our system is updated.Since we are going to install Tomcat on CentOS 8, we will run the following commands.
cat /etc/redhat-release 
yum -y install epel-release
yum -y update -y
Next, we need to verify whether Java is already installed.
java -versionBut If we do not have Java installed, we will receive the output in the ScreenShot below.
Install Java
Moving forward, let’s install Java.Apache Tomcat will not work properly if Java is not present on the system.Additionally, we need to ensure that we are installing Java OpenJDK 11. Because it is open-source and a long term release, we will not run into any licensing issues. To accomplish this task, we will use the following command.
dnf install java-11-openjdk-devel -y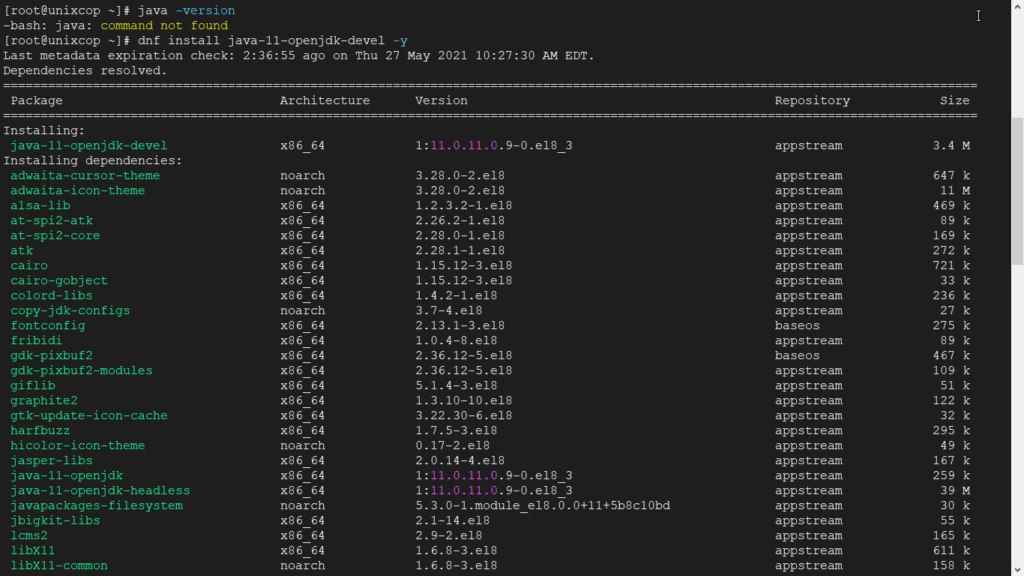
So next, we will verify the version of Java installed by running this command.
java -version
Installing Tomcat
Note: At the time of this writing, the latest version of Tomcat is 10.0.6. If you would like to download the latest version, visit this download link for Tomcat 10 to check for the newest version.
So, First we need to create a user for Tomcat.
useradd -r tomcatNext, we are going to create a folder and then use the “cd” command to change directories into that folder where we will download Tomcat.
mkdir /usr/local/tomcat10
cd /usr/local/tomcat10
Now, let’s download the Tomcat archive using curl(wget is also an option if it is installed on your version of CentOS 8.)
curl -o tomcat10.tar.gz https://downloads.apache.org/tomcat/tomcat-10/v10.0.6/bin/apache-tomcat-10.0.6.tar.gz
Note: Using the curl command with the -o flag allows us to download the tar.gz file and save it locally to whatever filename we choose.In this case, we simply saved the file as tomcat10.tar.gz.
So Next, we can unpack the “tomcat10 tar.gz” file into our working folder.
tar -xvf tomcat10.tar.gz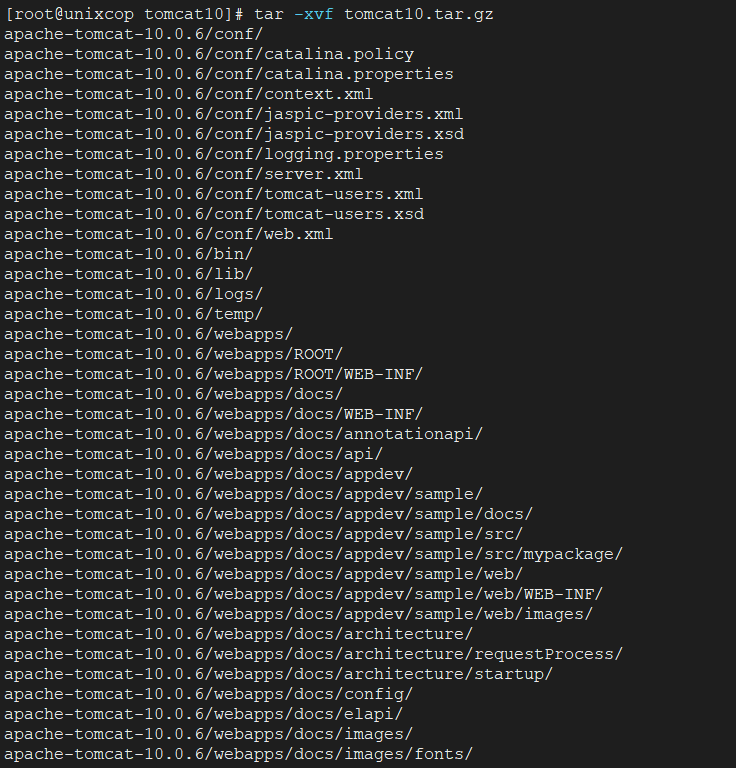
So, Now we need to modify the ownership of the /usr/local/tomcat10/ directory.
chown -R tomcat:tomcat /usr/local/tomcat10Then copy the files in the apache-tomcat10.0.6 into tomcat10 directory by using the following commands:
cd apache-tomcat-10.0.6/
cp -r * /usr/local/tomcat10
In addition to By default, your files will be located in this folder: /usr/local/tomcat10 and the configuration files will be stored in: /usr/local/tomcat10/conf
ll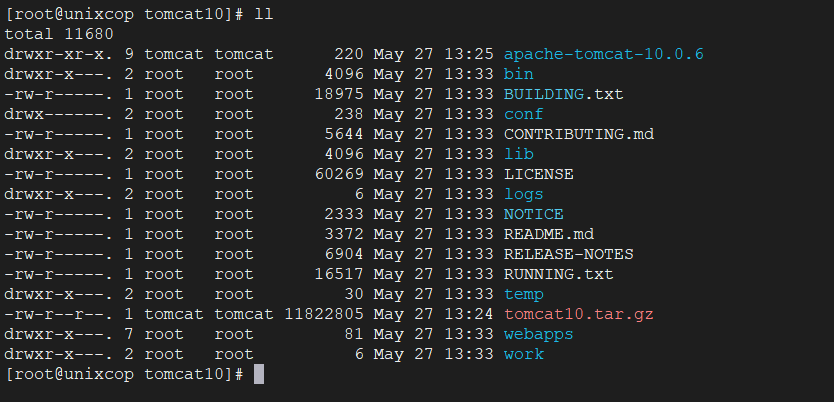
Set Environment Variable
Now, we can configure the CATALINA_HOME environment variable using the following commands:
 echo "export CATALINA_HOME="/usr/local/tomcat10"" >> ~/.bashrc
 source ~/.bashrc
This variable is set to ensure software access is allowed for all the users on your system.
Create & Configure The Systemd Service
So First, let’s review our Java information as we will need that info to populate part of our unit file.
alternatives --list | grep java

So Next, to ensure we have Tomcat set up as a service, we will create a simple systemd unit file.
Note: A unit file is a plain-text record that defines the system resources that are available to be managed by the systemd daemons.
touch /etc/systemd/system/tomcat.service
vim /etc/systemd/system/tomcat.service
Now, we can add the following information to our new unit file.
[Unit]
Description=Apache Tomcat Server
After=syslog.target network.target

[Service]
Type=forking
User=tomcat
Group=tomcat

Environment=CATALINA_PID=/usr/local/tomcat10/temp/tomcat.pid
Environment=CATALINA_HOME=/usr/local/tomcat10
Environment=CATALINA_BASE=/usr/local/tomcat10

ExecStart=/usr/local/tomcat10/bin/catalina.sh start
ExecStop=/usr/local/tomcat10/bin/catalina.sh stop

RestartSec=10
Restart=always
[Install]
WantedBy=multi-user.target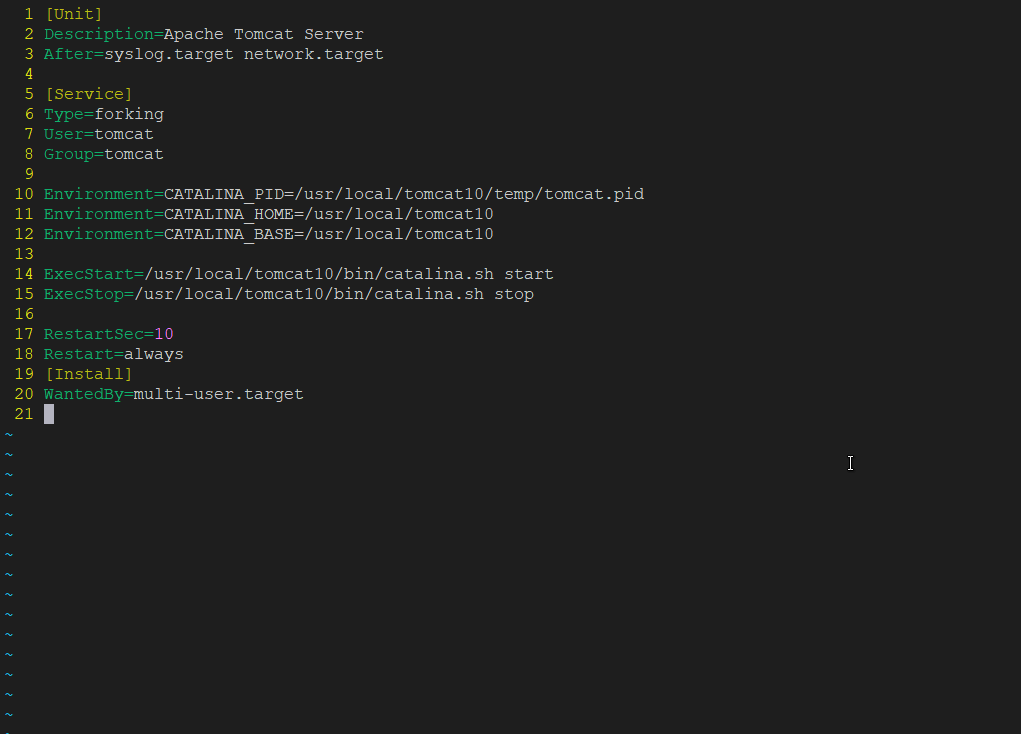
This unit file can contain multiple directives besides the ones listed above.After this, we need to save the file (using :wq) and reload the service to apply the changes.
systemctl daemon-reloadSo Now we can test the systemd Java config file.
Start, Enable, and Check the Status of Tomcat
Next, let’s start the Tomcat service, and then enable it.
[root@unixcop tomcat10]# systemctl start tomcat.service
[root@unixcop tomcat10]# systemctl enable tomcat.service
Now, we can check its status using the following command.
systemctl status tomcat.service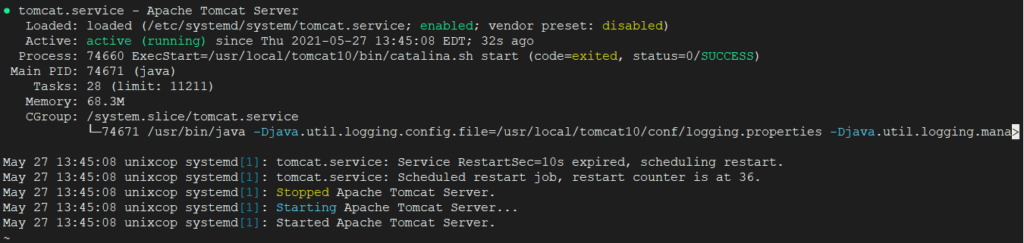
Finally, hit the ‘q’ key to exit out of the status check and return to the bash prompt.
Version Check
To retrieve the Tomcat server information, we can use the following command:
/usr/local/tomcat10/bin/version.sh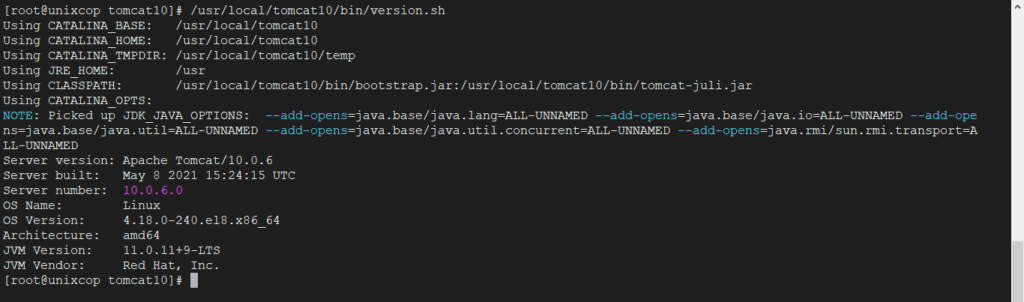
Testing
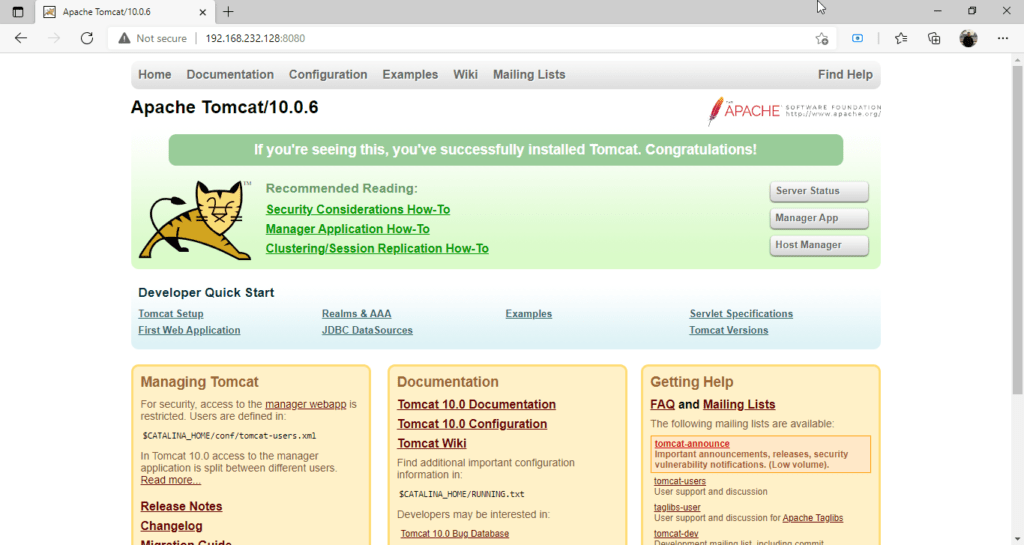
So Next, let’s open a browser to test out the connection.
Load http://localhost:8080 or http://serverIP:8080 into your browser, and you should see an image like the one below.
Errors!
If by some chance, you get an “err_ssl_protocol_error” page when visiting http://ip.ad.dr.ess:8080/, verify the error using curl and once verified, take the following steps.
#curl -Iv https://IPADDRESS:8080
For exampl my machine ip add:
curl -Iv https://192.168.232.128:8080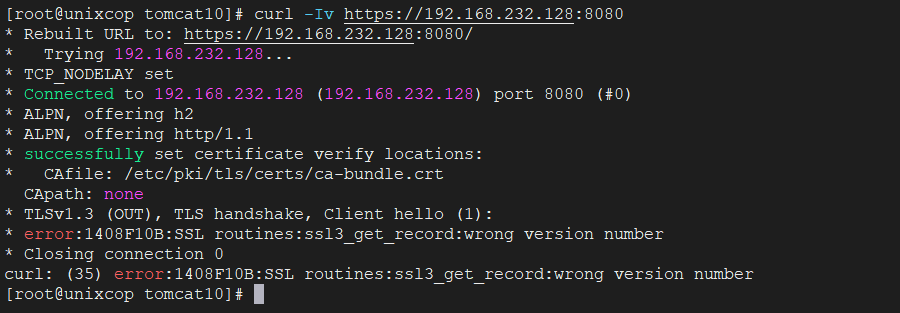
1. Check to ensure the Java/Tomcat ports are open in the firewall
firewall-cmd --zone=public --permanent --add-port=8080/tcp
firewall-cmd --zone=public --permanent --add-port=8443/tcp
2. Then Run a netstat command to check to see if the server is listening for the IPv4 addresses (and/or IPv6 address if needed).
So After checking netstat, we saw that Tomcat was only bound to the IPv6 protocol ports.
[root@unixcop tomcat10]# netstat -nlp | grep java
Note: So You may need to install Netstat using the “yum install net-tools” command to view this issue as our version of CentOS 8 did not include the netstat command by default.
To address this, create a file called setenv.sh file within either your CATALINA_BASE or CATALINA_HOME bin/ directory
(we used the /usr/local/tomcat10/bin folder).
Then create a new file called setenv.sh.
cd bin/
touch setenv.sh
vim setenv.sh
Click insert and add the following line to the file.
JAVA_OPTS="$JAVA_OPTS -Djava.net.preferIPv4Stack=true -Djava.net.preferIPv4Addresses=true "

This entry overrides the default settings used by Tomcat.Once that task is complete, save and exit the file using “:wq” and reload the services to save our changes.
systemctl daemon-reload
So Now, let’s check the ports again with same command:
[root@unixcop tomcat10]# netstat -nlp | grep java
tcp 0 0 0.0.0.0:8080  0.0.0.0:* LISTEN 59815/java
tcp 0 0 127.0.0.1:8005 0.0.0.0:* LISTEN 59815/java
tcp 0 0 0.0.0.0:8009  0.0.0.0:* LISTEN 59815/java
Verify correct firewall ports are open.
[root@unixcop ~]# firewall-cmd --zone=public --list-ports | grep 8080
8080/tcp 8443/tcp
[root@unixcop ~]#
Then If all that fails you can stop and disable the firewall service temporary for testing your tomcat page:
systemctl disable firewalld
systemctl stop firewalld
Configuration Settings
Here are a couple of useful configuration settings for Tomcat.
Add Users
So we may need to add new users or an admin user. We can accomplish this by going to the Tomcat conf folder and modifying these settings.
[root@unixcop conf]# cd /usr/local/tomcat10/conf <!-- user admin can access manager and admin section both -->
<role rolename="admin-gui" />
<user username="admin" password="_SECRET_PASSWORD_" roles="manager-gui,admin-gui" />Note: We can open the file through vi or vim or by utilizing the file manager and opening the file using a text editor.
Finally, use :wq to save the file.
Changing Ports
So At times, you may wish to run Tomcat on an alternate port. To accomplish this, we can modify the connector port setting in the server.xml file.
These are the steps to take.
[root@unixcop conf]# cd /usr/local/tomcat10/conf/
[root@unixcop conf]# vim /usr/local/tomcat10/conf/server.xml
In addition to In the server.xml file or from within a text editor, we can modify the “Connector port” line, changing it from port 8080 to 80 or any other port number we choose.
Line
68  <Connector port="8080" protocol="HTTP/1.1"
69        connectionTimeout="20000"
70        redirectPort="8443" />
Conclusion
Overall, Tomcat easily facilitates the exchange of data between a client and the servlet, provides a programming platform for web applications, and assumes the functions of identifying and authorizing clients, creating sessions for each of them in a safe and secure manner.