
Hello, friends. In this post, you will learn how to install Cockpit on Debian 11. The process is simple, but it’s always good to know how to monitor the system through a very complete web interface.
What is Cockpit?
Cockpit is an open-source utility that allows you to manage your Linux system through a convenient web interface. Although it is not the best in its field, its main feature is that it is effortless to install and use.
Another aspect that makes Cockpit an important piece of software is that it is free, open source and has an active community of developers behind it.
With Cockpit, you can use an internal terminal, make SSH connections and much more. Some of them:
- Inspect and change the network configuration
- Configure a firewall
- Manage storage (including RAID and LUKS partitions)
- Create and manage virtual machines
- Download and run containers
- Browse and search system logs
So let’s go for it.
Install Cockpit on Debian 11
As I pointed out earlier, one of the advantages of Cockpit is that it’s easy to install and apart from that, it doesn’t consume too many resources because it’s a system service.
First open a terminal or connect via SSH to your server.
Then, make sure your system is up-to-date.
sudo apt update
sudo apt upgrade
This step ensures that the server and repository information is up-to-date, so the server will be more secure because you will have the latest security patches installed.
You can then install Cockpit by running this command
sudo apt install cockpit
Reading package lists... Done
Building dependency tree... Done
Reading state information... Done
The following additional packages will be installed:
  cockpit-bridge cockpit-system cockpit-ws dbus-user-session dconf-gsettings-backend dconf-service glib-networking glib-networking-common glib-networking-services
  gsettings-desktop-schemas libcrack2 libdconf1 libjson-glib-1.0-0 libjson-glib-1.0-common libpolkit-agent-1-0 libpolkit-gobject-1-0 libproxy1v5 libpwquality-common
  libpwquality-tools libpwquality1 libssh-4
Suggested packages:
  cockpit-doc cockpit-pcp cockpit-machines xdg-utils sssd-dbus
Recommended packages:
  cockpit-storaged cockpit-networkmanager cockpit-packagekit cracklib-runtime
The following NEW packages will be installed:
  cockpit cockpit-bridge cockpit-system cockpit-ws dbus-user-session dconf-gsettings-backend dconf-service glib-networking glib-networking-common
  glib-networking-services gsettings-desktop-schemas libcrack2 libdconf1 libjson-glib-1.0-0 libjson-glib-1.0-common libpolkit-agent-1-0 libpolkit-gobject-1-0
  libproxy1v5 libpwquality-common libpwquality-tools libpwquality1 libssh-4
0 upgraded, 22 newly installed, 0 to remove and 25 not upgraded.
Need to get 5,696 kB of archives.
After this operation, 14.6 MB of additional disk space will be used.
Do you want to continue? [Y/n]
And you’re done.
Managing the Cockpit service
Once the program is installed, a new system service will be created. If you want to start it, then you have to run.
sudo systecmtl start cockpit.socketOr stop it
sudo systecmtl stop cockpit.socketFinally, you can check the status of the service by running the command
systemctl status cockpit.socketYou will get an output screen like the following one
● cockpit.socket - Cockpit Web Service Socket
     Loaded: loaded (/lib/systemd/system/cockpit.socket; enabled; vendor preset: enabled)
     Active: active (listening) since Wed 2022-03-30 22:12:46 UTC; 44s ago
   Triggers: ● cockpit.service
       Docs: man:cockpit-ws(8)
     Listen: [::]:9090 (Stream)
    Process: 2196 ExecStartPost=/usr/share/cockpit/motd/update-motd  localhost (code=exited, status=0/SUCCESS)
    Process: 2203 ExecStartPost=/bin/ln -snf active.motd /run/cockpit/motd (code=exited, status=0/SUCCESS)
      Tasks: 0 (limit: 4557)
     Memory: 8.0K
        CPU: 21ms
     CGroup: /system.slice/cockpit.socket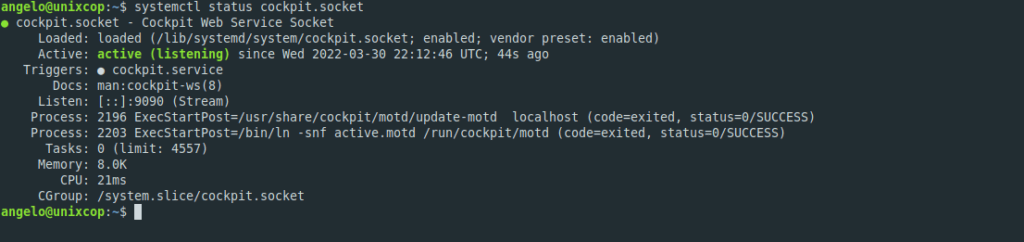
Cockpit is installed correctly.
Configuring the firewall for Cockpit
The next step is to configure the firewall so that cockpit can work. This has to be done because Cockpit works on port 9090 and we have to open it.
To achieve this, we have to run
sudo ufw allow 9090/tcpWith this, you are ready to go.
Accessing the Cockpit web interface in Debian 11
You can now access the Cockpit web interface by opening a web browser and going to https://your-domain:9090 and you will see the login screen

Log in with your system credentials, and you will finally be able to use Cockpit.
Conclusion
Throughout this post, you have learned how to install Cockpit from the official Debian 11 repositories. I hope you liked this post.