
The following topics will be discussed in this blog:
Infrastructure as Code is used to maintain Terraform-created cloud resources. IaC is supposed to be used for all resource adjustments, installation, and deletion. Manual updates via the web console are strictly followed by teams who’ve already used Terraform for infrastructure management.
In this post, you’ll learn how to handle the deletion of Terraform-managed cloud infrastructure resources as well as how to avoid some frequent issues.
The association among both infrastructure objects as well as the IaC configurations is preserved in a state file once Terraform configurations are deployed. The state file is extremely important for all future terraform operations, including destroy.
A Terraform destroy command deletes infrastructure resources from your current Terraform project’s state file, effectively terminating resources maintained by the current Terraform project.
When Terraform executes the destroy command, it first verifies the information in the state file by comparing it to cloud provider APIs. It creates a dependency graph internally to determine the order where the resources will be discarded.
Clearly, Terraform uses the state file as a source of facts when performing any operation. Terraform can react in unexpected ways if somehow the state file gets corrupted.
How to Destroy Terraform Resources.
Keeping the state file in mind, there are two possible approaches to destroy resources in Terraform.
Step 1: Apply to Destroy is the first step.
If you’ve a collection of resources deployed via Terraform configurations, you can destroy one or all of them by removing/commenting out its resource blocks. Then execute the terraform plan to verify and implement the desired action.
Terraform identifies the holes in config and state files during its validation step. It also determines whether real-world resources are available and creates a plan to eliminate any resources that are available in the actual world but not in the setup.
This also means that if we manually remove a resource, the following destroy cycle will take that into account and will only try to remove the resource that already exists.
Running the uncommented example code below will create two EC2 instances: instance1 and instance2. Comment out the matching resource section in the code – instance2 – to kill one of the EC2 instances.
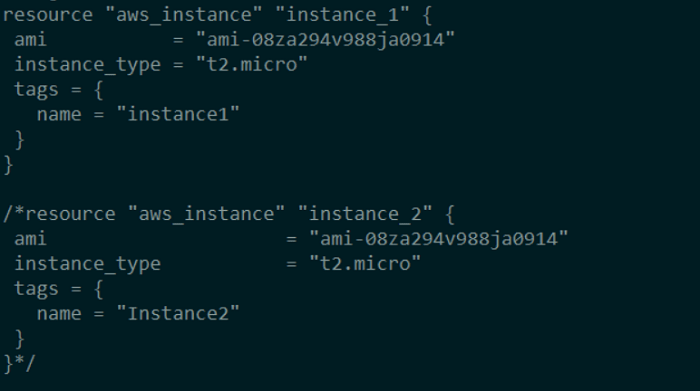
Run terraform plan and look at the results.
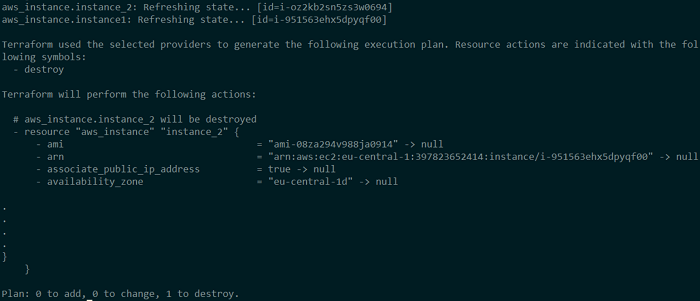
Terraform notices that instance2 is missing from the configuration, although it is present in the state file and in the real world. As a result, it devises a strategy for destroying that EC2 instance. This EC2 instance would be destroyed if you ran terraform apply now.
Step 2: Destroy to Destroy is the second step.
Terraform destroy is the more common technique of destroying Terraform-managed resources. The destroy command is used to wipe off an entire cloud service or a specific resource.
The –target argument can be used to destroy the particular resource, as seen below.
Destroy the target using Terraform
$ terraform destroy --target aws_instance.instance_1Terraform checks the state and presence of the selected EC2 instance in the AWS EC2 console before deleting it.
Destroy a specific resource in Terraform.
.
- throughput            = 0 -> null
          - volume_id             = "vol-040c21ea887ddd779" -> null
          - volume_size           = 20 -> null
          - volume_type           = "gp2" -> null
        }
    }

Plan: 0 to add, 0 to change, 1 to destroy.

╷
│ Warning: Resource targeting is in effect
│
│ You are creating a plan with the -target option, which means that the result of this plan may not represent all of the changes requested by the current
│ configuration.
│
│ The -target option is not for routine use, and is provided only for exceptional situations such as recovering from errors or mistakes, or when
│ Terraform specifically suggests to use it as part of an error message.
╵

Do you really want to destroy all resources?
  Terraform will destroy all your managed infrastructure, as shown above.
  There is no undo. Only 'yes' will be accepted to confirm.

  Enter a value: yes

aws_instance.instance_1: Destroying... [id=i-oz2kb2sn5zs3w0694]
aws_instance.instance_1: Still destroying... [id=i-oz2kb2sn5zs3w0694, 10s elapsed]
aws_instance.instance_1: Still destroying... [id=i-oz2kb2sn5zs3w0694, 20s elapsed]
aws_instance.instance_1: Still destroying... [id=i-oz2kb2sn5zs3w0694, 30s elapsed]
aws_instance.instance_1: Still destroying... [id=i-oz2kb2sn5zs3w0694, 40s elapsed]
aws_instance.instance_1: Destruction complete after 40s

╷
│ Warning: Applied changes may be incomplete
│
│ The plan was created with the -target option in effect, so some changes requested in the configuration may have been ignored and the output values may
│ not be fully updated. Run the following command to verify that no other changes are pending:
│     terraform plan
│
│ Note that the -target option is not suitable for routine use, and is provided only for exceptional situations such as recovering from errors or
│ mistakes, or when Terraform specifically suggests to use it as part of an error message.
╵


Destroy complete! Resources: 1 destroyed.
Log in to the AWS Management Console to verify the same.
Simply execute terraform destroy without the —target argument to destroy both EC2 instances. Terraform checks the state and presence of the selected EC2 instance in the AWS EC2 console before deleting it. Now, run terraform destroy with example seeing what happens.
.
.
Plan: 0 to add, 0 to change, 2 to destroy.

Changes to Outputs:
  - instance_id_1 = "i-3556811n24s10pub0" -> null


Do you really want to destroy all resources?
  Terraform will destroy all your managed infrastructure, as shown above.
  There is no undo. Only 'yes' will be accepted to confirm.
  Enter a value: yes

aws_instance.instance_2: Destroying... [id=i-im9ni551100205aa1]
aws_instance.instance_1: Destroying... [id=i-3556811n24s10pub0]
aws_instance.instance_2: Still destroying... [id=i-im9ni551100205aa1, 10s elapsed]
aws_instance.instance_1: Still destroying... [id=i-3556811n24s10pub0, 10s elapsed]
aws_instance.instance_2: Still destroying... [id=i-im9ni551100205aa1, 20s elapsed]
aws_instance.instance_1: Still destroying... [id=i-3556811n24s10pub0, 20s elapsed]
aws_instance.instance_1: Still destroying... [id=i-3556811n24s10pub0, 30s elapsed]
aws_instance.instance_2: Still destroying... [id=i-im9ni551100205aa1, 30s elapsed]
aws_instance.instance_2: Still destroying... [id=i-im9ni551100205aa1, 40s elapsed]
aws_instance.instance_1: Still destroying... [id=i-3556811n24s10pub0, 40s elapsed]
aws_instance.instance_1: Destruction complete after 41s
aws_instance.instance_2: Still destroying... [id=i-im9ni551100205aa1, 50s elapsed]
aws_instance.instance_2: Still destroying... [id=i-im9ni551100205aa1, 1m0s elapsed]
aws_instance.instance_2: Destruction complete after 1m7s


Destroy complete! Resources: 2 destroyed.
Step 3: Destroy Resources that Are Protected
Let’s re-create the infrastructure from the previous example, but with a little change. Instance2 should have the disable API termination = true attribute. Attempt to destroy the same object with the terraform destroy command once again. Examine the output for any errors.
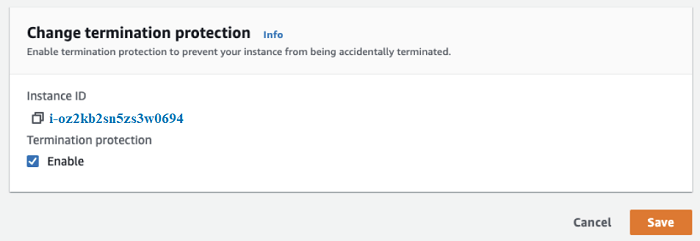
We get an OperationNotPermitted issue for one of the EC2 instances, according to the error notice. disable API termination is set to true in the Terraform configuration that created this EC2 instance. This is an extra layer of protection offered by the cloud provider to prevent the EC2 instance from being accidentally deleted.
Terraform operations use cloud provider APIs to update and remove configurations, therefore they can’t do anything that the provider’s API doesn’t allow. It means Terraform won’t be able to destroy Instance2 in this scenario. It was, however, capable to delete Instance1, which had no such attribute set. This signifies that it is by default set to false.
Disable the termination option for this EC2 instance in the AWS EC2 console. This time destroy command again.
Terraform does not have the ability to alter this behavior at this moment. However, this is a good thing because it prevents critical resources from being accidentally deleted.
Step 4: Destroy everything but a few.
You may see the situations where you want to reconstruct the majority of the infrastructure components while keeping a few important ones in place. There is currently no method to tell Terraform which resources should not be destroyed.
However, because the state is so important in Terraform’s decision-making, the following appears to be a workaround:
- Using the terraform state rm command, delete the resource from the state file.
- Without the —target argument, run terraform destroy.
- Restore the target resources back into the state file when they’ve been destroyed successfully. This article explains how to use Terraform to import cloud resources.
Terraform will be notified that some resources are no longer controlled by Terraform when you run terraform state rm. Terraform somehow doesn’t touch such resources when destroy is used. When the cleanup of other resources is finished and the remaining resources are imported again, Terraform maintains the resources once more.
Points to Remember
Terraform destroy is a command that is sometimes used when absolutely necessary. It can’t be used in a production environment on a regular basis.
However, because many proof-of-concept trials necessitate cleanup efforts, it would be used frequently in sub-production contexts.
/////////////////////////////////////////////////////////////////////////////////////////////////////////////////////////////////