
Swap Space Introduction
Have you experienced a memory spike? A moment where your system is getting slower due to lack of physical memory. Linux has a mechanism to overcome this issue. It introduced a Swap Space. Swap Space is a space on hard disk which is a substitute of physical memory. The kernel will search the idle memory pages in the RAM, then the kernel will write the idle page to the swap area.
Initial Check
Firstly we need to check if there is an existing swap on our system. We can use command swapon to check this, adding -s will display swap usage summary by device.
#swapon -s
If nothing was returned, meaning the summary is not exist, and no swapfile being configured.
Another way to check current swap is to use this free command using parameter m below :
#free -m

From the output above, we found that our Swap size is 0, meaning we do not have any Swap space yet.
Make Partition
We need to allocate a special partition for this Swap space. We can utilize fdisk command to accomplish this. We need to check the current disk attached to the system.
#fdisk -l
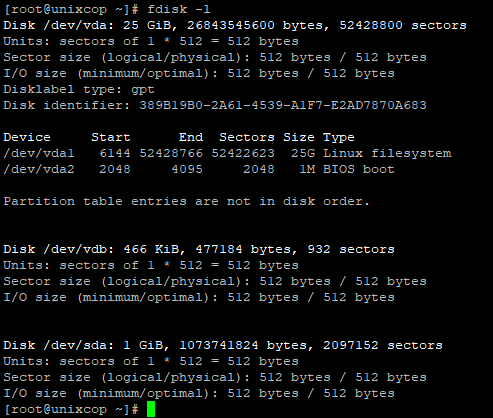
From the result above, we know that /dev/sda does not have partition yet, and it have enough size (1GB). Since we plan to make a 500MB Swap space, so that disk is the perfect choice for our Swap partition.
Create Partition
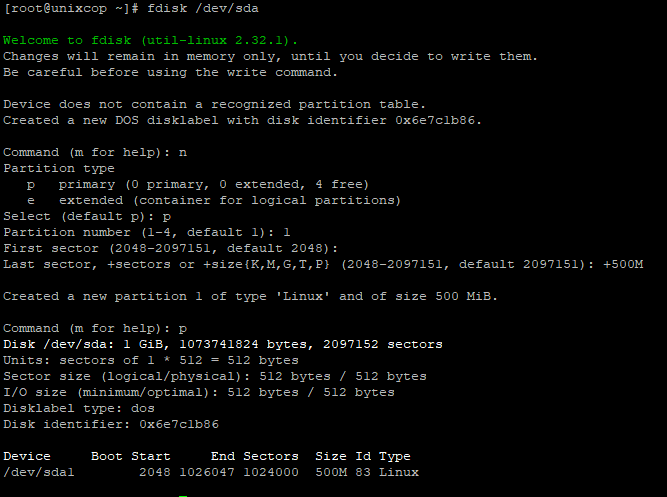
#fdisk /dev/sda
Assign the type of partition
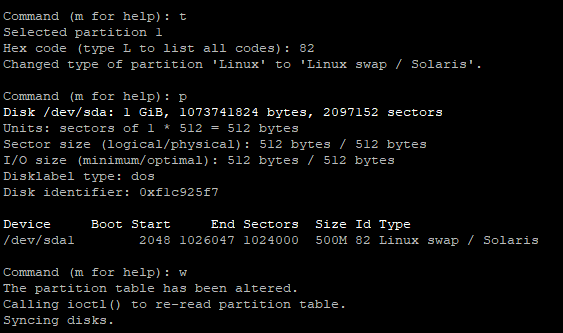
After create the partition (/dev/sda1), the type is still Linux and the code is 83 , hence we need to change it to Linux swap / Solaris. The code for this type is 82.
Verify the newly created Swap Partition
$fdisk -l
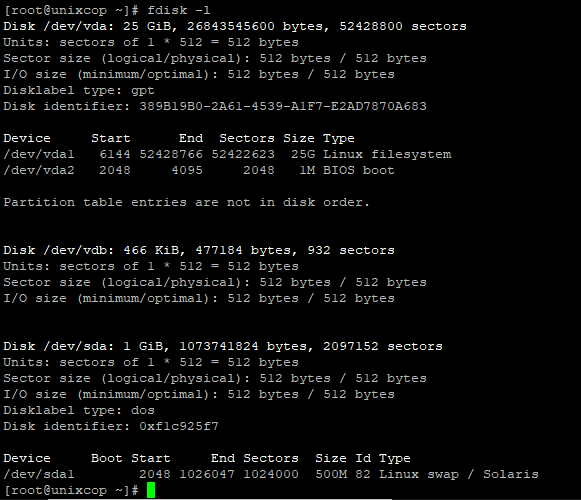
From the result above, we can see the /dev/sda1 had been created with the planned size(500MB) and the correct Id (82) and correct Type (Linux swap / Solaris).
Format the device
To set up a Linux swap area on the device , we need to run mkswap
#mkswap /dev/sda1

Activate the swap space
Since our device is ready to use, we may begin using it by running this command below:
#swapon /dev/sda1

Check the newly activated swap using the previous free -m command.
#free -m

As you can see that, now we have a Swap Space, the size is 499MB, and currently not used (0 MB). Later, when the physical Memory free already low, it will start to use the Swap space.
Make The Swap Space Permanent
Our swap space is enabled. But when we reboot, the server will not automatically enable the swap for use. Hence we need to set it in /etc/fstab. We will use UUID of the device in the configuration.
We need to check the UUID of our device.
#blkid /dev/sda1

Add the UUID to the /etc/fstab, using vi
#vi /etc/fstab

After adding the line, please save and quit the vi using :wq!. The next reboot, server will read the /etc/fstab and activate the swap space.