
In this article, you will learn how to configure a recursive DNS server using BIND. If you haven’t checked our article on how to install the BIND DNS server in FreeBSD yet, you can find the article here. Please note that in this article, the term recursive DNS server might also be referred to as DNS Caching server or just Caching server. The term DNS server might also be referred to as Nameserver or just name server.
What is a Recursive DNS Server?
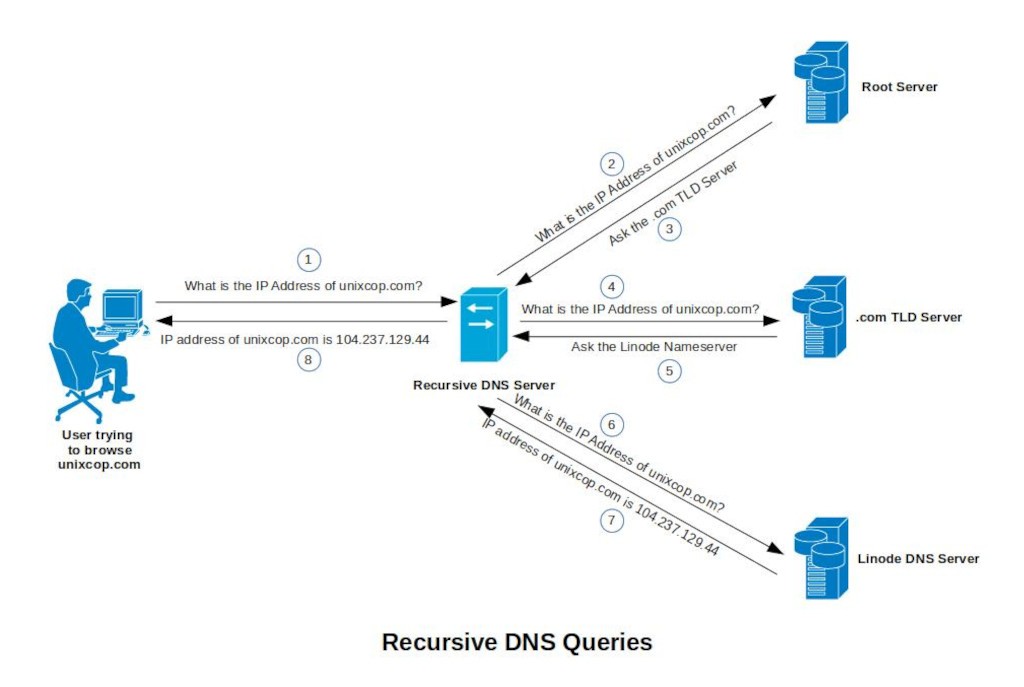
When you try to type in your browser, https://unixcop.com, the first thing the browser will do is to determine the IP address of the domain name unixcop.com. It will ask the recursive DNS server the question, “What is the IP address of unixcop.com?”.
But wait, you might ask, how does our browser know the IP address of the recursive DNS server? The IP address of this recursive DNS server is configured in our workstation/device either manually or distributed and configured automatically in our device through DHCP.
Let us proceed. The recursive DNS server will then check if the answer (which is the IP address of unixcop.com) to the question is already in the cache. If it is already in the cache, then it will send the answer to the browser right away. But if it is not yet in the cache, the recursive DNS server will ask the same question to the DNS root server.
The DNS Root Server
You might be wondering again, how did the recursive DNS server know the IP address of the DNS root server?
The DNS protocol was designed in such a way that the management of zones can be hierarchical and distributed. This makes the system scalable and reliable. Take for example the domain name unixcop.com. This domain name is broken down into zones. We have the .com zone and the actual unixcop.com zone. The .com zone is managed at the .com TLD (Top Level Domain)Server. There are so many domain names that uses the .com TLD. Just to name a few, we have google.com, facebook.com, twitter.com and many more. By the way, there are also other TLD’s available. Just to name a few, there is .net, .org, .edu, .gov, .mil and the list goes on. You can see the complete list here.
It is hard to manage all these domains in one central server. So the .com TLD server delegates the management of the google.com zone to the Google DNS server. It delegates the management of the facebook.com zone to the Facebook DNS server. And in our example, the .com TLD Server delegates the management of the unixcop.com zone to the Linode DNS Server.
In DNS, there is also a zone called the root zone. It is simply represented by a dot “.”. Consider this root zone as the starting point of the DNS hierarchy. According to the Internet Assigned Numbers Authority (IANA), this root zone is managed and maintained by 13 different operators. This gives us 13 different authoritative DNS servers of the root zone. These authoritative DNS servers are commonly called root servers. Each of which has their own IPv4 and IPv6 address.
Thanks to the Anycast IP protocol, although there are only 13 IPv4 and IPv6 addresses assigned to each root server, there are actually hundreds of these servers sharing the same IP addresses. They are strategically placed in different geographical locations around the world. This is to prevent a single point of failure and to distribute the DNS request traffic.
Going back to the question. When you configure a recursive DNS server, you need to have a copy of the file called root hints. This root hints file contains the IP addresses of the 13 authoritative DNS servers of the root zone. You can download it from here or through FTP.
So how did the recursive DNS server know the IP address of the DNS root servers? The recursive DNS server knows how to reach the DNS root servers because it has a copy of the root hints file.
These root servers are the ones that delegates the management of the TLD’s to the different TLD DNS servers or TLD authoritative DNS servers.
The .com Top Level Domain Server
Let us go back to the recursive DNS server asking the DNS root server, “What is the IP address of unixcop.com?”. Does the DNS root server know this information? No. Right? But based on the domain name itself, the DNS root server knows the IP address of the DNS server that managed the .com TLD. It is the DNS root server that delegates this management task down to the different TLD’s. So the DNS root server will respond to the recursive DNS server, “Go ask the .com TLD server.”.
Once again, the recursive DNS server will ask the question, “What is the IP address of unixcop.com?”. This time, the question is sent to the .com TLD server. But again, the .com TLD server doesn’t know this information. It only knows the IP address of the authoritative DNS server of unixcop.com. This time, the authoritative DNS server of unixcop.com is managed by Linode. So the .com TLD server will respond to the recursive DNS server, “Go ask the Linode DNS server.”.
The Search is Over
The recursive DNS server will ask Linode DNS server, “What is the IP address of unixcop.com?”. Since the Linode DNS server is the authoritative DNS server of the unixcop.com zone, it will reply “The IP address of unixcop.com is 104.237.129.44.”.
Finally, the search is over. The recursive DNS server will store this information in the cache before sending it to the requesting application. In this case, your browser.
Your browser can then send HTTPS request to the IP address of unixcop.com.
So what is a recursive DNS server? It is a server that recursively sends a DNS query in order to get the equivalent IP address of a given domain name. It is also known as a DNS Caching server because it has the ability to store the responses into the cache memory.
Configuring a Recursive DNS Server or DNS Caching Server
Let us create first a working directory for our recursive DNS server. You need to do this as root user. Use the su command to switch to root. You will be asked to input the root password. After creating the working directory, go inside the newly created directory using the cd command.
$ su -
Password:
# mkdir -p /var/named/recursive
# cd /var/named/recursive
When you are already inside the new directory, download the root hints file through FTP. You need to login using the username anonymous and just press Enter key when asked with a password. Once you are inside the ftp server, go inside the domain directory using the cd command. Run the bin or binary command in order to set the file transfer mode to binary. I also usually run the hash command just to print a hash (#) character after every 1024 bytes of data transferred. Download the root hints file using the get command. The name of the file is named.root. Lastly, you need to exit from the ftp server using the bye command.
# ftp rs.internic.net
ftp> cd domain
ftp> bin
ftp> hash
ftp> get named.root
ftp> bye
#
After we have downloaded the root hints, you need to write a configuration file and save it as named.conf. Take note, that we should still be inside our working directory which is the /var/named/recursive.
You can use any of your favorite Unix text editor. In our guide here, I am using the vi text editor.
# vi named.confThis command will open up the vi text editor. Lines that starts with double slash (//) are just comments. I am adding these comments to give you a bit of explanation about the succeeding lines of configuration. You may skip typing all of them if you like. You can then start typing the following:
// filename: named.conf
// this will tell named that this is our working directory
options {
	directory "/var/named/recursive";
};

// recursive/caching name server configuration
// this will tell named that the IP address of all the root servers are inside
// the root hints file named named.root
zone "." {
	type hint;
	file "named.root";
};

// the loopback reverse zone
// why is this needed?
// - when a reverse DNS lookup for 127.0.0.1 address is received,
// the recursive server doesn’t have to look somewhere else for
// the answer. It has to be defined locally
// since it is just a localhost address
zone "0.0.127.in-addr.arpa." {
	type master;
	file "db.127.0.0";
};
To exit the vi text editor, just use the command :wq to save the data into the file named named.conf. It will then exit from the text editor after saving.
Next, we will create the reverse loopback zone data file for our localhost. Take note, we still need to be inside the /var/named/recursive directory.
# vi db.127.0.0This command will open up the vi text editor once again. You can then start typing the following in our zone data file:
$TTL 1d
@	SOA	localhost. 	root.localhost. (
				1	; serial no.
				30m	; refresh
				15m	; retry
				1d	; expire
				30m	; negative cache ttl
				)

		NS	localhost.
1		PTR	localhost
Again, to exit the vi text editor, just use the command :wq to save the data into the file named db.127.0.0. It will then exit from the text editor after saving.
Running our Recursive DNS Server
Let us try to run named with -g and -c options so we can check if there are errors in our configuration. The -g option will make our named run in the foreground and the -c option is for us to specify the location of our configuration file.
# named -g -c /var/named/recursive/named.conf
11-Jun-2021 23:47:29.122 starting BIND 9.16.16 (Stable Release) <id:0c314d8>
11-Jun-2021 23:47:29.122 running on FreeBSD amd64 13.0-RELEASE FreeBSD 13.0-RELEASE #0 releng/13.0-n244733-ea31abc261f: Fri Apr  9 04:24:09 UTC 2021     [email protected]:/usr/obj/usr/src/amd64.amd64/sys/GENERIC
11-Jun-2021 23:47:29.122 built with '--with-openssl'
11-Jun-2021 23:47:29.122 running as: named -g -c /var/named/recursive/named.conf
11-Jun-2021 23:47:29.122 compiled by CLANG FreeBSD Clang 11.0.1 ([email protected]:llvm/llvm-project.git llvmorg-11.0.1-0-g43ff75f2c3fe)
11-Jun-2021 23:47:29.122 compiled with OpenSSL version: OpenSSL 1.1.1k  25 Mar 2021
11-Jun-2021 23:47:29.122 linked to OpenSSL version: OpenSSL 1.1.1k  25 Mar 2021
11-Jun-2021 23:47:29.122 compiled with zlib version: 1.2.11
11-Jun-2021 23:47:29.122 linked to zlib version: 1.2.11
11-Jun-2021 23:47:29.122 ----------------------------------------------------
11-Jun-2021 23:47:29.122 BIND 9 is maintained by Internet Systems Consortium,
11-Jun-2021 23:47:29.122 Inc. (ISC), a non-profit 501(c)(3) public-benefit
11-Jun-2021 23:47:29.122 corporation.  Support and training for BIND 9 are
11-Jun-2021 23:47:29.122 available at https://www.isc.org/support
11-Jun-2021 23:47:29.122 ----------------------------------------------------
11-Jun-2021 23:47:29.122 found 1 CPU, using 1 worker thread
11-Jun-2021 23:47:29.122 using 1 UDP listener per interface
11-Jun-2021 23:47:29.123 using up to 21000 sockets
11-Jun-2021 23:47:29.125 loading configuration from '/var/named/recursive/named.conf'
11-Jun-2021 23:47:29.125 reading built-in trust anchors from file '/usr/local/etc/bind.keys'
11-Jun-2021 23:47:29.126 using default UDP/IPv4 port range: [49152, 65535]
11-Jun-2021 23:47:29.126 using default UDP/IPv6 port range: [49152, 65535]
11-Jun-2021 23:47:29.126 IPv6 socket API is incomplete; explicitly binding to each IPv6 address separately
11-Jun-2021 23:47:29.126 listening on IPv6 interface em0, fe80::a00:27ff:feb9:fe96%1#53
11-Jun-2021 23:47:29.127 listening on IPv4 interface em0, 192.168.43.39#53
11-Jun-2021 23:47:29.128 listening on IPv6 interface lo0, ::1#53
11-Jun-2021 23:47:29.128 listening on IPv6 interface lo0, fe80::1%2#53
11-Jun-2021 23:47:29.129 listening on IPv4 interface lo0, 127.0.0.1#53
11-Jun-2021 23:47:29.129 generating session key for dynamic DNS
[ Content truncated...]
11-Jun-2021 23:47:31.245 resolver priming query complete
11-Jun-2021 23:47:35.668 managed-keys-zone: Key 20326 for zone . is now trusted (acceptance timer complete)
Congratulations! You now have a running recursive DNS server. While named is running in the foreground, you can open another terminal and try to resolve unixcop.com using the dig command.
$ dig @127.0.0.1 unixcop.com

; <<>> DiG 9.16.16 <<>> @127.0.0.1 unixcop.com
; (1 server found)
;; global options: +cmd
;; Got answer:
;; ->>HEADER<<- opcode: QUERY, status: NOERROR, id: 33340
;; flags: qr rd ra; QUERY: 1, ANSWER: 1, AUTHORITY: 0, ADDITIONAL: 1

;; OPT PSEUDOSECTION:
; EDNS: version: 0, flags:; udp: 1232
; COOKIE: 51db53ba2cfd88a40100000060c409608c33ef5a5ceaddb3 (good)
;; QUESTION SECTION:
;unixcop.com.			IN	A

;; ANSWER SECTION:
unixcop.com.		3600	IN	A	104.237.129.44

;; Query time: 1638 msec
;; SERVER: 127.0.0.1#53(127.0.0.1)
;; WHEN: Sat Jun 12 09:09:52 PST 2021
;; MSG SIZE  rcvd: 84
Excellent!
Running named Automatically During Boot-Time
Now it is time to make our named to run automatically during boot time. I realized that since we installed our BIND DNS server from source, we need to create our own FreeBSD rc script in order to control the start, stop and restart of the named daemon. You need to do this as root user.
$ su -
Password:
# cd /etc/rc.d
# vi named
You need to type the following codes:
# $FreeBSD$
#

# PROVIDE: named
# REQUIRE: NETWORKING ldconfig syslogd
# BEFORE: SERVERS
# KEYWORD: shutdown

. /etc/rc.subr

name="named"
desc="BIND DNS Server startup script"
rcvar="named_enable"
start_cmd="named_start"
stop_cmd="named_stop"
restart_cmd="named_restart"
pidfile="/usr/local/var/run/named/${name}.pid"

load_rc_config ${name}

named_enable=${named_enable:-"NO"}
named_conf=${named_conf:-"/var/named/recursive/named.conf"}
named_program=${named_program:-"/usr/local/sbin/named"}


named_start()
{
	echo "Starting named..."
	if [ -f "${named_conf}" ] ; then
		${named_program} -c ${named_conf}
	fi
}

named_stop()
{
	echo "Stopping named..."
	if [ -f "${pidfile}" ] ; then
		kill -9 `/bin/cat ${pidfile}` >/dev/null 2>&1
	fi
}

named_restart()
{
	echo "Restarting named..."
	named_stop
	named_start
}

run_rc_command "$1"
Exit the vi text editor using the command :wq to save the code into the named script. You have just created a simple FreeBSD rc script. We may need to enhance this script over time in our future articles, but for now, this works great already.
Let us change the permission of the script and make it executable.
# chmod 555 named
# ls -alh named
-r-xr-xr-x  1 root  wheel   852B Jun 11 23:31 named
Now that we have the rc script ready, you need to add the following lines into the FreeBSD rc.conf file. Open the file /etc/rc.conf using vi text editor and add these lines.
named_enable="YES"
named_program="/usr/local/sbin/named"
named_conf="/var/named/recursive/named.conf"
The whole rc.conf file will look something like this or maybe a bit different if you already have made changes in it:
hostname="fbsd13"

# Note: for production DNS server, use static IP address
ifconfig_em0="DHCP"
ifconfig_em0_ipv6="inet6 accept_rtadv"

sshd_enable="YES"
ntpdate_enable="YES"

# inserted by me
named_enable="YES"
named_program="/usr/local/sbin/named"
named_conf="/var/named/recursive/named.conf"

# Set dumpdev to "AUTO" to enable crash dumps, "NO" to disable
dumpdev="AUTO"
zfs_enable="YES"
Save the changes by typing :wq command in vi and exit from the text editor. When you reboot your system, named will now automatically start.
Finally! You now have your own recursive DNS server!
It worked great and got me going but, it was obviously aimed at people running freebsd when it comes to starting and stopping. It would be nice if we could get some instructions for those of us running RHEL. I am running AlmaLinux 8.5