Introduction
zram is a kernel module in which data written to the device nodes it creates are compressed and stored in memory itself . This is similar to tmpfs in which one could mount a directory as tmpfs and the data would be stored in memory rather than on disk. One obvious reason to use this is performance (due to faster disk I/O). Additionally, since zram also has compression features, we might as well replace it with all of our tmpfs.
This article concerns with one of the various ways we can improve performance on Linux. As such, it shouldn’t be tied to a specific Linux distribution. The reason for the title is that’s the system I am using to test stuff out at the moment. Not to mention, I also don’t want to be bothered if this doesn’t work on some (probably obscure) distro.
The default installation of Ubuntu 22.04 uses a swap file (/swap.img) which provides me a good opportunity to replace it with zram.
Enabling ZRAM Temporarily
Enabling zram may cause conflicts with zswap, which is enabled by default. So we need to firstly disable it.# echo 0 > /sys/module/zswap/parameters/enabled
Now we can load the zram module.# modprobe zram
We should be able to find a device node named /dev/zram0. Let’s allocate a size for it.# echo 800M > /sys/block/zram0/disksize
Now we can format this device as if it was just a normal disk partiition we designated for swap.# mkswap --label zram0 /dev/zram0# swapon -p 100 /dev/zram0
Enabling ZRAM Permanently
Although there are some tools that can make this easier, I want this to work on most distros. Therefore, we proceed with the manual way which requires no extra packages to make it work.
As before, we first need to disable zswap. This can be done permanently through kernel parameters. Modify /etc/default/grub so that it looks like the following.

Make sure to run update-grub to update the bootloader config files.
Now, we can make it so that the zram module is loaded at boot.# echo "zram" > /etc/modules-load.d/zram.conf
Now, let’s set the number of devices we need. If I were to be using zram for other tmpfs directories like /tmp as well, then I’d have to increase this number.# echo "options zram num_devices=1" > /etc/modprobe.d/zram.conf
Now let’s create a udev rule so that our device node is formatted automatically as swap.

Now all we need to do is add that device to our /etc/fstab. We’ll obviously also need to remove the already existing swapfile entry. Additionally, we can give the pri=value as an option to the swap entry.# printf "/dev/zram0\tnone\tswap\tdefaults,pri=100\t0\t0\n" >> /etc/fstab

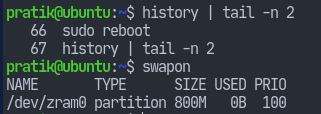
Finally, we can reboot and see that our swap device is indeed active.


Great tutorial. You could have allowed us to copy/paste some parts instead of using images 🙂
How can I use this on Linuxmint 21, which does not come with systemd?
You should be using the systemd-zram-generator package. I put a link to that package in this post.
Hope that helps.