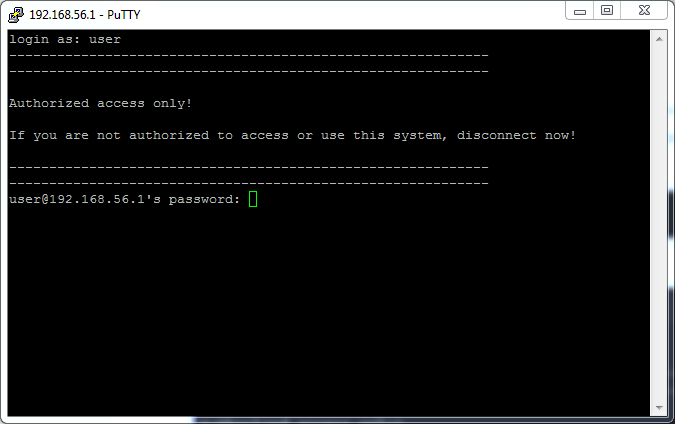
SSH banner warnings are necessary when companies or organizations want to display a stern warning to discourage unauthorized parties from accessing a server.
These warnings appear immediately before the password prompt, informing unauthorised users who are about to log in of the implications of doing so. Typically, these warnings represent legal consequences that unauthorised users may face if they continue to access the server.
Follow this guide to see how you can set a custom warning banner.
Step 1: Configure SSH Warning Banner
To get started, locate the /etc/ssh/sshd_config SSH configuration file using your preferred text editor. Today, we will be using the vim text editor.
$ sudo vim /etc/ssh/sshd_configLook for the Banner option within the file. The path to the file containing the custom warning must be specified here.
Uncomment it and specify a custom file where your custom warning banner will be. This will be the /etc/mybanner file in our example.
Banner /etc/mybanner
Save the changes and exit the file.
Step 2: Create SSH Warning Banner
The next step is to create the file in which the custom banner will be defined. This is the file that we defined in the previous step, /etc/mybanner.
$ sudo vim /etc/mybannerHere is an example banner. Feel free to use it.
------------------------------------------------------------
------------------------------------------------------------

Authorized access only!

If you are not authorized to access or use this system, disconnect now!

------------------------------------------------------------
------------------------------------------------------------
Save and exit the file.
To apply the changes, restart the SSH service:
$ sudo systemctl restart sshdStep 3: Testing SSH Warning Banner
We’ll attempt logging in to the remote server to see how well our banner works. The warning banner is seen immediately before the password prompt, preventing unauthorised users from logging in.
$ ssh user@remote-server-ip
Step 4: Setting a MOTD Banner
Edit the /etc/motd file to set a MOTD (Message Of The Day) banner.
$ sudo vim /etc/motdThen specify your MOTD message. For our case, we are using the example from earlier.
Save and, once again, restart the SSH service.
$ sudo systemctl restart sshdThat’s all there is to it. We hope you can now utilise your custom SSH warning banner to prevent unwanted people from gaining access to your server.
Please refer to our homepage for additional guides.


