Oracle DBMS is a multi-model database management system Basically it’s a SQL DB System.
It is a database commonly used for running online transaction processing (OLTP), data warehousing (DW) and mixed (OLTP & DW) database workloads. Oracle Database is available by several service providers on-prem, on-cloud, or as hybrid cloud installation. It may be run on third party servers as well as on Oracle hardware (Exadata on-prem, on Oracle Cloud or at Cloud at Customer.
Hello Guys ! We will discuss about Oracle DB today, surely, like every other tutorials, we will go through hands on ! But before that, some boring description about the Oracle DB, Hope you will get some important staffs from this.
Oracle Database is the first database designed for enterprise grid computing, the most flexible and cost effective way to manage information and applications. Enterprise grid computing creates large pools of industry-standard, modular storage and servers. With this architecture, each new system can_be rapidly provisioned from the pool of components. There is no need for peak workloads, because capacity canbe easily added or reallocated from the resource pools as needed.
Let’s discuss some of the Oracle DB’s features.
Features of Oracle DB
People who administer the operation of an Oracle database system, known as database administrators (DBAs), are responsible for creating Oracle databases, ensuring their smooth operation, and monitoring their use. In addition to the many alerts and advisors Oracle provides, Oracle also offers the following features:
A primary concern of a multi user database management system is how to control concurrency, which is the simultaneous access of the same data by many users. Without adequate concurrency controls, data could be updated or changed improperly, compromising data integrity.
Application developers can use SQL online analytical processing (OLAP) functions for standard and ad-hoc reporting. For additional analytic functionality, Oracle OLAP provides multidimensional calculations, forecasting, modeling, and what-if scenarios. This enables developers to build sophisticated analytic and planning applications such as sales and marketing analysis, enterprise budgeting and financial analysis, and demand planning systems. Data can stored in either relational tables or multidimensional objects.
Requirements
I needed the following things to do the installation & configuration work:
- Fresh installed Cantos 8 Machine
- 4 GB of RAM.
- 4 Core CPU.
- 50 GB of free Space.
- 1 Static IP.
Before Getting Started
Machine Installation
I have installed a centos8 machine on the virtual box with the IP 192.168.0.214 & user oracle. We will do the rest of the work with the username oracle. User oracle has administrative access to the machine.
Set the Hostname
We will set the hostname as ipamaster.unixcop.local. Obviously you can set of your own
hostnamectl set-hostname oracledb.unixcop.localInstallation Prerequisites
We can perform either automatic or manual setup for the oracleDB.
We need oracle-database-preinstall-21c installed to install the 21c DB. First try with the DNF command
dnf install oracle-database-preinstall-21c -y
If the package installs automatically, we are fine. If not, we have to download the RPM package manually and install with the DNF local install.
For this we have to go to this link https://yum.oracle.com/repo/OracleLinux/OL8/appstream/x86_64/index.html
We will get a long page with a lots of RPM packages. Search for the string “preinstall” with the help of your keyboard ctrl + F

Download the package for 21c with wget & install with DNF local install
dnf localinstall oracle-database-preinstall-21c-1.0-1.el8.x86_64.rpm
After a while it will _be installed. Then we have to update the repository
dnf update -y
Now, we have to update the password for the oracle user, as we have to perform the installation task with this specific user.
If the user is not present in the system, we have to add that particular user manually.
useradd oracle
passwd oracle
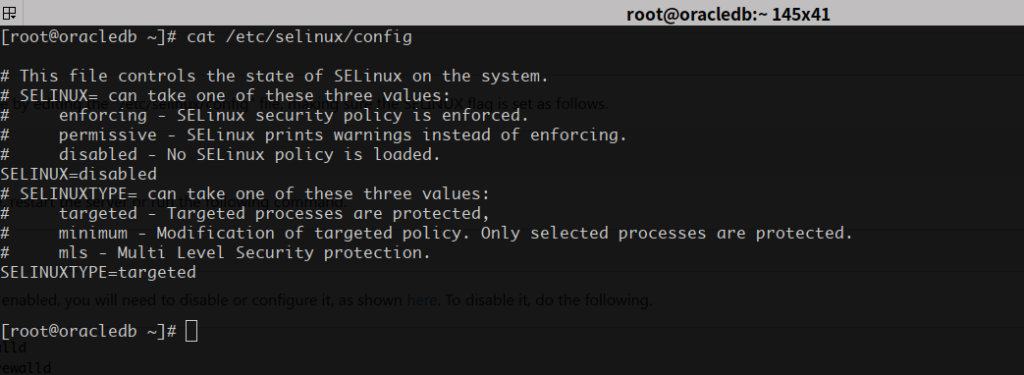
We also need to disable the SELinux

The default firewall for the centOS 8 should also ~be stopped & disabled. We have to make sure that.

Now, we have to add some directories for the installation tasks, we also need to give them the proper permission as follows

Create a “scripts” directory.
mkdir /home/oracle/scriptsCreate an environment file called “setEnv.sh”. The “$” characters are escaped using “\”. If you are not creating the file with the cat command, you will need to remove the escape characters.

Add a reference to the “setEnv.sh” file at the end of the “/home/oracle/.bash_profile” file.

Create a “start_all.sh” and “stop_all.sh” script that can be called from a startup/shutdown service. Make sure the ownership and permissions are correct.

Once the installation is complete and you’ve edited the “/etc/oratab”, you should be able to start/stop the database with the following scripts run from the “oracle” user.
~/scripts/start_all.sh
~/scripts/stop_all.sh
Change the permission for the following directories like this

With that, we done with the prerequisites. It’s time to install the DB !
Installation Processes
So We first need to download the DB package for linux.
Go to this link and download the DB https://www.oracle.com/database/technologies/oracle21c-linux-downloads.html

Now, we need to unzip the zipped file and move the file to the oracle’s home directory
After downloading, unzipping & moving the files, list out should be like this

Finally, time to installation !
Also, We can install the DB in two ways, first, the Interactive Way (GUI)
Second, the CLI Way (Silent Mode)
In this write up, we will go through with the GUI mode.
Run the following script staying in the unzipped section of the directory. Make sure you are running the script as oracle user
./runInstaller.shAfter the welcome page, you will get the following page

Click create & configure a single instance database & hit Next

Also Select the Server class & click Next, as we want this to be installed as server mode, not desktop !

We want this software to be installed in Enterprise mode, hit next to go on

Specify the oracle path & hit Enter

So, Select General Purpose/Transaction Processing & hit Next

Specify the database identifiers, i.e, give it a name, SID & PDB Name & hit next

Keep the memory default go to the next step by hitting the Next Button

We did not setup the OEM, (Enterprise Manager), so we need not select this option. Click Next to go on

We can enable the DB just in case (backup) needed, like disaster or something.

Click enable recovery & give the location of the archived backup. Hit Next

We can set separate password or we can also use the same password for all the users. Best practice is to set separate password for all the users. But this tutorial for the shake of the examples, we are setting one password for all.

My given password was strong enough 🙁 , We have to set strong password in real life situation. As I am setting up an example DB, I can use weaker password, we can ignore this alert by pressing Yes.

Keep these as default, we won’t change any permission.

We also keep this as default as we won’t want any additional setup. Hit Next & go

Finally if everything is good, we are ready to install. Click install to begin the installation process.

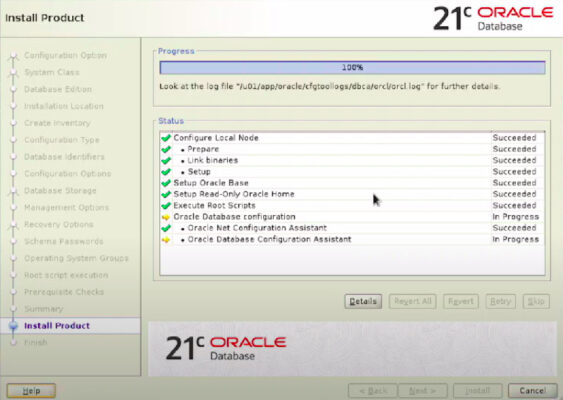
Installation process is going on !

Opps ! looks like we have an issue arrived ! Don’t worry, just do as per instructions, this error will go away.
Just open the terminal & run thise scripts as per instructions.

After doing all the things, finally we have got 21c installed in our system.
Well, that’s it for now. If you have any questions/queries/concerns, please let me know in the comment section. If you find it’s useful, don’t forget to share with your friends !


