Hello flocks, today we are going to learn some DNS stuffs. We all know about what’s a DNS, how DNS works, its types, etc. So, wrap things up and let’s dive into our today’s topic about DNS Response Policy Zone (RPZ).
To view our other topics on DNS server please visit here.
What is RPZ?
DNS Response Policy Zone (RPZ) is a DNS zone which enables DNS administrators to customize policy in DNS servers, so that the server returns modified answers to Client’s DNS queries. In other words, RPZ provides a way to alter a DNS response in real time. It can be used to modify potentially unsafe DNS Data to block communication or provide local data to redirect to a “walled garden”. As we can alter query response or block any domain using RPZ it is also known as DNS firewall.
Like any other DNS Zone, RPZ consists of different Resource Records (RR) Sets. Rather than SOA, NS and DNSSEC records, all other RRs contains a trigger and an action for the trigger.
Triggers configured to rewrite DNS queries based on:
- IP Address/Subnet (RPZ-IP)
- Hostname/Domain (QNAME)
- Nameserver Name/Domain (RPZ-NSDNAME)
- Nameserver Address/Subnet (RPZ-NSIP)
- Client IP (RPZ-CLIENT-IP)
Policy Actions are as below
- “NXDOMAIN” Action (CNAME .)
- “NODATA” Action (CNAME *.)
- “PASSTHRU” Action (CNAME rpz-passthru.)
- “DROP” Action (CNAME rpz-drop.)
- “TCP-Only” Action (CNAME rpz-tcp-only.)
- “Local Data” Action (arbitrary RR types)
RPZ Applications:
DNS RPZ has different application and use cases. Examples:
- Block Malware and phishing websites
- Block Ads
- Rewrite any domain RR and provide custom DNS Data
- Block a set of Internet user’s traffic and land their requests to a walled-garden
In this article we are going to learn how to configure RPZ in BIND9, block a domain for all user and redirect some users to a walled-garden.
Install BIND9 and Configure RPZ:
Let’s install a BIND9 Caching DNS Server on Debian Linux.
# apt-get update
# apt-get install -y bind9
Enable and Start bind9 service
# systemctl enable bind9.service
# systemctl start bind9.service
# systemctl status bind9.service
Output:

Our Server has 192.168.10.38 address configured on its physical interface. Now check BIND9 listening status
# netstat -lntup | grep -E "PID|named"
Output:

We see BIND9 is listening on both IPv4 and IPv6 address families for all interfaces. To operate BIND9 on IPv4 only change startup option in /etc/default/bind9 file
OPTIONS="-4 -u bind"
Restart bind9 service
# systemctl restart bind9.service
Backup default options file
# cp /etc/bind/named.conf.options /etc/bind/named.conf.options.ori
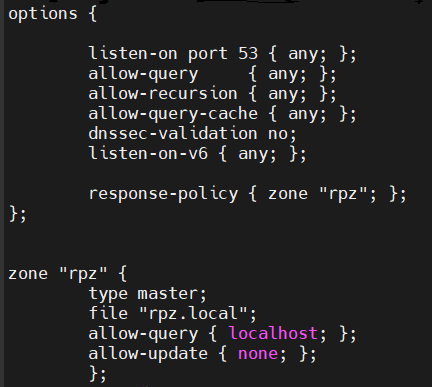
Add RPZ configuration directives under BIND9 main options and zone names in the /etc/bind/named.conf.options file
response-policy { zone "rpz"; };
We can also add multiple zones in the response-policy directive as follows
response-policy {
                 zone "rpz1";
                 zone "rpz2";
                 };
Now define the zone properties
zone "rpz" {
    type master;
    file "rpz.local";
    allow-query { localhost; };
    allow-update { none; };
};

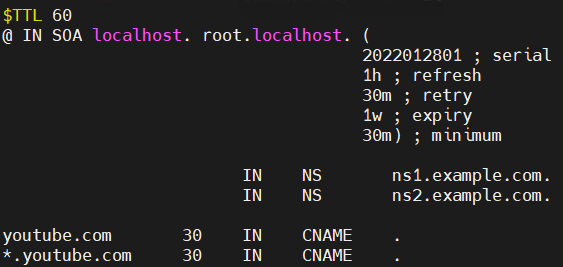
Now suppose we would like to block a Domain due to Malware activity or may be a Ads site or it may directed by regulatory authority to block the site. In this example, we are blocking “youtube.com“. Create rpz.local file in default directory for BIND9 including below content
$TTL 60
@ IN SOA localhost. root.localhost. (
    2022012801 ; serial
    1h ; refresh
    30m ; retry
    1w ; expiry
    30m) ; minimum

    IN    NS    ns1.example.com.
    IN    NS    ns2.example.com.

youtube.com      30    IN    CNAME    .
*.youtube.com    30    IN    CNAME    .

Restart BIND9 service
# systemctl restart bind9.service
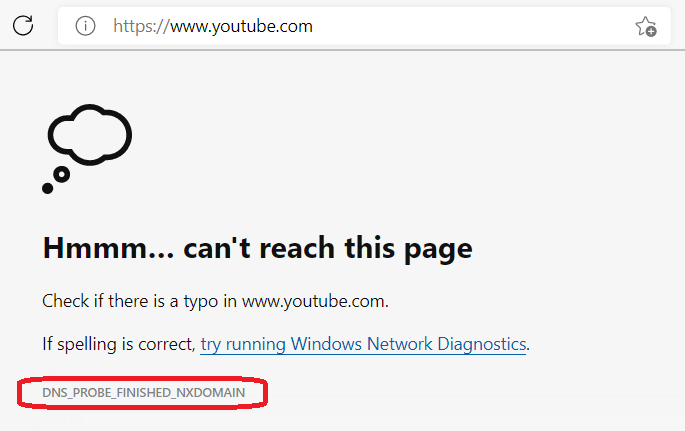
In above configuration directives we have defined “NXDOMAIN” Policy Actions for the domain “youtube.com“. Now if we try to browse from our workstation we will not be able to browse the site and it will return NXDOMAIN message in browser

In the next example, we will redirect “btcl.com.bd” users to a walled-garden by means of RPZ. It will show a message to the users by providing local data in DNS query. To achieve that we will have to write RRs as follows
btcl.com.bd      30    IN    A    192.168.10.38
*.btcl.com.bd    30    IN    A    192.168.10.38
Note: We have a webserver running on 192.168.10.38 and it will provide custom message to the users.
Restart BIND9 service.
Browsing the website “http://btcl.com.bd” results below message

Block payment defaulted customer’s using RPZ
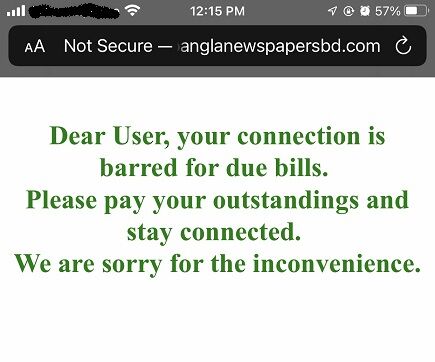
In this example, we are going to redirect all users with outstanding balance to a walled-garden to show a message to pay their dues.
We have a user with IP address 192.168.10.13 which failed to pay bills. To redirect all requests for the user to a wall-garden webserver 192.168.10.38 we will configure the rpz.local file as follows
32.13.10.168.192.rpz-client-ip 30 IN A 192.168.10.38
Note: 32.13.10.168.192.rpz-client-ip defines the host IP in CIDR notation 192.168.10.13/32. If you like to block a subnet 172.16.20.0/24 then it should present as 24.0.20.16.172.rpz-client-ip.
Restart BIND9 service.
Browsing from regular client

Browsing from wall-gardened client

References:
https://tools.ietf.org/id/draft-vixie-dnsop-dns-rpz-00.html
http://www.zytrax.com/books/dns/


