
What is partition?
A partition is a contiguous set of blocks on a drive that are treated as independent disk. To divide a single hard drive into many logical drives is known as partitioning. Further we read about Types of Partitions. When we learn about partitioning a question comes in our mind why we need it.
Need of Partitioning
- Encapsulate our data.
- Since file system corruption is limited to that partition only. So we can save our data from accidents.
- We can increase the disk space efficiency.
- Depending on our usage we can format the partition with different block sizes. So we can reduce the wastage of the disk.
- We can limit the data growth by assigning the disk quotas.
Structure of the disk partition
The first sector of the O/S disk contains the MBR (Master Boot Record). The MBR is divided into 3 parts and it’s size is 512 bytes. The first part is IPL (Initial Program Loader) and it contains the Secondary Boot Loader. So, IPL is responsible for booting the O/S and it’s size is 446 bytes.
The second part is PTI (Partition Table Information) and It’s size is 64 byte. It contains the number of partitions on the disk, sizes of the partitions and type of the partitions on the disk. Each single physical partition contains 16Bytes. This is the reason you can create maximum 4 physical partition only on a single disk.
The third part is of 2 byte which is used for validation checks.
Types of Partitions
Every disk can have max. 4 partitions. The 4 partitions are 3 Primary partitions and 1 Extended partition. The MBR and O/S will install in Primary partition only. The Extended partition is a special partition and can be further divided into multiple logical partitions. There are two Types of Partitions
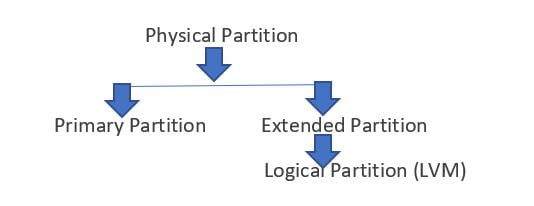
Ratio of primary and Extended partition can be.
1:1, 2:1, 3:1.
Device Naming Methods/Conventions
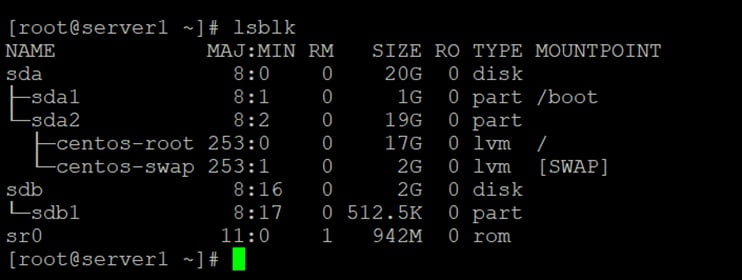
Command to list all connected storage and optical devices is
# lsblk
In Linux different types of disks will be identified by different ‘naming conventions’.
- IDE) drives will be shown as /dev/hda, /dev/hdb, /dev/hdc, …etc., and the partitions are /dev/hda1, /dev/hda2, /dev/hda3, …etc.
- iSCSI/SCSI and SATA drives will be shown as /dev/sda, /dev/sdb, /dev/sdc, …etc., and the partitions are /dev/sda1, /dev/sda2, /dev/sda3, …etc.
- Virtual drives will be shown as /dev/vda, /dev/vdb, /dev/vdc, …etc., and the partitions are /dev/vda1, /dev/vda2, /dev/vda3, …etc.
- NVMe-attached storage (many SSDs) /dev/nvme0, /dev/nvme1 …
- SD/MMC/eMMC storage (SD cards) /dev/mmcblk0, /dev/mmcblk1 …
IDE —–> Integrated Drive Electronics.
iSCSI —–> Internet Small Scale System Interface.
SCSI —–> Small Scale System Interface.
NOTE: – Many virtual machines use the newer virtio-scsi paravirtualized storage that will have /dev/sd*-style naming.
Partitions Creation
FDISK is a tool that allows you to change the ‘partitioning of hard disks’. As you know we can create physical and extended (Types of Partitions).
# fdisk -l (To list the block storage devices)
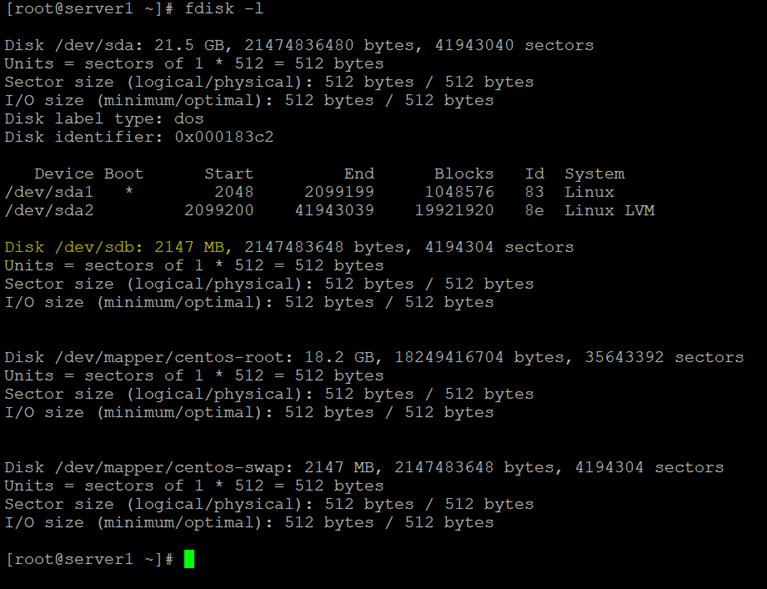
Here you have seen that a hard drive /dev/sdb has no partitions, so you need to create a new partition on it.
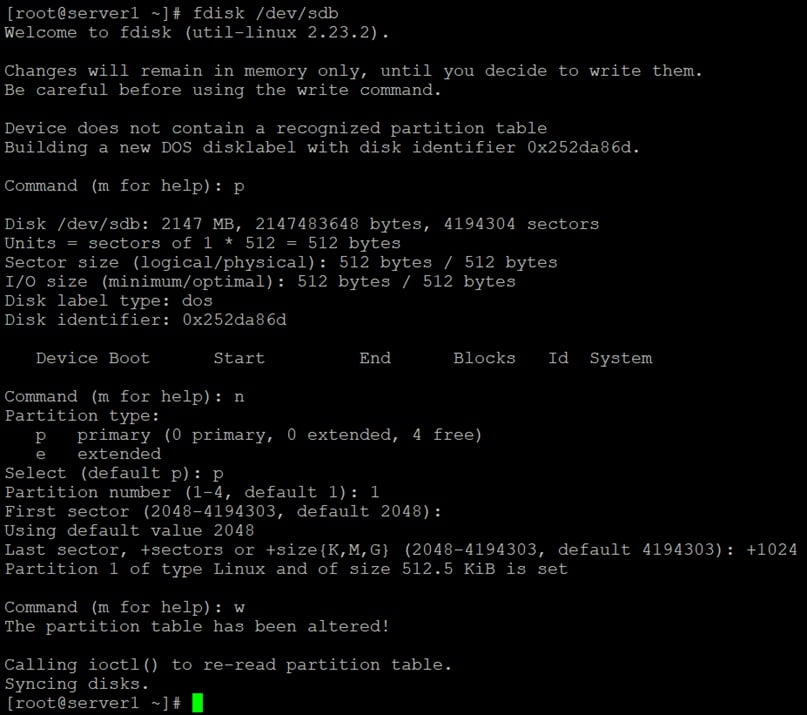
# fdisk /dev/sdb
You need to Press m for help.
After this Press p to print partition table.
and Press n to create new partition.
again Press p to make primary partition.
Press 1 is created first partition on selected disk.
There are 1-4 partition number. We can type any one number from them.( for Types of Partitions)
Press enter to leave first cylinder as default.
Now assign space to partition. Use + to assign space e.g.+1024M and press enter.
Press p to print partition table.
Press w to write/save partition.
# partprobe /dev/sdb (to update the ‘partitioning information’ in partition table)
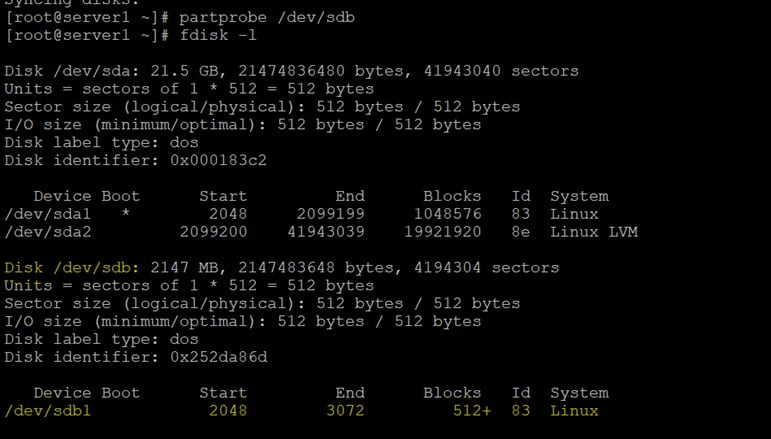
Here your partition /dev/sdb1 has been created. If you will run the command lsblk then no mount point will show for this partition. Here two Types of Partitions is showing.
To mount this partition you need to format this with required filesystem type. Here first you will learn about filesystem.
What is Filesystem?
It is a method of storing the data in an organized fashion on the disk. Every partition on the disk except MBR and Extended partition should be assigned with some file system in order to make them to store the data. ‘File system’ is applied on the partition by formatting it with a particular type of file system. You can format all Types of Partitions in same way.
Types of Filesystem
- ext2 —->Second extended file system (default in RHEL – 3 & 4)
- ext3 —->Third extended file system (default in RHEL – 5)
- ext4 —-> Fourth extended file system (default in RHEL – 6)
- xfs —-> Extended file system (default in RHEL – 7,8)
- ufs —-> Unix file system (default in Solaris)
- jfs —-> Journal file system (default in IBM-AIX)
- hfs —-> High performance file system (default in HP-UX)
- vxfs —-> Veritas file system procfs —-> Process file system (temporary)
- tempfs —-> Temporary file system (temporary)
- cdfs —-> Compact disk file system
- hdfs —-> DVD file system
- iso9660 —-> To read the CD/DVD.iso image format files in Linux
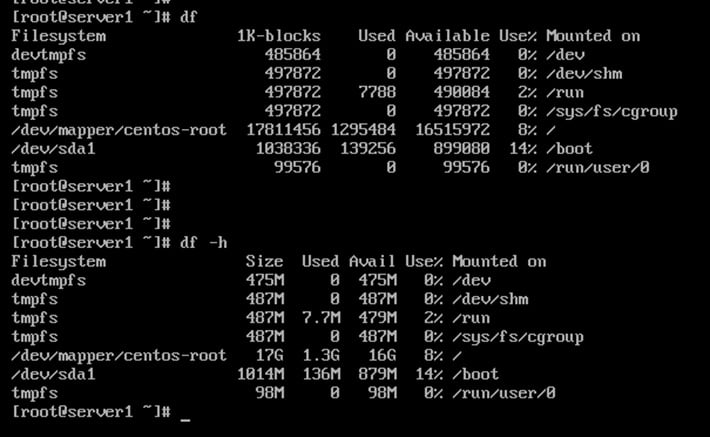
To get an overview of local and remote file system devices and the amount of free space available, run the df command.
As #df -h command will result total disk space, used disk space, free disk space, and the percentage of the total disk space used on all mounted regular file systems in human readable format. It reports on both local and remote file systems.
Format partition
As you have already created a partition /dev/sdb1 in step 6. Now format this partition with filesystem type ext4.
You can use any one of two command to format this partition.
# mkfs -t ext4 /dev/sdb1
# mkfs.ext4 /dev/sdb1
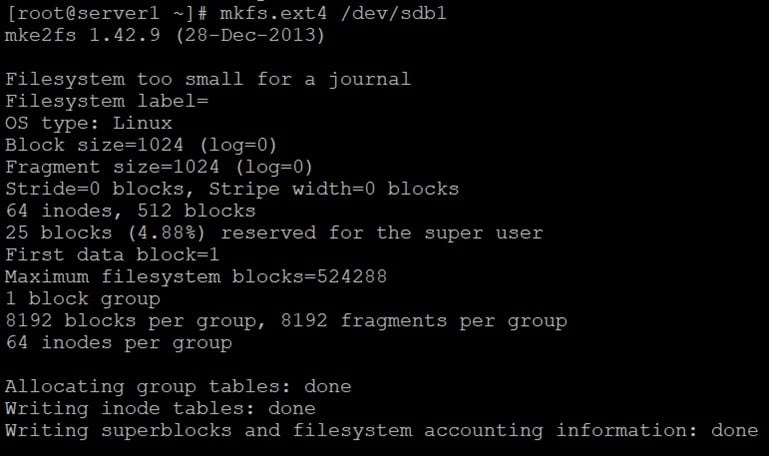
Since here we are using very small partition 1GB only. So it is showing Filesystem too small for a journal. But partition has formatted.
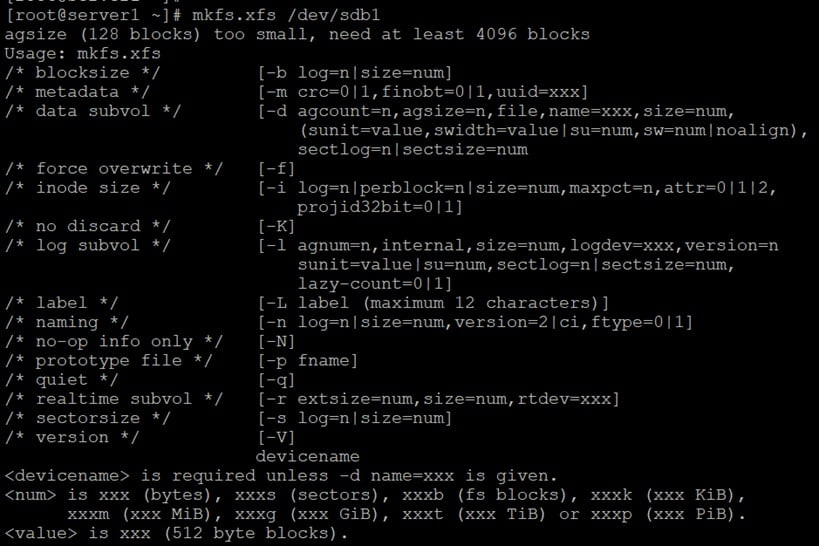
If you will try to format the partition with xfs type then it will not format the partition due to small partition.
Mounting and Unmounting Partition
Mounting
The mount command allows the root user to manually mount a file system.
The first argument of the mount command specifies the file system to mount. The second argument specifies the directory to use as the mount point in the file-system hierarchy. There are two common ways to specify the file system on a disk partition to the mount command:
• With the name of the device file in /dev containing the file system.
• With the UUID written to the file system, a universally-unique identifier.
To mount /dev/sdb1 partition first we need to create a mount point as /data1.
# mkdir /data1
# mount /dev/sdb1 /data1 (this is temporary mounting)
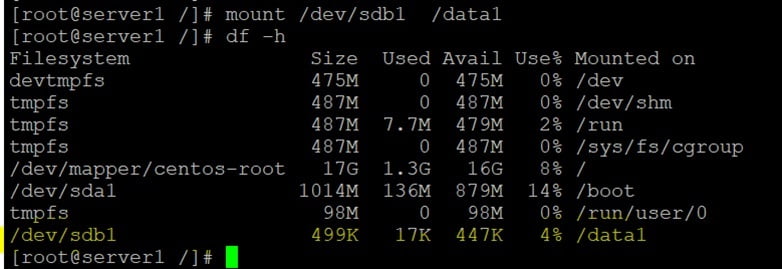
On rebooting the system this partition will get unmounted itself.
IMPORTANT:-
If there was any file present in the directory on which filesystem was mounted. Then those files are not accessible until the file system will get unmounted again.
Permanent Mounting
For permanent mounting you need to make an entry of partition in /etc/fstab file. There are two way so that you can make entry in /etc/fstab.
1. By device name /dev/sdb1
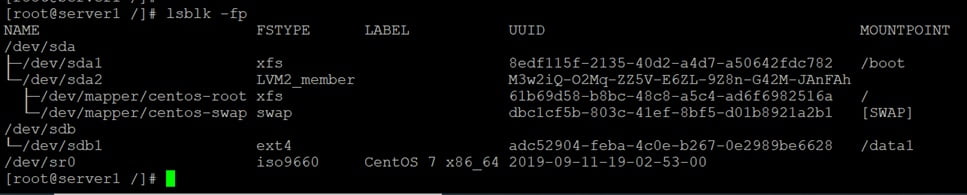
2. By UUID (universally-unique identifier): UUID is part of the file system and remains the same as long as the file system is not recreated. The lsblk -fp command lists the full path of the device, along with the UUIDs and mount points, as well as the type of file system in the partition.
Now make an entry in /etc/fstab for permanent mounting.
# vi /etc/fstab
Add line :
/dev/sdb1 /data1 ext4 defaults 0 0
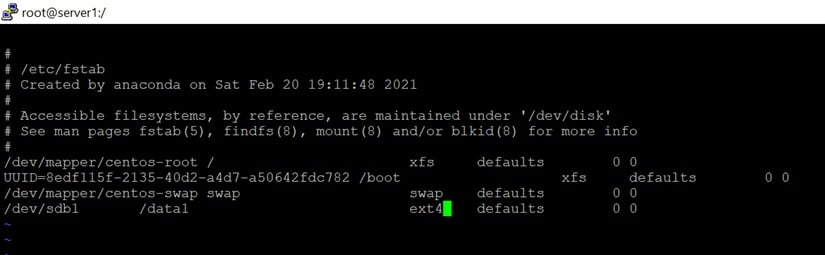
Or
By UUID add line as given below.
UUID= adc52904-feba-4c0e-b267-0e2989be6628 /data1 ext4 defaults 0 0
After that save and exit.
For Automounting
Run command mount -a. Now this command will mount all unmounted partitions. That have entries in /etc/fstab.
Unmounting
The shutdown and reboot procedures unmount all file systems automatically. As part of this process, any file system data cached in memory is flushed to the storage device thus ensuring that the file system suffers no data corruption.
WARNING:-
File system data is often cached in memory. Therefore, in order to avoid corrupting data on the disk, it is essential that you unmount removable drives before unplugging them. The unmount procedure synchronizes data before releasing the drive, ensuring data integrity.
Command to unmount filesystem is
#umount /dev/sdb1
Unmounting is not possible if the mounted file system is in use.
Below is the example if the filesystem is in use.

The lsof command lists all open files and the process accessing them in the provided directory. It is useful to identify which processes currently prevent the file system from successful unmounting.

Hope this article will be helpful to you. See you in new article.
Leave comments and suggestions below. Thank you