Arch Linux is an independently developed X86_64 optimized distribution system for Open hand Linux users. It uses its own PACMAN package manager to provide updates to the latest application with full dependency tracking. It is based on Rolling release system. For instance, We can do the installation with a CD or a Bootable drive via an FTP server. The default installation provides the core base of this distribution that can be further customized as per the user requirements and needs. Here we will go through “How to install Arch Linux 2021”
- It’s a Popular linux distribution between the Linux users as it gives the following forehand over the other available Linux distributions.From the installation to the management ,its a “Do it on your own” type of Linux. This enables you to install your desired components and services, Desktop environment. You have the power to build on your own customized version over the minimal default install. When you would try to start working on it you will find some complexities related to that but it also gives you a chance to learn how all this linux distribution works.
Some more stuff about Arch Linux
- Arch Linux is a rolling Distribution system. New kernel and applications version are rolled out as soon as they are released. Similarly Arch repositories get their updates as the new ones are released. It means forget to install new updates as it gives out you a fresh rolling release update. A huge number of software are available in the repository of arch linux i.e. Arch User Repository(AUR).AUR uses a community driven approach to update itself.
- All the major distributions are corporate backed like ubuntu, opensuse and fedora, But this provides you a free community driven distribution feel
In this tutorial I will guide you through all the detailed steps to install Arch Linux 2021 in Virtualbox .I will show you from scrap how to do a clean installation of Arch Linux 2021.
STEP(1) Downloading Latest Version of Arch Linux
First of all Download the Latest Arch Linux from https://archlinux.org/download/.In my case I am using the Latest Arch Linux 2021.
STEP(2) Creating a new Arch Linux VM in VirtualBox
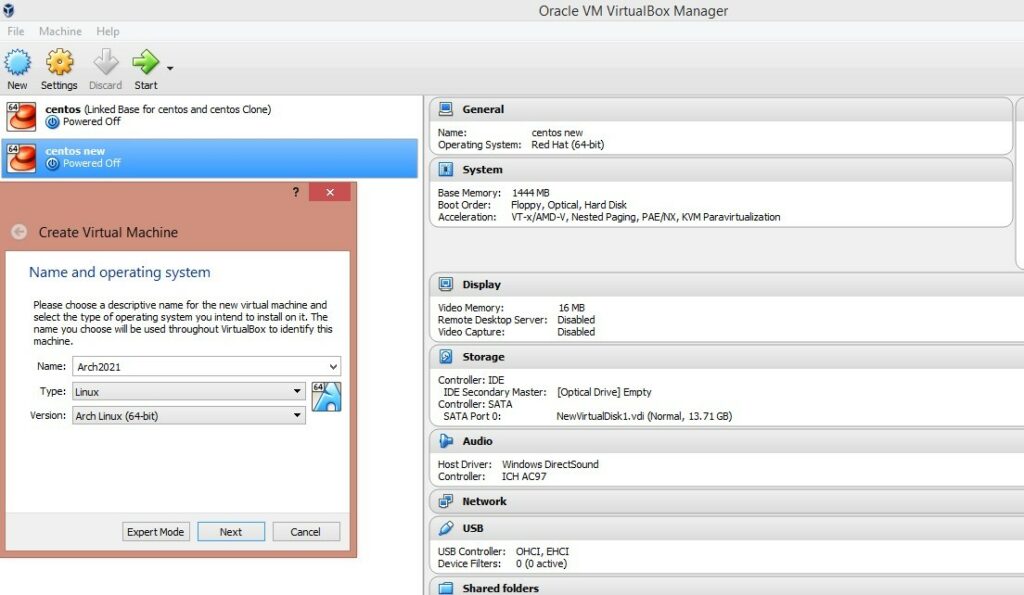
Now Add a VM to your virtualbox by NEW option. Name the OS as you like. select the TYPE and VERSION as shown below.
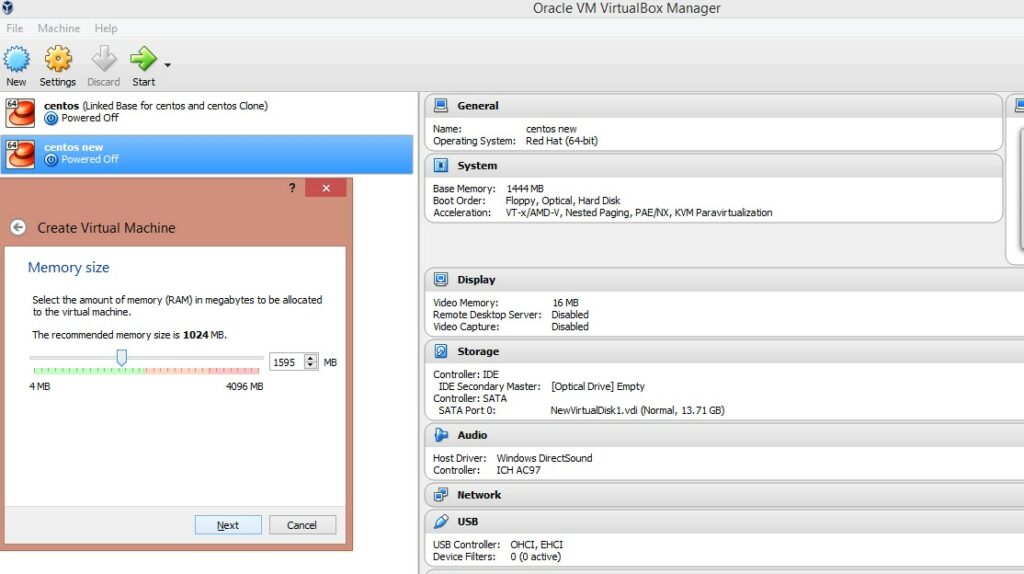
Next allocate memory(RAM) for the OS.I recommend you to allocate at least 1.5 GB so that it can work smoothly in future when we will install its various components.
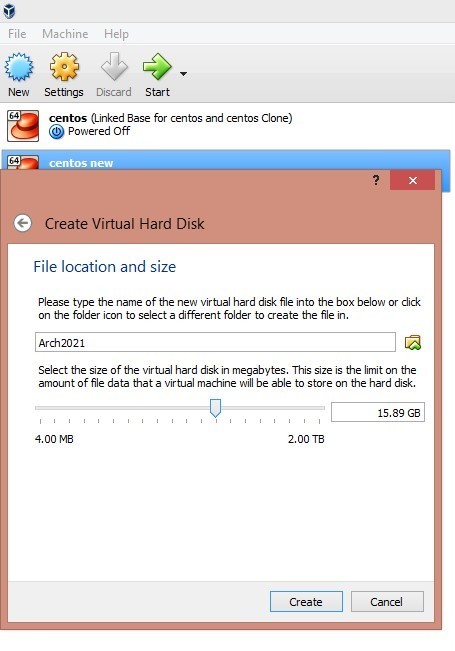
Now create a Virtual Hard disk as per your required location to install Arch linux. I recommend you to go with a FIXED type and with Size at least 15 GB, so that its performance stays good while the installation occurs.
Now wait for sometime while it creates your Virtual Hard disk.You can see that your Arch Linux VM is created. Now go to the Storage option and Link the Arch Linux ISO which you had downloaded earlier as shown below.
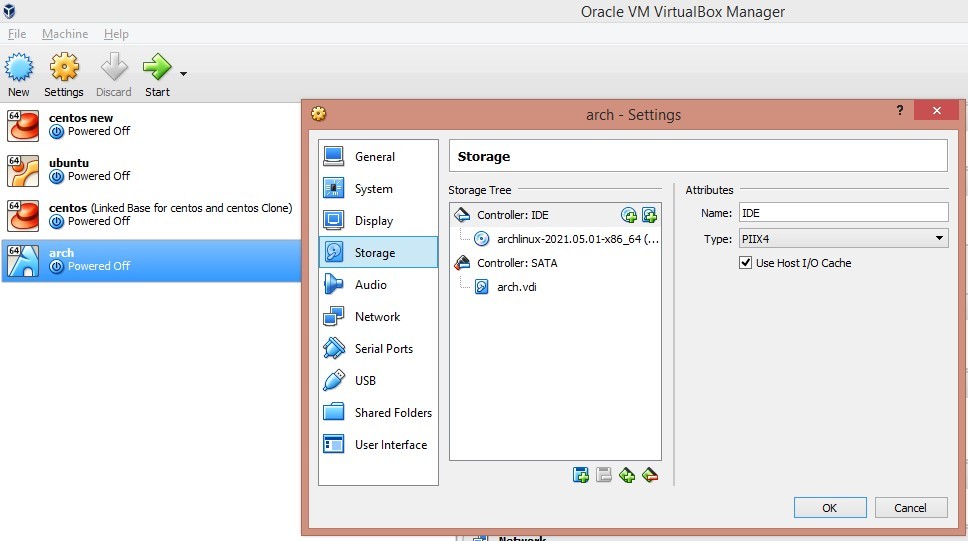
Link the ISO and click on ‘ok’ .Your settings had been saved now.
STEP(3) Booting the created Arch Linux VM
Now its time to make the VM live. The below screen will appear. Choose the default selected option to install on BIOS.

After pressing Enter the installation will get started. Finally after various checks you will get the ROOT prompt as shown below.

STEP(4) Network configuration
As it will require an internet connection for further installation of repositories and components, Check whether it is connected to the internet connection or not by making a Ping to Google.com.
# Ping -c 4 Google.comIf it doesn’t get Reply from the other side, Check whether the NAT settings on the virtual box are Enabled or not .
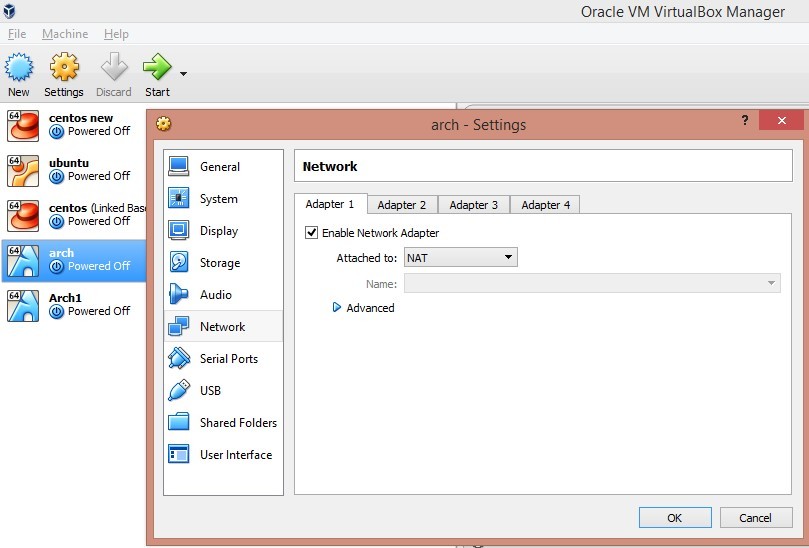
Also check the interfaces and network connections with the ifconfig command as shown below.

STEP(5) Make Disk partitions
Now create partitions by using fdisk utility to install the OS. Check for the available VBOX hard disk using the following.
# fdisk -l
The available hard disk is /dev/sda .Now we have to create partitions with the given details:
- /BOOT 1024 MB
- SWAP 4 GB
- / Remaining space
1. Create /BOOT as shown below:

2. Create SWAP partition as shown below:

3. Create /(ROOT) partition as shown below:

Once you have created all the partition just confirm it by ‘P‘ and the n press ‘W‘ to save the changes. Just do the following :

Now we have created three given partitions:
- /dev/sda1 /BOOT
- /dev/sda2 SWAP
- /dev/sda3 /(ROOT)
STEP(6) Creating the File System
Now we have to format the created partitions according to the required file system. we will format the created partitions as following:
- /BOOT EXT2
- /(ROOT) EXT4
- SWAP swap
Enter the following commands to do that :
# mkfs.ext2 /dev/sda1
# mkfs.ext4 /devsda3
# mkswap /dev/sda2
STEP(7) Mounting the partitions
After formatting the partitions successfully ,Now we have to mount these.
- /(ROOT) partition must be mounted on /mnt directory.
- /BOOT partition needs to be mounted on /mnt/boot.
- Initialize the SWAP partition.
Enter the below commands:
# mount /dev/sda3 /mnt
# mkdir /mnt/boot
# mount /dev/sda1 /mnt/boot
# swap  /dev/sda2
NOTE : If you have another usable partition then they can be mounted on different directories of /mnt directory.
STEP(8) Select the required mirrors
Arch Linux packages can be downloaded from internet mirror servers. All the mirrors are defined in /etc/pacman.d/mirrorlist. We can use the reflector to retrieve the latest mirror from Arch Linux mirror status, then filter the up to date mirror, sort them by speed and update the mirror list file.
First we have to back up the existing mirror list and then update the mirrorlist file with 10 mirrors with rating them according to their download speed.
# cp /etc/pacman.d/mirrorlist/ /etc/pacman.d/mirrorlist.backup
# reflector --verbose --latest 10 --sort rate --save /etc/pacman.d/mirrorlist

STEP(9) Installing the Arch Linux base system
Now after downloading the Arch linux base we have to install it. It will take around 20 min to install depending on your hardware configuration. Some supplementary packages like openssh ,vi editor ,network manager will also be installed as they are required after the post installation. For that enter the following:
# pacstrap /mnt/ base linux linux-firmware net-tools networkmanager openssh vi
STEP(10) Creating the fstab file
After the base linux installation we have to generate fstab file for the system.This can be done by using the fstab command.
# genfstab -U /mnt >> /mnt/etc/fstabCheck the fstab entries by using the following command
# cat /mnt/etc/fstab
STEP(11) Chroot the new system
Now next step is to Chroot the new system.The chroot changes the root directory for the current running process and their children.
# arch-chroot /mntSTEP(12) Set the system language
Uncomment the required languages in the /etc/locale.gen file to configure the system language. For US english uncomment en_US.UTF_8 UTF_8.
# vi /etc/locale.gen
Now generate the locales by entering the below command
# locale-gen
Also set the Lang variable in /etc/locale.conf file by pushing the following in the file with echo.
# echo "LANG=en_US.UTF_8" > /etc/locale.confSTEP(13) Arch Linux basic configuration
- Now set the timezone by creating a symlink of your timezone to the /etc/localtime file.All the available timezones can be found in /usr/share/zoneinfo directory.In my case I had took my timezone as Asia,Calcutta. You can set as per your requirement. The hardware clock also needs to be set to UTC.
# ln -sf /usr/share/zoneinfo/Asia/Calcutta /etc/localtime
# hwclock --systohc --utc- Also set the hostname in /etc/hostname file.
# echo "archlinux-2021.unixcop.local" > /etc/hostname- Set the root password using the passwd command.

STEP(14) Install GRUB
To boot the system Arch linux requires a Boot loader to Boot the system. So we have to install GRUB. Use the below commands to do that.
#pacman -S grub
Now enter the command
# grub-install /dev/sda
Next run this command
# grub-mkconfig -o /boot/grub/grub.cfg
Exit the Chroot and then Reboot the system.
Now if you want to a install GUI then you can take a look on my tutorial “How to install GUI on Arch linux 2021”.Before making your first Login into the Arch Linux , don’t forget to update the Arch Linux one more time , so that all the packages and components are properly updated. For that enter the following :
# sudo Pacman -SyuStep(15)Login to the Arch Linux
Now Finally you have completed a clean installation of Arch Linux .Now you can Log in with your password which you had set during the installation.

Conclusion
In this tutorial I had provided you with all the steps regarding the Linux Arch installation on Virtualbox detailwise.I hope this tutorial would help you to perform a proper and clean installatation of Arch Linux 2021 on Virtual Box.Now you can enjoy learning and exploring the power of Arch Linux


Great guide, thanks for creating this. The Arch Wiki does not integrate VirtualBox and Grub so that it works for a Virtualbox guest installation. I had to figure out that I needed a Boot partition.
In Step 6 : mkfs.ext4 /devsda3 should be mkfs.ext4 /dev/sda3 ( missing slash )
In Step 7: “swap” was not found, but “swapon” worked.